RubiconBobs JK Unlimited Build
+4
AquilesT
dongalonga
Andrew Miller
Ryan McKee
8 posters
Page 1 of 1
 RubiconBobs JK Unlimited Build
It's been over a year since I purchased my rubicon and, this being the third jeep I have owned, i was determined to actually do something off road with this one. I decided to start this thread because I learned and appreciated reading other jeep build threads on this forum, and I wanted a place to record everything I have learned and done to my jeep. The first few parts will be catchup on the past year, including mistakes (lots of those). Once i’m caught up i do plan on updating when i make further changes.
The goal of this build was first and foremost a great winter daily driver, then family hauler, and finally off road-toy. I've read a lot of other builds, and while theres no concrete definitions it seems that Jeeps are built for either daily drivers, rock crawlers, overlanders or a combination of the general builds. I wanted the combination, which sums up to a capable "all arounder" to me, knowing I would be sacrificing some capability at the extreme end but i would have a very capable and much used vehicle that fit my needs.
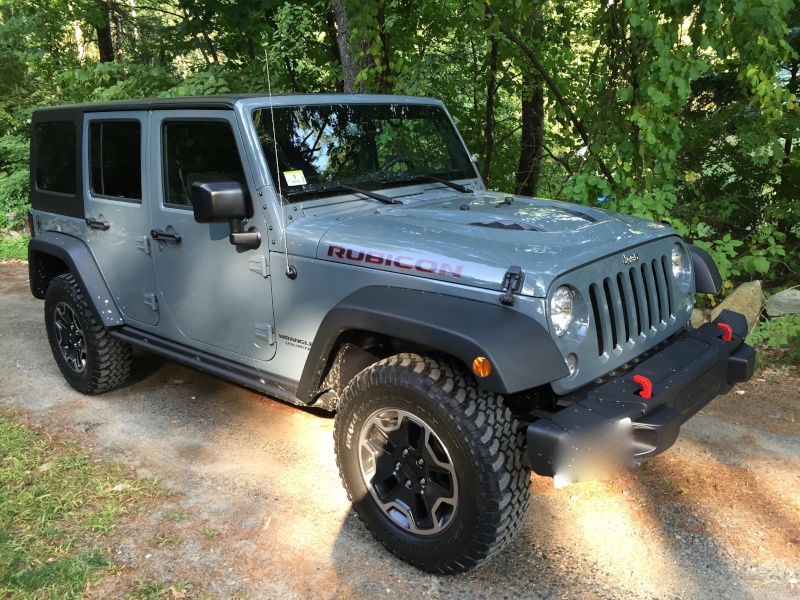
The start was a 2015 rubicon unlimited hard rock (10a package). Manual transmission, hard top, and a cool anvil color. It came with metal bumpers, awesome looking hood, and lots of creature comforts a guy my age has gotten accustomed to. Here it is, brand new in the driveway.
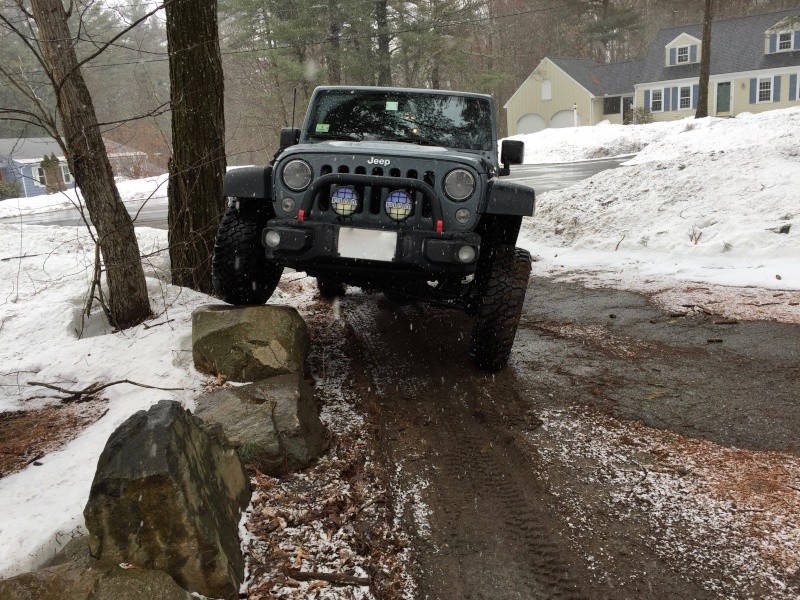
I added a few mods right away. New KC LED headlights because stock headlights are terrible for 2015 year vehicles, a bumper bar from Maximus-3, Antenna-X mid-sized antenna to replace the stock whip,and PIAA ion fogs on the bumper for snowstorm visibility. For the first winter, the PIAA fogs were the best bang for the buck, as the led's blueish light in a snowstorm lit up a wall of white with limited "down the road" visibility compared to the low and yellowish light of the strong PIAA's. Here are the KC LED's and a poser pic on a rock in my driveway.

I had it off road less than two months after I bought it, with a "family" trip to Rausch creek for a 101 class and met up met some guys who told me about NSJ. For new folks who like their jeeps but are hesitant taking it off road for fear of damages as their jeeps a daily driver, I would highly recommend a trip to Rausch. It's not super expensive and a good weekend getaway, and you learn to get comfortable with your jeeps capabilities, thus learning what leads to damage so you can avoid it. For fair warning, you will likely get a mild addiction to off roading after the trip.
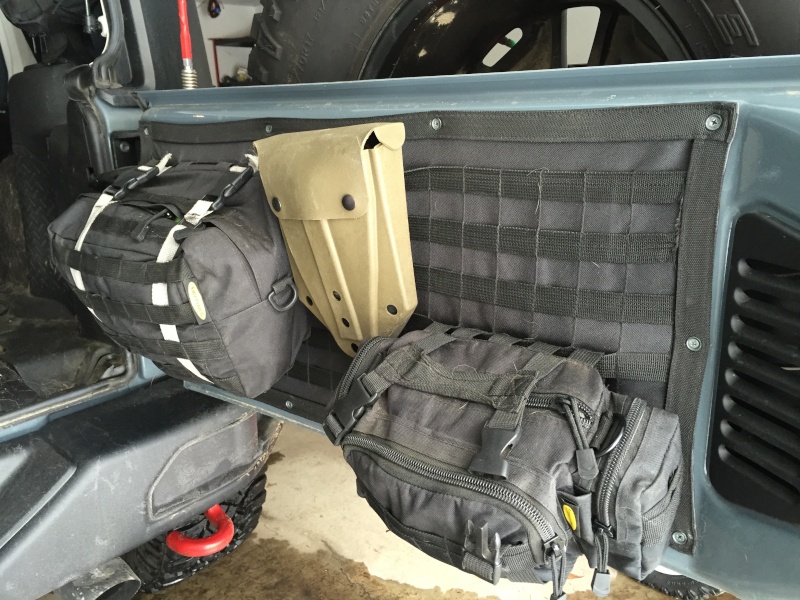
Now that I was comfortable with what I could do with a stock rubicon, I added some basic essentials like a midland handheld CB with external antenna, fire extinguisher, some basic recovery gear. A pair of D-shackles and a Warn recovery strap (kinetic) came with the jeep so I had a start. I added a tailgate molle system and some misc utility gear like jumper cables, tire repair kit, and a few other small items that are handy like a poncho tarp and flashlights.
I pretty much drove it like this for the winter and started to research other upgrades that I wanted to do by spring.
The goal of this build was first and foremost a great winter daily driver, then family hauler, and finally off road-toy. I've read a lot of other builds, and while theres no concrete definitions it seems that Jeeps are built for either daily drivers, rock crawlers, overlanders or a combination of the general builds. I wanted the combination, which sums up to a capable "all arounder" to me, knowing I would be sacrificing some capability at the extreme end but i would have a very capable and much used vehicle that fit my needs.
The start was a 2015 rubicon unlimited hard rock (10a package). Manual transmission, hard top, and a cool anvil color. It came with metal bumpers, awesome looking hood, and lots of creature comforts a guy my age has gotten accustomed to. Here it is, brand new in the driveway.

I added a few mods right away. New KC LED headlights because stock headlights are terrible for 2015 year vehicles, a bumper bar from Maximus-3, Antenna-X mid-sized antenna to replace the stock whip,and PIAA ion fogs on the bumper for snowstorm visibility. For the first winter, the PIAA fogs were the best bang for the buck, as the led's blueish light in a snowstorm lit up a wall of white with limited "down the road" visibility compared to the low and yellowish light of the strong PIAA's. Here are the KC LED's and a poser pic on a rock in my driveway.


I had it off road less than two months after I bought it, with a "family" trip to Rausch creek for a 101 class and met up met some guys who told me about NSJ. For new folks who like their jeeps but are hesitant taking it off road for fear of damages as their jeeps a daily driver, I would highly recommend a trip to Rausch. It's not super expensive and a good weekend getaway, and you learn to get comfortable with your jeeps capabilities, thus learning what leads to damage so you can avoid it. For fair warning, you will likely get a mild addiction to off roading after the trip.
Now that I was comfortable with what I could do with a stock rubicon, I added some basic essentials like a midland handheld CB with external antenna, fire extinguisher, some basic recovery gear. A pair of D-shackles and a Warn recovery strap (kinetic) came with the jeep so I had a start. I added a tailgate molle system and some misc utility gear like jumper cables, tire repair kit, and a few other small items that are handy like a poncho tarp and flashlights.

I pretty much drove it like this for the winter and started to research other upgrades that I wanted to do by spring.
RubiconBob- Admin
- Posts : 67
Join date : 2014-11-18
 Re: RubiconBobs JK Unlimited Build
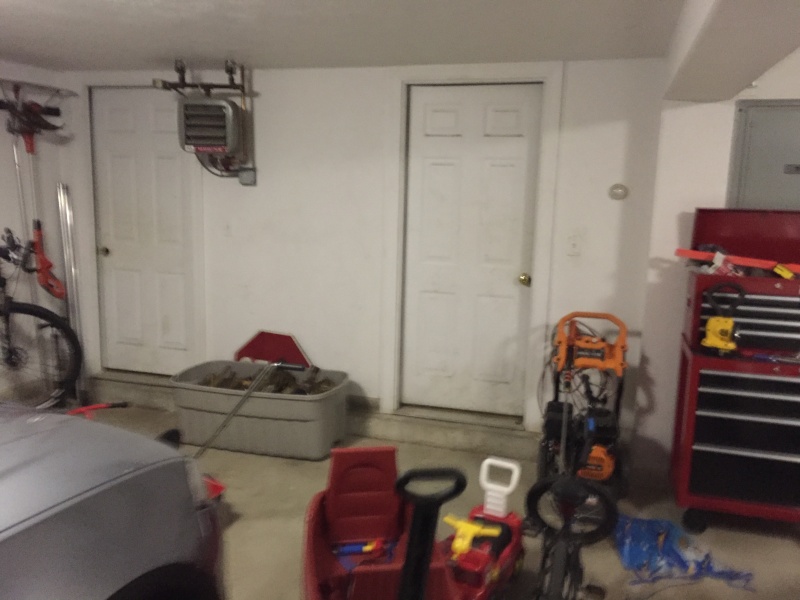
Apparently jeep mods arent strictly limited to jeeps themselves. To make a long story short, my house's original foundation had a single car garage that was closed up when an addition was added in favor of a 2 car garage. I really wanted a 3 car garage so here's the before and after of the wall I took down to fit my summer car and jeep in the same garage.
Before:
After:

Before:

After:


RubiconBob- Admin
- Posts : 67
Join date : 2014-11-18
 Re: RubiconBobs JK Unlimited Build
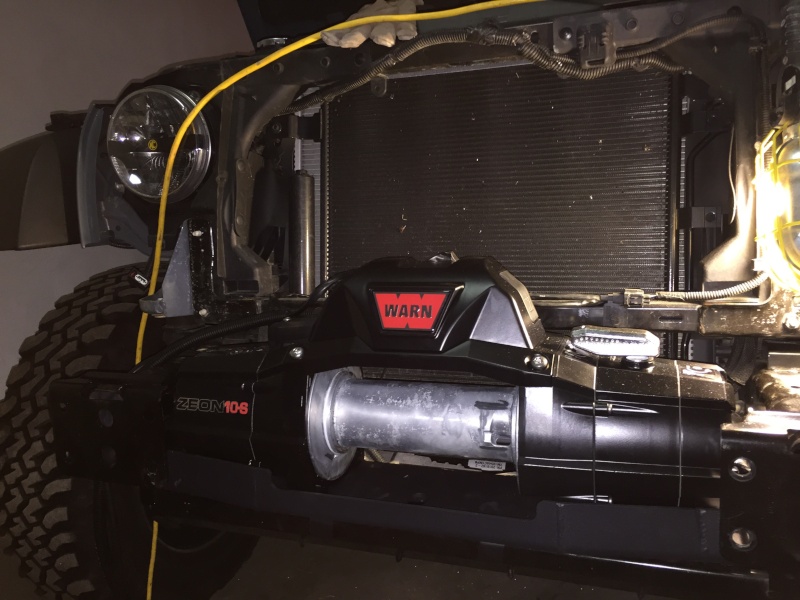
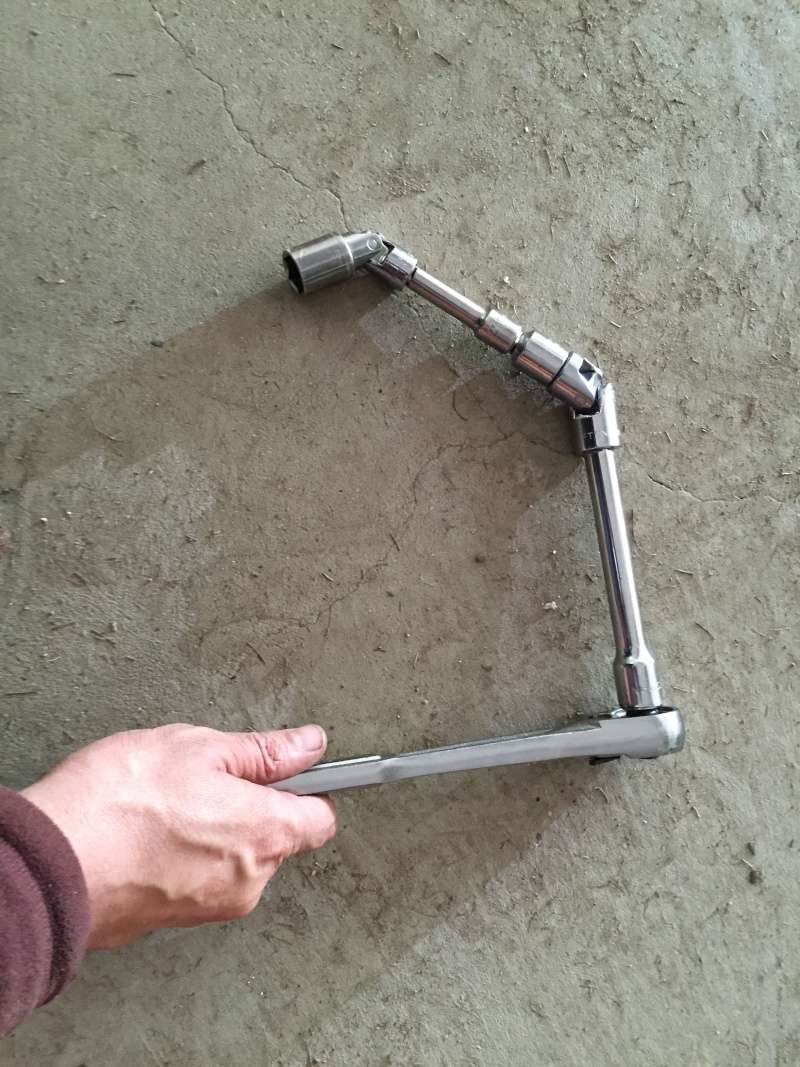
Next up was some sort of lift to raise the belly a little and remove the front rake. Nothing major, but enough to add a little height, compensate for a winch's weight and also allow me to still run mostly stock. I installed a teraflex budget boost, front pucks only, and spidertrax wheel spacers. I also researched winches and installed a Warn Synthetic inside the front bumper. Install of this winch was a real pain due to limited working room for tools and hands. Here's the ratchet I had to assemble to get the bumper nuts back on.
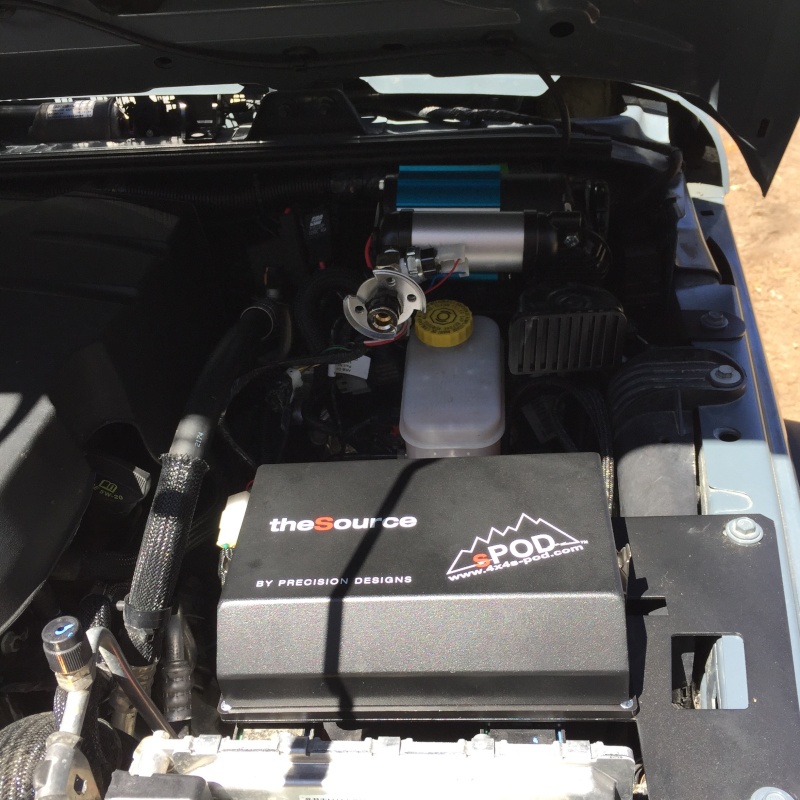
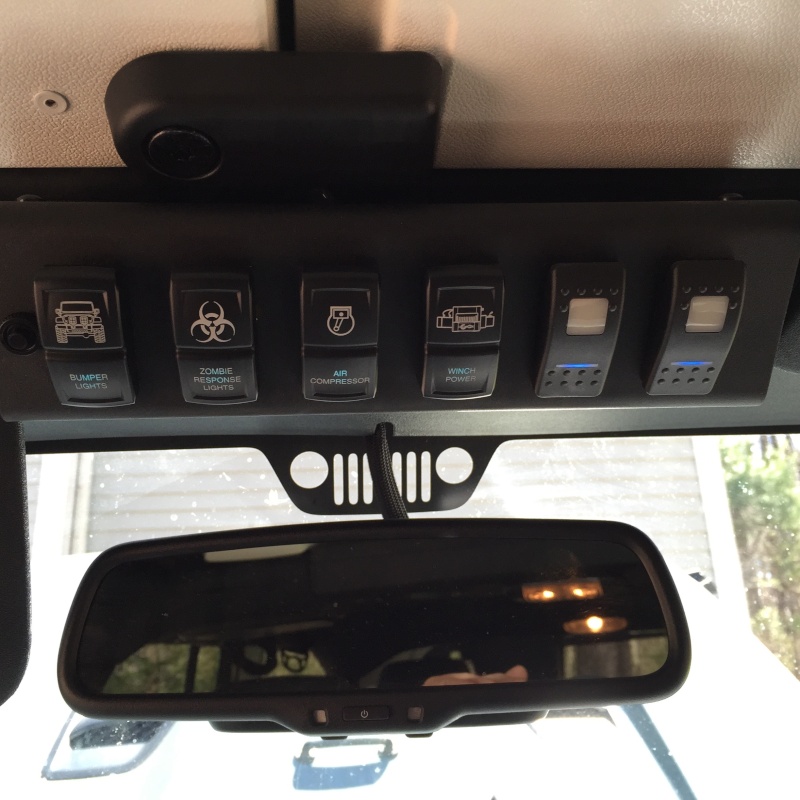
I added a few more accessories around the same time: WARN Power Interrupt Kit, ARB Air Compressor + EVO mounting plate, and a sPod to wire them and the lights to the cabin. The air compressor's been great to have permanently onboard and I have filled some slow leaks and snow tubes and the sPod, while ridiculously expensive, became well worth it as I no longer blow fuses or muck with the canbus. The power interrupt kit was probably overkill but I've prioritized caution and safety because I was taking the family on some trips already. I didn't like the idea of something not working on the winch controls and not having an emergency shutoff.
The final spring mod was a magnaflow exhaust. Not sure if I would do this one again, but I do enjoy the exhaust note vs stock, which is the only reason to get one. I convinced myself it would pay for itself in gas savings, but I modded so many other things that it's impossible to tell, and was probably a bad theory to begin with on the 3.6 pentastar. The downside is that the pipes have taken a beating so it looked good until i took a mostly stock rubicon to Ma Bell.

That pretty much takes me to spring/early summer 2015. Here's how it looked on the outside.


I added a few more accessories around the same time: WARN Power Interrupt Kit, ARB Air Compressor + EVO mounting plate, and a sPod to wire them and the lights to the cabin. The air compressor's been great to have permanently onboard and I have filled some slow leaks and snow tubes and the sPod, while ridiculously expensive, became well worth it as I no longer blow fuses or muck with the canbus. The power interrupt kit was probably overkill but I've prioritized caution and safety because I was taking the family on some trips already. I didn't like the idea of something not working on the winch controls and not having an emergency shutoff.
The final spring mod was a magnaflow exhaust. Not sure if I would do this one again, but I do enjoy the exhaust note vs stock, which is the only reason to get one. I convinced myself it would pay for itself in gas savings, but I modded so many other things that it's impossible to tell, and was probably a bad theory to begin with on the 3.6 pentastar. The downside is that the pipes have taken a beating so it looked good until i took a mostly stock rubicon to Ma Bell.


That pretty much takes me to spring/early summer 2015. Here's how it looked on the outside.


RubiconBob- Admin
- Posts : 67
Join date : 2014-11-18
 Re: RubiconBobs JK Unlimited Build
Finally! A Build for the Beast.
Great JK... I think the only one I've ever really driven, but still an insanely comfortable and capable ride.
Great JK... I think the only one I've ever really driven, but still an insanely comfortable and capable ride.
 Re: RubiconBobs JK Unlimited Build
Yes! Bob now has a build!
Andrew Miller- Admin
- Posts : 398
Join date : 2011-12-19
Location : Harvard Ma
 Re: RubiconBobs JK Unlimited Build
I remember that Mabell run and you absolutely mangling those exhaust tips and then just shrugging it off...good stuff. Definitely one of my favorite JKU build the color on the 10a model is perfect.
Nice work on regaining a garage spot!
Nice work on regaining a garage spot!
Tonellin- Rausch Creek
- Posts : 313
Join date : 2013-01-08
Location : Medford
 Re: RubiconBobs JK Unlimited Build
Finally! I really want a SPod.
dongalonga- Rubicon Trail
- Posts : 1047
Join date : 2012-03-20
Age : 40
Location : Lowell, MA
 Re: RubiconBobs JK Unlimited Build
Ha, I learned a lot from that firs trip to Ma Bell running mostly stock with stock 32" tires. I had to use lockers at some points, bashed my skids for the first time, got to use my winch to help align Andrews axle and got the experience I needed to know what I wanted in a lift and tires. With all the learning and mistakes I have made, the part i'm most happy with is that I did push the stock rubicon to find its limits (and mine) before I heavily invested in suspension and tires. I started a new shopping list. A 2-3.5” lift, 315 duratracs, and more armor.
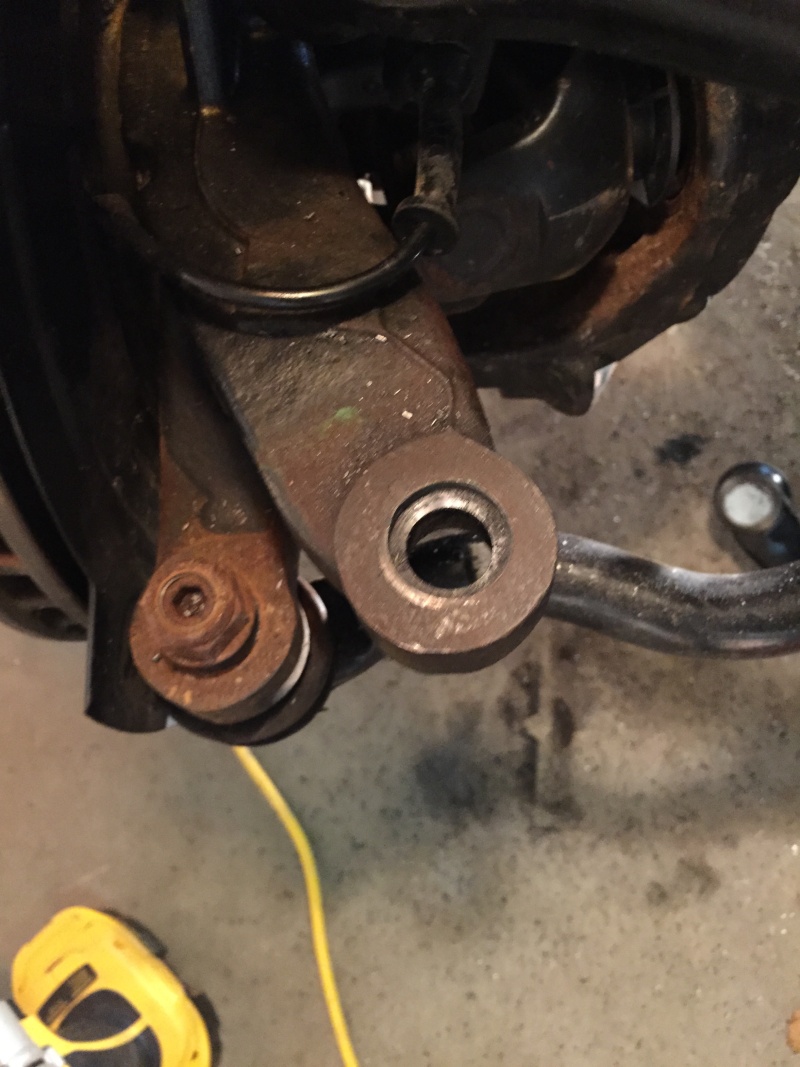
The lift was a toss up between Metalcloak and AEV after I narrowed it down from the other main players. I really liked Metalcloak, so of course I didn't go with that. Issues was due to price at the time plus I knew the AEV had great road reviews and was more of a sure thing for 98% of the miles I drove. Final choice was an AEV 3.5" lift with Bilstein shocks and control arm brackets. I'm still using stock control arms. It took a few days to get it installed, and nothing says commitment like drilling out a steering knuckle in a 6month old jeep. There's no going back now I like a Euro feel in cars, and that's how this lift feels in a jeep-like way. It took me about 5 nights to get it all done, but it was my first lift install and learned a lot in the process.


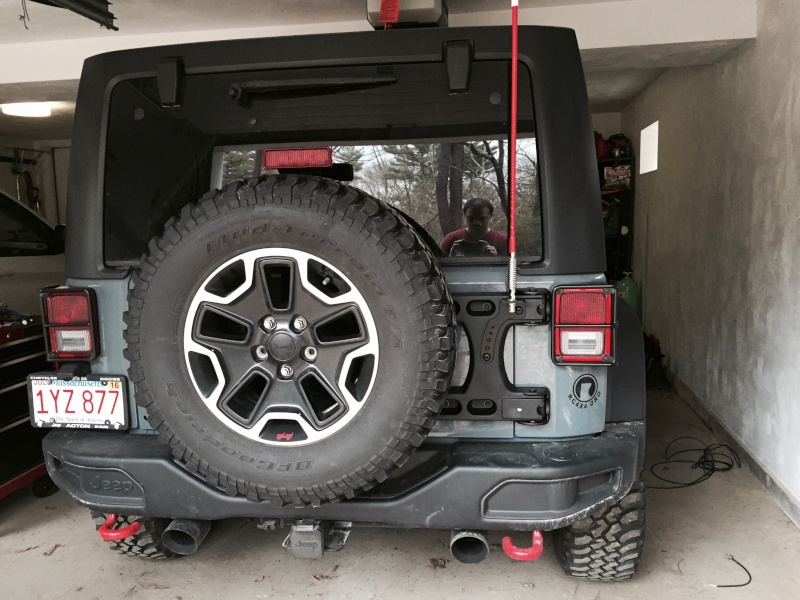
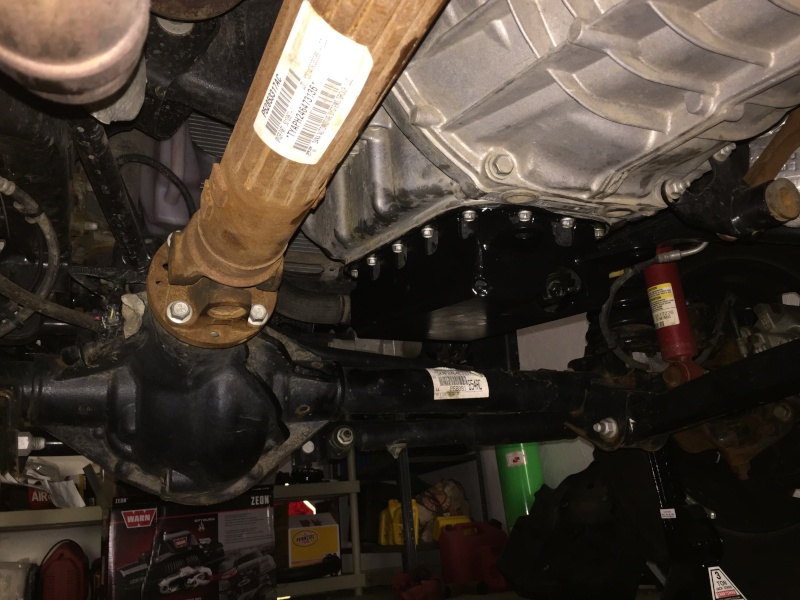
Tires came down to all around performance, and winter ratings for duratracs tipped the scales for me. New tires meant upgrading the tailgate with a teraflex hinge and carrier as the JK hinges are the weak link for heavier spares. This thing is stout! I also installed an EVO Protek oil pan skid, part 1 of a 3 part set. Priority was the oil pan until the budget allowed for more.
A note on tire balancing: I used a company out of Boston that did mounting and balancing in your driveway. Great company, awesome service. I would use them again, but not for my jeep. The reason is that they use a type of powder to “balance” the tires instead of weights. Theoretically this should have worked, but in practice it didn’t and I would get a shimmy at highway speeds until the powder dispersed itself to the right areas. I felt this at various speeds, and the jeep would wobble until i went 5mph slower or faster. Never really the same speed, always a guess. I had to get them rebalanced with weights and its been great since. To be fair to the original balancer, he did inform me that he mostly dealt with sports cars and sedans and not much on light truck tires.
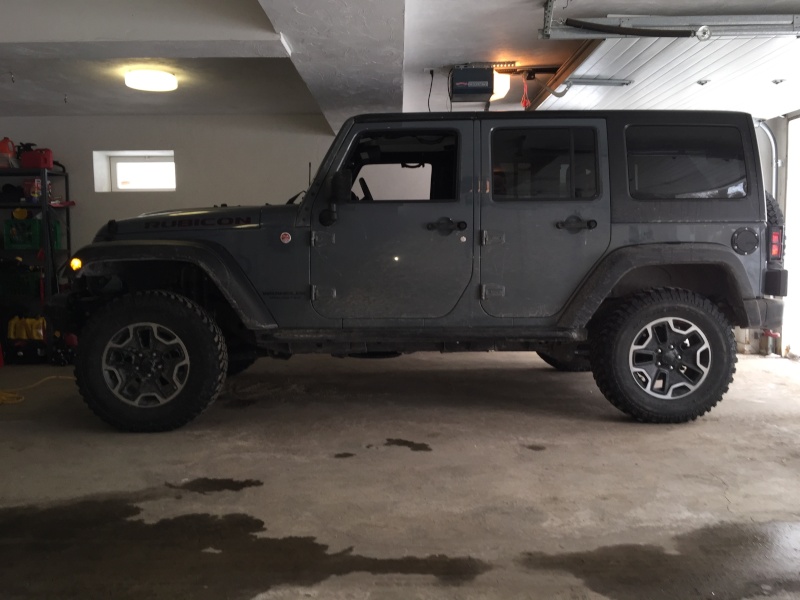
Here's the before and after of the lift and tire upgrade.
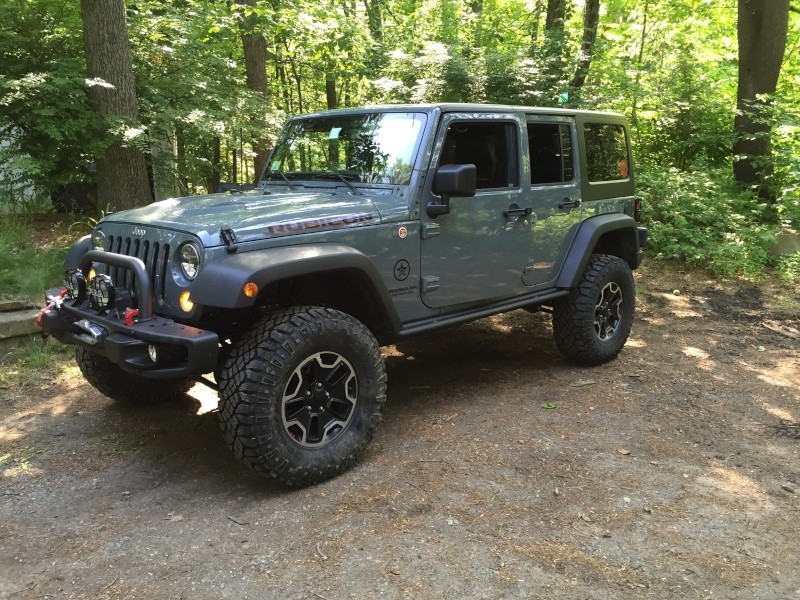
The lift was a toss up between Metalcloak and AEV after I narrowed it down from the other main players. I really liked Metalcloak, so of course I didn't go with that. Issues was due to price at the time plus I knew the AEV had great road reviews and was more of a sure thing for 98% of the miles I drove. Final choice was an AEV 3.5" lift with Bilstein shocks and control arm brackets. I'm still using stock control arms. It took a few days to get it installed, and nothing says commitment like drilling out a steering knuckle in a 6month old jeep. There's no going back now


Tires came down to all around performance, and winter ratings for duratracs tipped the scales for me. New tires meant upgrading the tailgate with a teraflex hinge and carrier as the JK hinges are the weak link for heavier spares. This thing is stout! I also installed an EVO Protek oil pan skid, part 1 of a 3 part set. Priority was the oil pan until the budget allowed for more.


A note on tire balancing: I used a company out of Boston that did mounting and balancing in your driveway. Great company, awesome service. I would use them again, but not for my jeep. The reason is that they use a type of powder to “balance” the tires instead of weights. Theoretically this should have worked, but in practice it didn’t and I would get a shimmy at highway speeds until the powder dispersed itself to the right areas. I felt this at various speeds, and the jeep would wobble until i went 5mph slower or faster. Never really the same speed, always a guess. I had to get them rebalanced with weights and its been great since. To be fair to the original balancer, he did inform me that he mostly dealt with sports cars and sedans and not much on light truck tires.
Here's the before and after of the lift and tire upgrade.


RubiconBob- Admin
- Posts : 67
Join date : 2014-11-18
 Re: RubiconBobs JK Unlimited Build
I did all this work in preparation for a trip i signed up for through Vermont Overland, which was truly a “top-3” vacation. 4 days of wheeling on Vermont class 5 roads and visiting local breweries along the way, camping each night. It was the first trip with the new lift. At the start of the final day, I started to hear what sounded like a rumble strip noise coming from under my jeep. After investigating I found this little gem. Not completely unexpected, but i didn’t think I would replace a driveshaft after 4 days of the new lift.
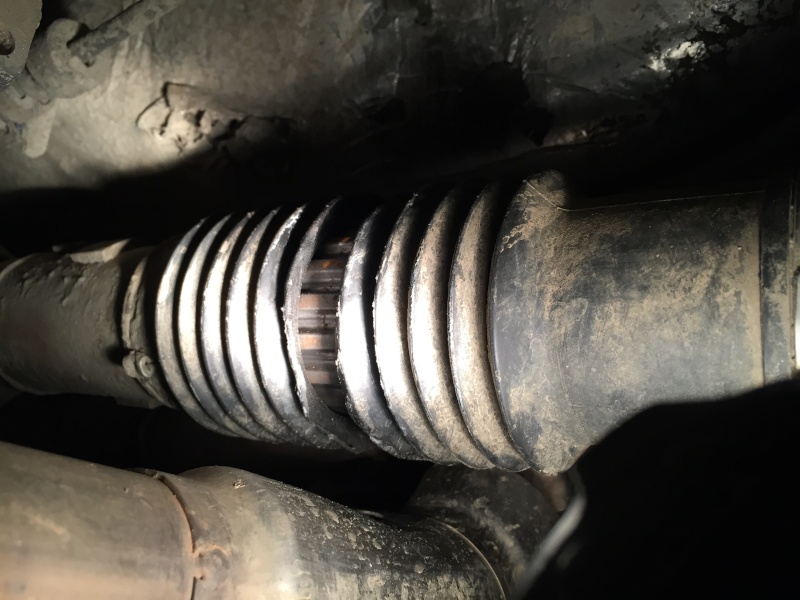
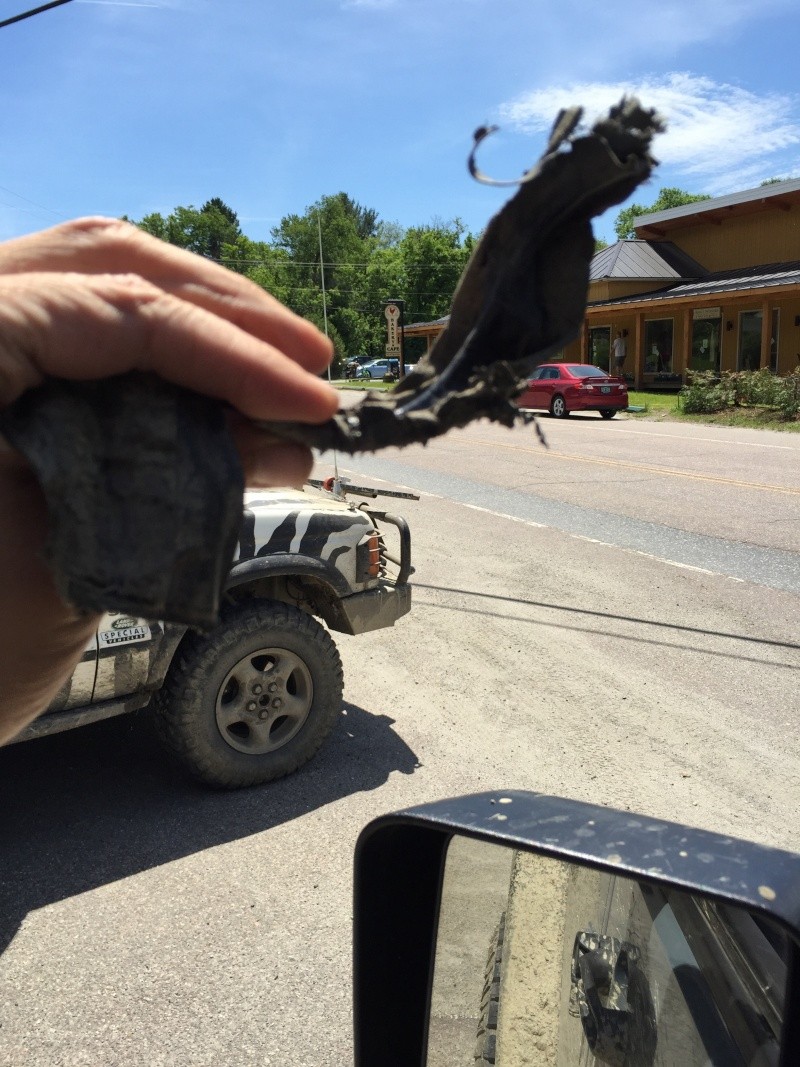
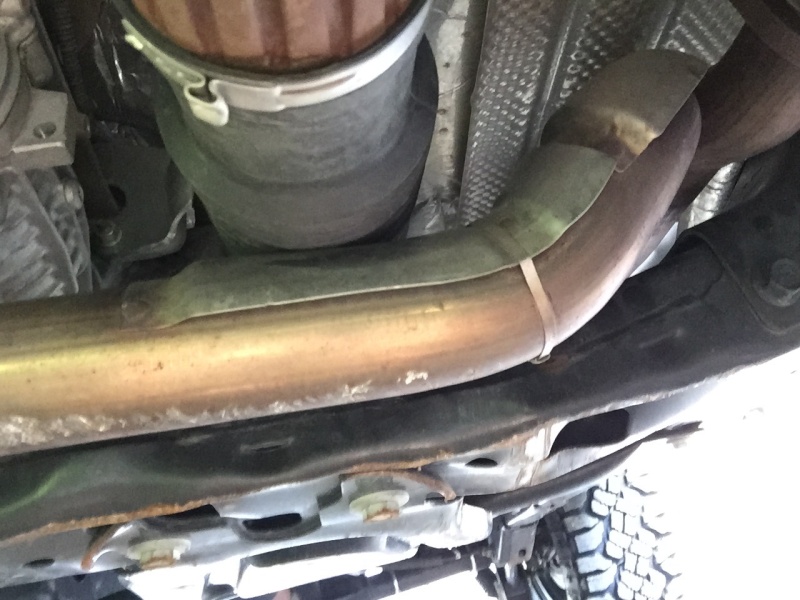
In the last pic you can see how tight the driveshaft boot was to the exhaust crossover with the new lift when flexed. This was a problem waiting to happen, but thankfully you can drive a JK with the front boot torn for a bit. I got home fine and ordered a new driveshaft from adams and a cordless impact wrench to help remove the stock shaft. By far the hardest install i had experienced with this jeep, mostly due to this little problem.

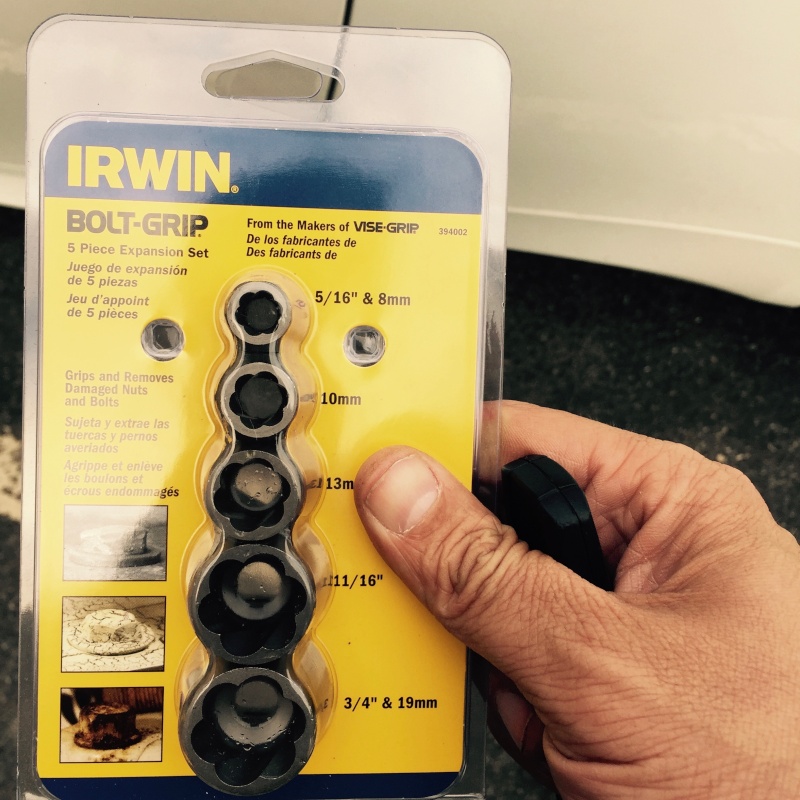
I somehow got a few out, but they were all mangled. Maybe soft screws, maybe too much torque or user error, but I had a #$%# of a time getting them out. The solution was a lot of swearing, reading, and purchasing a set Irwin Bolt Grippers. I bought a set of craftsman a day earlier but they sucked. The Irwins did the job. Victory and a new front driveshaft!


In the last pic you can see how tight the driveshaft boot was to the exhaust crossover with the new lift when flexed. This was a problem waiting to happen, but thankfully you can drive a JK with the front boot torn for a bit. I got home fine and ordered a new driveshaft from adams and a cordless impact wrench to help remove the stock shaft. By far the hardest install i had experienced with this jeep, mostly due to this little problem.

I somehow got a few out, but they were all mangled. Maybe soft screws, maybe too much torque or user error, but I had a #$%# of a time getting them out. The solution was a lot of swearing, reading, and purchasing a set Irwin Bolt Grippers. I bought a set of craftsman a day earlier but they sucked. The Irwins did the job. Victory and a new front driveshaft!


RubiconBob- Admin
- Posts : 67
Join date : 2014-11-18
 Re: RubiconBobs JK Unlimited Build
Nice stuff,Bob! great to see the build is coming along well.. Good call on the teraflex hinge and carrier, currently im driving with the spare inside the jeep as my tailgate rattles too much after 2 years of carrying 35's.
AquilesT- Class 6A
- Posts : 198
Join date : 2013-08-15
Location : Roslindale
 Re: RubiconBobs JK Unlimited Build
This picture

is so awesome.
Perfectly describes that feeling when a part has been kicking your ass all day and you FINALLY get it out. After at least a few lacerations, one trip minimum to buy a tool or some unrelated part you broke, and innumerable choice words, degrading the vehicle in question. Nice work.

is so awesome.
Perfectly describes that feeling when a part has been kicking your ass all day and you FINALLY get it out. After at least a few lacerations, one trip minimum to buy a tool or some unrelated part you broke, and innumerable choice words, degrading the vehicle in question. Nice work.
Rob Cote- Moab Dessert
- Posts : 673
Join date : 2012-07-11
Age : 36
Location : Ipswich, MA
 Re: RubiconBobs JK Unlimited Build
Ah, so that's what success looks like, lol
Mark- Rubicon Trail
- Posts : 1300
Join date : 2011-12-10
Location : Haverhill, MA
 Re: RubiconBobs JK Unlimited Build
question on the teraflex hinge carrier cb antenna mount. Because it has to sort of bee all the way to the right of the carrier, how did you manage to run the wires so that it looked somewhat decent?
i'm installing the hinge/carrier this weekend but noticed i wont be able to use my old mount given that the tire literally needs to be tight up against the cast hinge.
i'm installing the hinge/carrier this weekend but noticed i wont be able to use my old mount given that the tire literally needs to be tight up against the cast hinge.

AquilesT- Class 6A
- Posts : 198
Join date : 2013-08-15
Location : Roslindale
 Re: RubiconBobs JK Unlimited Build
I put it behind the teraflex CB mount, ran behind the tire, used black gaffers tape and pushed it through one of the grommets that lead inside the tailgate. From there, you can remove a plastic panel on the interior side of the tailgate and run it along with the tailight wires until you can get it under the carpet.
Hinge and CB mount (antenna and spring are inside the jeep)
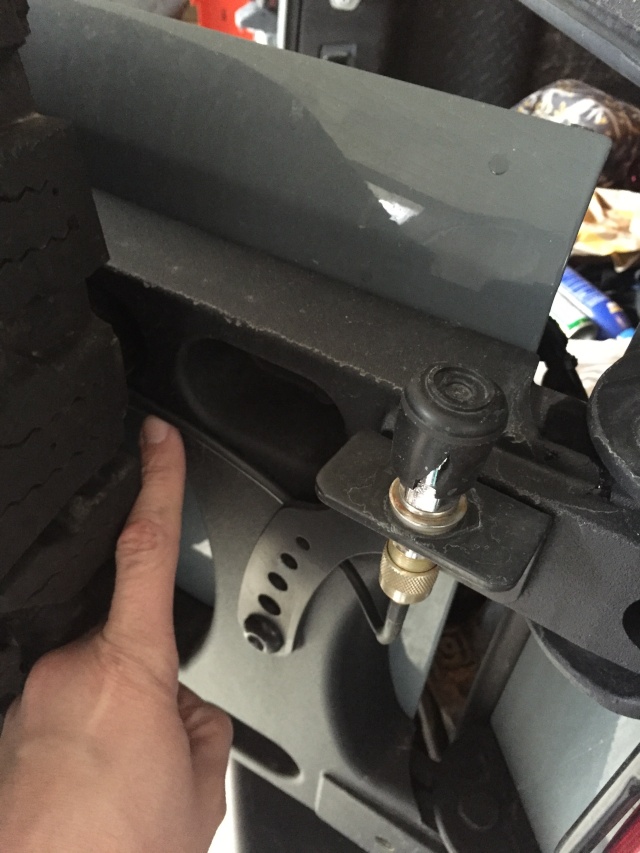
Looking in from the spare rim, you can see the black tape and the grommet that I entered. I had to pull out the grommet, cut it with a knife, run the coax through and put the grommet back in with some trimming IIRC.

Hinge and CB mount (antenna and spring are inside the jeep)

Looking in from the spare rim, you can see the black tape and the grommet that I entered. I had to pull out the grommet, cut it with a knife, run the coax through and put the grommet back in with some trimming IIRC.


RubiconBob- Admin
- Posts : 67
Join date : 2014-11-18
 Re: RubiconBobs JK Unlimited Build
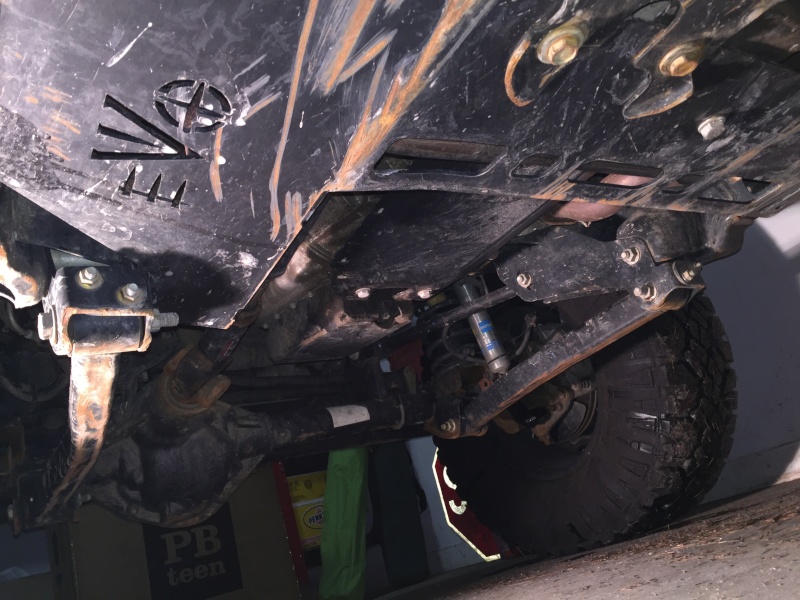
Next update: A few more upgrades happened over the summer. To start, I added more armor and finished the Evo Protek skid system, which covers oil pan, crossmember, and transmission. My crossmember took a beating earlier in the year at Ma Bell. Here’’s the original crossmember and before and afters. I didn’t get a good pic of them pristine, so this is after a few harder trails.


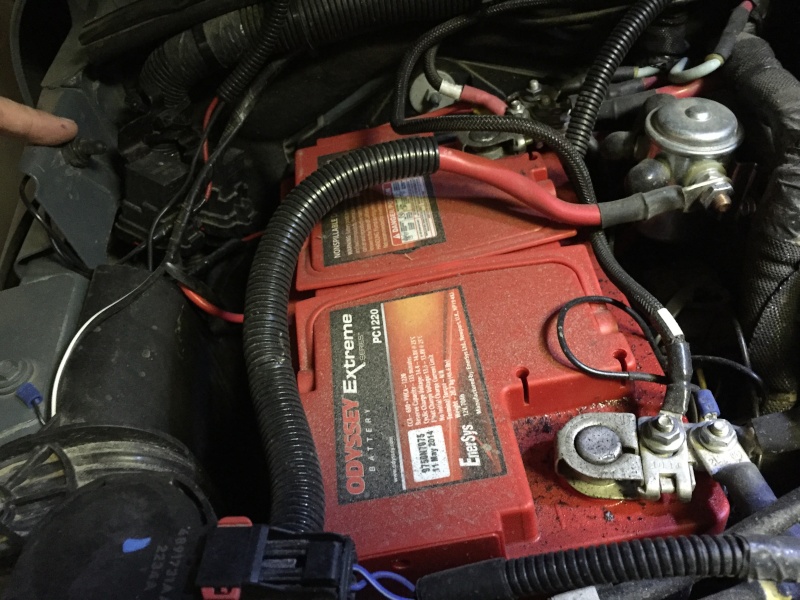
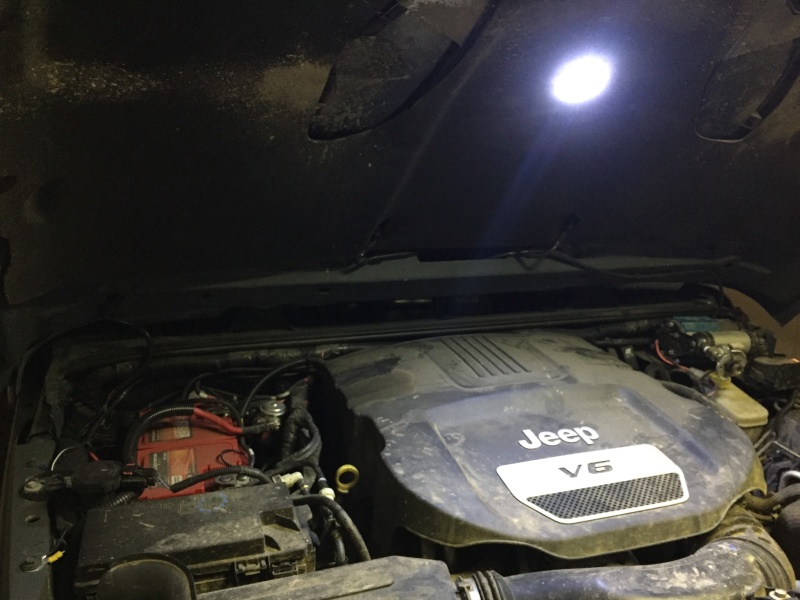
Around the time of that night wheeling trip, I started having battery problems. I got less than one year from the stock battery and while I could get it to start, I had to fiddle with it and it ultimately wasn’t reliable anymore. I did some research and settled on an odyssey battery and added a KC Cyclone underhood light around the same time. First pick is the battery and the hood light switch is where my finger is. The next pic shows the light, and to the right of the battery (silver cylinder) is the Warn power interrupt i installed back in the spring.

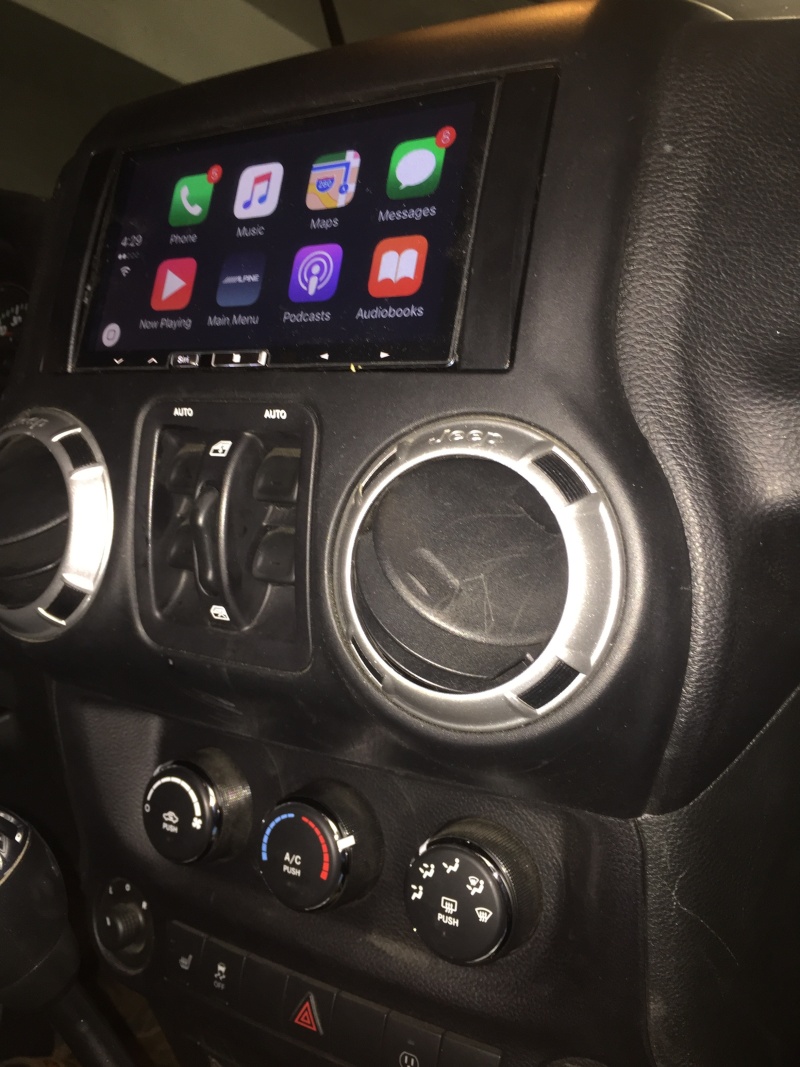
Stereo Placement:
When i ordered this jeep, i ordered options for steering wheel communication controls but purchased the base radio. It's really wasteful for Chrysler to charge $1,500 for a built-in nav with 5 year old tech. Out with the old, in with the new Alpine ILX-007 carplay stereo and control modules. Hands free works well, GPS functions where my phone gets signal, and no more syncing my phone contacts to the car as this stereo always reads straight from my phone. It’s really just an external interface for an iPhone. All-in i did this for half the cost of the factory option and have a more current radio to boot. Siri works well too so i have a hands free nav, phone and radio. The after shot:


Around the time of that night wheeling trip, I started having battery problems. I got less than one year from the stock battery and while I could get it to start, I had to fiddle with it and it ultimately wasn’t reliable anymore. I did some research and settled on an odyssey battery and added a KC Cyclone underhood light around the same time. First pick is the battery and the hood light switch is where my finger is. The next pic shows the light, and to the right of the battery (silver cylinder) is the Warn power interrupt i installed back in the spring.


Stereo Placement:
When i ordered this jeep, i ordered options for steering wheel communication controls but purchased the base radio. It's really wasteful for Chrysler to charge $1,500 for a built-in nav with 5 year old tech. Out with the old, in with the new Alpine ILX-007 carplay stereo and control modules. Hands free works well, GPS functions where my phone gets signal, and no more syncing my phone contacts to the car as this stereo always reads straight from my phone. It’s really just an external interface for an iPhone. All-in i did this for half the cost of the factory option and have a more current radio to boot. Siri works well too so i have a hands free nav, phone and radio. The after shot:


RubiconBob- Admin
- Posts : 67
Join date : 2014-11-18
 Re: RubiconBobs JK Unlimited Build
Cool, thanks.. Now to decide wether to get the antenna mount or the accesory mount that has the built in antenna mountRubiconBob wrote:I put it behind the teraflex CB mount, ran behind the tire, used black gaffers tape and pushed it through one of the grommets that lead inside the tailgate. From there, you can remove a plastic panel on the interior side of the tailgate and run it along with the tailight wires until you can get it under the carpet.
Hinge and CB mount (antenna and spring are inside the jeep)
Looking in from the spare rim, you can see the black tape and the grommet that I entered. I had to pull out the grommet, cut it with a knife, run the coax through and put the grommet back in with some trimming IIRC.
Last edited by AquilesT on 3/6/2016, 11:58 pm; edited 1 time in total

AquilesT- Class 6A
- Posts : 198
Join date : 2013-08-15
Location : Roslindale
 Re: RubiconBobs JK Unlimited Build
Looks good Bob!

Andrew Miller- Admin
- Posts : 398
Join date : 2011-12-19
Location : Harvard Ma
 Re: RubiconBobs JK Unlimited Build
Did you end up having to use a wheel spacer in order to get the factory wheel + larger tire to work well in the TF carrier?

AquilesT- Class 6A
- Posts : 198
Join date : 2013-08-15
Location : Roslindale
 Re: RubiconBobs JK Unlimited Build
No spacer, but I aired it down. I already had on board air so airing up the tire when I need it is not a big deal.

RubiconBob- Admin
- Posts : 67
Join date : 2014-11-18
 Re: RubiconBobs JK Unlimited Build
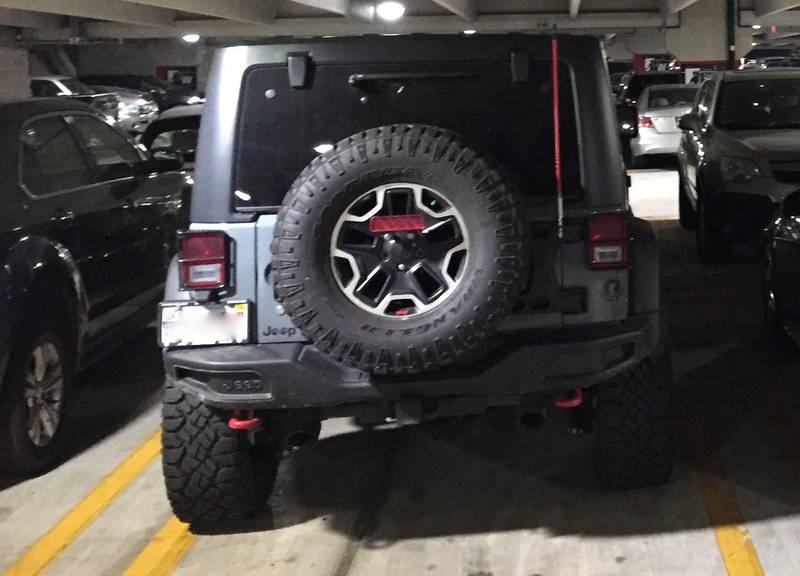
I let this get too far behind, time to catchup so I can post new updates. I changed out the stock fogs last september for a set of KC Gravity amber fogs, and did some damage to my rear bumper when the driver rear came down on a big rock from a drop-off. It's tweaked, and here is a pic of it post run. I tried to bang out the bracket and its better now, and I see the value in low profile bumpers. Beware of stamped steel, its just not strong and this was probably the first and only hit. This also broke part of the license plate bracket and the screws occasionally come loose, as I once found out when my license plate was hanging by the wiring for the license plate light.
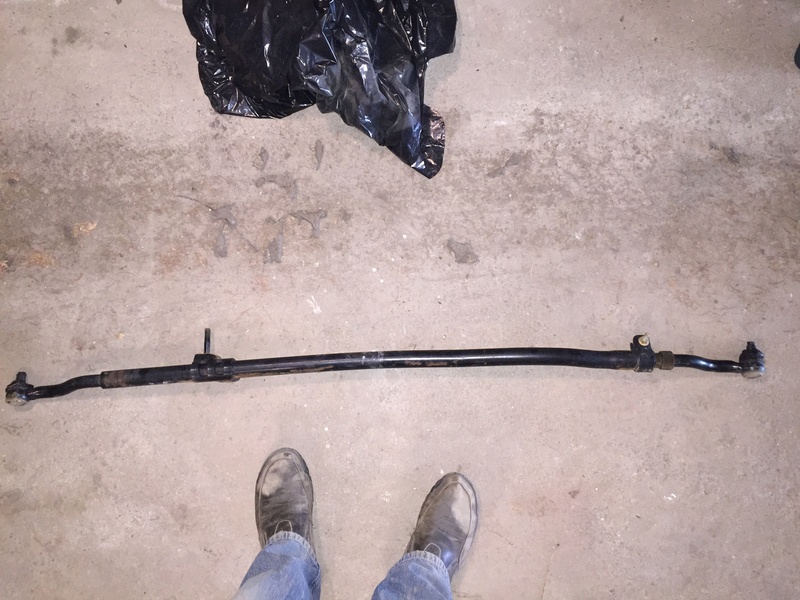
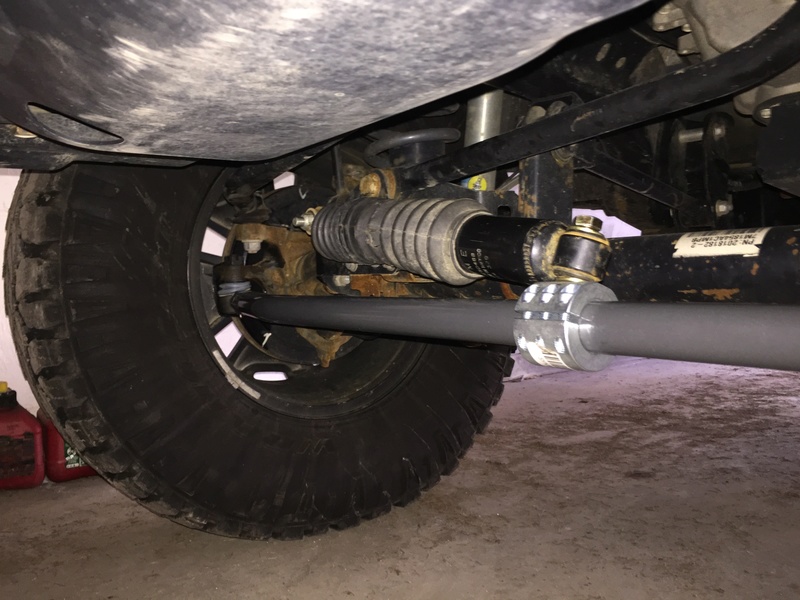
Fast forward to this spring, and a few things happened. First is a slight bend to my tie rod, so that was replaced with a Synergy. Shortly after during some trips, I got sick of the drag link coupling skipping threads so that has been replaced also with a Synergy. At this point my steerings been upgraded up to the pitman arm, and its been well worth it.
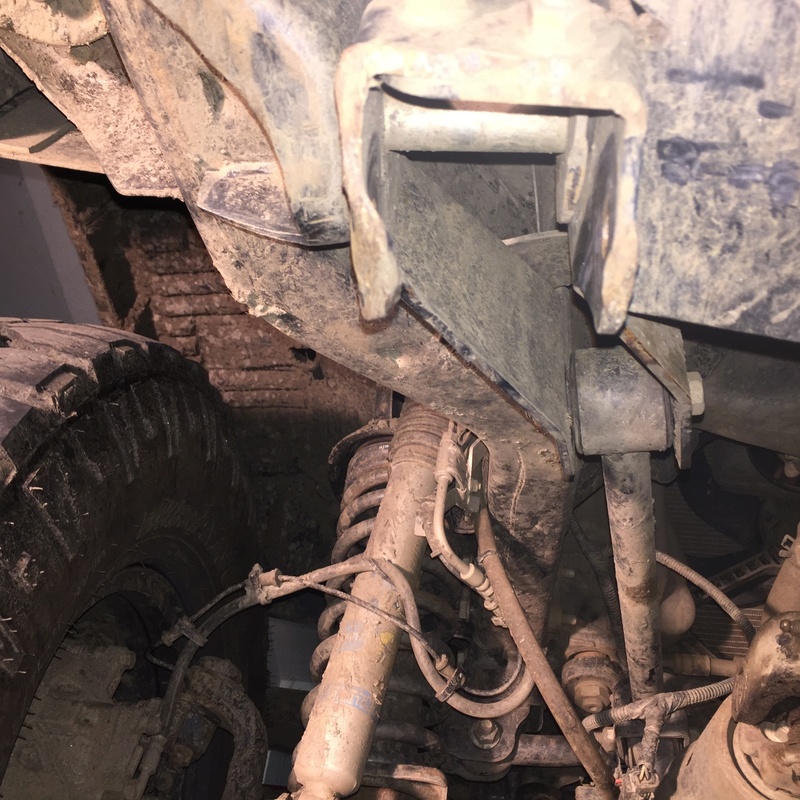
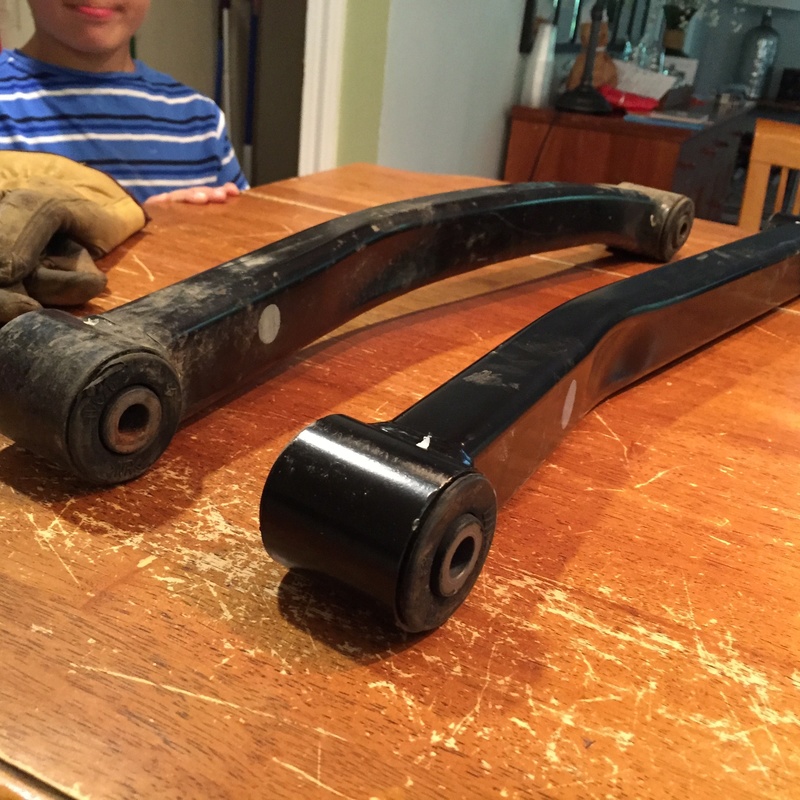
At the time of these upgrades, in june/july, it was a year of off-roading with an AEV 3.5" lift and i have taken stock of the damage to the stock parts they recommend using, and their own parts. Here is a mangled drop bracket (straightened out 3 times) and a badly bent lower CA (i also had a rear lower bent). Here is the front AEV drop bracket, notice the bends from rocks now that the CA is moved. Next is the picture of the arched front lower CA next to a new stock replacement.
Here's my small issues with AEV stuff: First off, i drove the rig so the damage is my fault. The real issue is the insistence of using stock parts, such as the drag link that sucks for 35+ tires as the threads can easily skip and throw your steering wheel off-center. The second is that, due to them not offering more comprehensive replacements, your forced to look elsewhere to strengthen your parts if you do more than overland style trips which led me to embracing... Metalcloak. Should have went with them the first time, but I didnt know then the types of wheeling i would do the next 12 months as its all new to me. My philosophy was to use the stock parts until i needed upgrades, and here I was one year later gettting front upper and lower CA's and selling those AEV drop brackets.
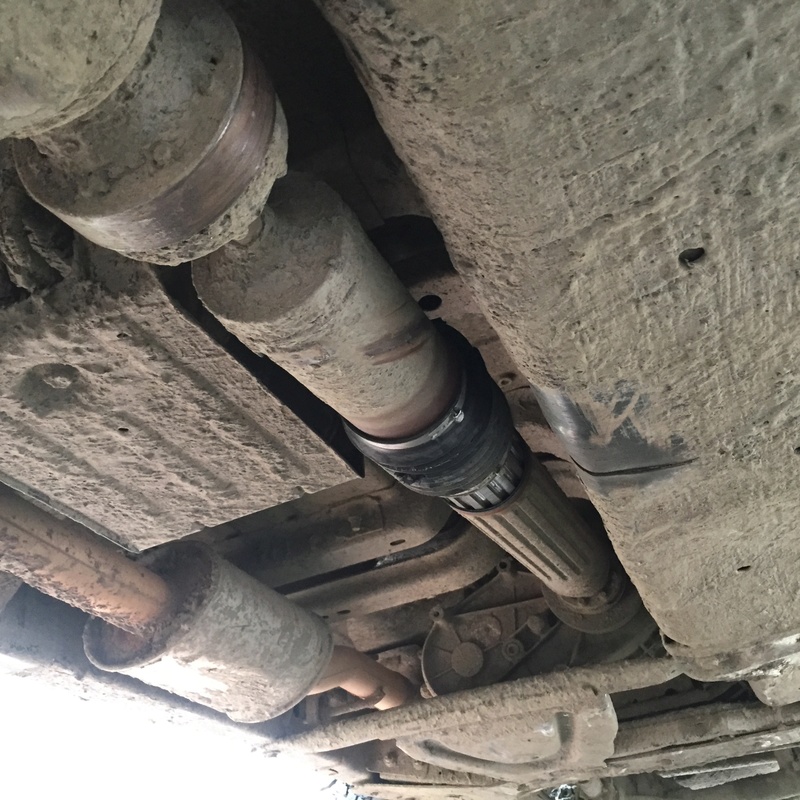
Part of the reason I didnt do MC last year was the costs outside of their lift, namely front and rear driveshafts they told me I would need (the front was a must according to them). Well, on another trip I happened to tear the rear boot thus forcing another upgrade. I do like the look of the Adams crossbones and skulls under my jeep


Fast forward to this spring, and a few things happened. First is a slight bend to my tie rod, so that was replaced with a Synergy. Shortly after during some trips, I got sick of the drag link coupling skipping threads so that has been replaced also with a Synergy. At this point my steerings been upgraded up to the pitman arm, and its been well worth it.


At the time of these upgrades, in june/july, it was a year of off-roading with an AEV 3.5" lift and i have taken stock of the damage to the stock parts they recommend using, and their own parts. Here is a mangled drop bracket (straightened out 3 times) and a badly bent lower CA (i also had a rear lower bent). Here is the front AEV drop bracket, notice the bends from rocks now that the CA is moved. Next is the picture of the arched front lower CA next to a new stock replacement.


Here's my small issues with AEV stuff: First off, i drove the rig so the damage is my fault. The real issue is the insistence of using stock parts, such as the drag link that sucks for 35+ tires as the threads can easily skip and throw your steering wheel off-center. The second is that, due to them not offering more comprehensive replacements, your forced to look elsewhere to strengthen your parts if you do more than overland style trips which led me to embracing... Metalcloak. Should have went with them the first time, but I didnt know then the types of wheeling i would do the next 12 months as its all new to me. My philosophy was to use the stock parts until i needed upgrades, and here I was one year later gettting front upper and lower CA's and selling those AEV drop brackets.
Part of the reason I didnt do MC last year was the costs outside of their lift, namely front and rear driveshafts they told me I would need (the front was a must according to them). Well, on another trip I happened to tear the rear boot thus forcing another upgrade. I do like the look of the Adams crossbones and skulls under my jeep


RubiconBob- Admin
- Posts : 67
Join date : 2014-11-18

Tonellin- Rausch Creek
- Posts : 313
Join date : 2013-01-08
Location : Medford
 Re: RubiconBobs JK Unlimited Build
The new lift rides great and very comfortable on the trail now that I fixed a spring retainer. The only issue I have now is what feels like a driveshaft vibration at and after 65mph. I'm thinking the rear pinion is the issue, and needs a fine adjustment. Anyone else experience something like that? The only other idea is an off balance wheel but the vibrations feel centered on the vehicle and are slight, not an exaggerated wobble I felt one a tire was out of balance in the past. Would mud in the tire cause a similar feeling?

RubiconBob- Admin
- Posts : 67
Join date : 2014-11-18
 Re: RubiconBobs JK Unlimited Build
Mud stuck to back side of rim can do that if concentrated in one spot.
Could be pinion angle, especially if it didn't do it before the lift was installed.
Most of the time you can feel it get worse the faster you go.
Have you compared what your pinion angle looks like compared to a drive shaft angle chart?
https://www.google.com/search?q=driveshaft+angle+chart&tbm=isch&tbo=u&source=univ&sa=X&ved=0ahUKEwiit7WIz9vQAhUHLMAKHbr6CBwQsAQIIg&biw=1348&bih=587

Mark- Rubicon Trail
- Posts : 1300
Join date : 2011-12-10
Location : Haverhill, MA
Page 1 of 1
Permissions in this forum:
You cannot reply to topics in this forum
 Home
Home
