The Oreo (T.J.'s YJ)
+11
Tonellin
Jake
nnovickzj
Andrew Miller
nsjbill
OverlandXJ
Mark
CrawlingForward
dongalonga
Ryan McKee
THOOPY3
15 posters
Page 11 of 11
Page 11 of 11 •  1, 2, 3 ... 9, 10, 11
 Re: The Oreo (T.J.'s YJ)
Andrew Miller wrote:That YJ will look killer with those MCE's!
Yeah buddy. And now I can worry a little less about stuffing the tires and hearing lovely metal crumpling sounds.
 Re: The Oreo (T.J.'s YJ)
The YJ has awoken from its winter slumber and will be making it's way to the body shop in the coming weeks for some much needed rocker and floor repairs. In preparation for this momentous occasion, this past Saturday I went ahead and removed the front and rear flares and swapped the 33" MTRs for the wimpy 28" rollers we've had kicking around. Pretty easy stuff as you might expect, only miscue was that the always-accurate forecast I looked at early Friday said expect rain in the afternoon Saturday, so I began my day early Saturday only to have it rain on me the entire time and stop once in the afternoon once I was done. I've been through worse.
Curiosity got the best of me and I decided to check out how MCE Fenders will sit once they're installed. I forgot to take a before shot, but here's what the rear looks like with the MCE flare mount mocked up with the 28" rollers:
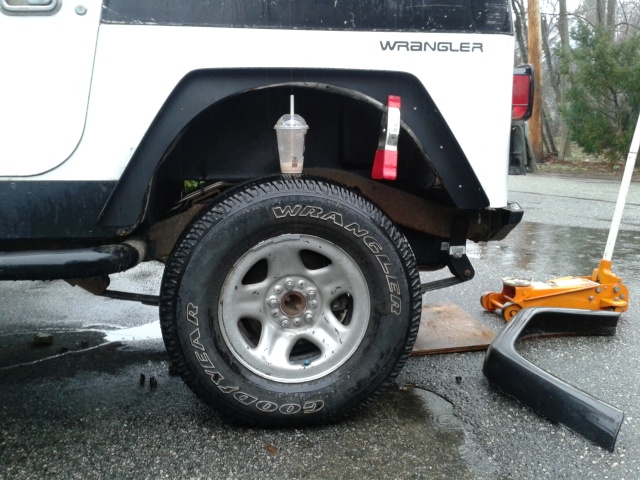
With the 3.5"-ish lift, roller tires, and the MCE flare there is now roughly 12" between tire and flare. With the MTRs back on there should be roughly 9"-10". What a difference a year and some mods make. In addition to the body work, we'll be installing the MCEs (front and rear), JCR Offroad OTK steering setup (still need to buy the correct reamer for the knuckles), Crown Performance extended brake lines (attempt #2, the lines we bought last year are still too short), and AtoZ Fabrication rocker guards. It will also most likely be going to Elias 4WD for the SYE kit install and possible minor crossmember frame touch-ups in the next few weeks as well, ideally before the MaBell run.
We planned on also installing an Aussie up front by the MaBell run but it's looking like that will be less likely. The chief reason is that we're deciding between installing a Posi-Lok system (to eliminate the vacuum disconnect and provide 2-Lo capabilities) or switching to a one-piece passenger side shaft (also to eliminate the vacuum disconnect and provide added strength and piece of mind). Both options have pros and cons and it's best we don't rush into it and possibly regret our choice.
Unfortunately because of all this work it's unlikely that the YJ will be making an appearance at the cookout this year. However we'll still be there to rep the minuscule square light/leaf spring contingency of the club with my Cherokee. For those of you that don't know, Jeeps used to be leaf sprung. Actually for quite a long time. Then soccer moms started wanting them. And Chrysler gave in to the dark side of the Force.
Curiosity got the best of me and I decided to check out how MCE Fenders will sit once they're installed. I forgot to take a before shot, but here's what the rear looks like with the MCE flare mount mocked up with the 28" rollers:

With the 3.5"-ish lift, roller tires, and the MCE flare there is now roughly 12" between tire and flare. With the MTRs back on there should be roughly 9"-10". What a difference a year and some mods make. In addition to the body work, we'll be installing the MCEs (front and rear), JCR Offroad OTK steering setup (still need to buy the correct reamer for the knuckles), Crown Performance extended brake lines (attempt #2, the lines we bought last year are still too short), and AtoZ Fabrication rocker guards. It will also most likely be going to Elias 4WD for the SYE kit install and possible minor crossmember frame touch-ups in the next few weeks as well, ideally before the MaBell run.
We planned on also installing an Aussie up front by the MaBell run but it's looking like that will be less likely. The chief reason is that we're deciding between installing a Posi-Lok system (to eliminate the vacuum disconnect and provide 2-Lo capabilities) or switching to a one-piece passenger side shaft (also to eliminate the vacuum disconnect and provide added strength and piece of mind). Both options have pros and cons and it's best we don't rush into it and possibly regret our choice.
Unfortunately because of all this work it's unlikely that the YJ will be making an appearance at the cookout this year. However we'll still be there to rep the minuscule square light/leaf spring contingency of the club with my Cherokee. For those of you that don't know, Jeeps used to be leaf sprung. Actually for quite a long time. Then soccer moms started wanting them. And Chrysler gave in to the dark side of the Force.
 Re: The Oreo (T.J.'s YJ)
TJ, installing a one piece axle is pretty simple, make a metal plate to block off where actuator was, remove bearing and seal in actuator cavity, install new inner seal in carrier and install axle.
I would install these also, they will help inner seals last. https://www.youtube.com/watch?v=RGGHXzMyT-U
If you have the smaller u joints now, and you want to upgrade to larger size you will need both side inner and outer axles from an XJ or TJ.
Install locker at the same time is the way to go so you don't have to take it apart twice.
As far as SYE goes you can do that yourself and save some dough and get to know what your working with.
Two wheel low is something that you will probably never need, unless your driving down MT Washington trying not to over heat the brakes.
Mark- Rubicon Trail
- Posts : 1300
Join date : 2011-12-10
Location : Haverhill, MA
 Re: The Oreo (T.J.'s YJ)
Mark wrote:TJ, installing a one piece axle is pretty simple, make a metal plate to block off where actuator was, remove bearing and seal in actuator cavity, install new inner seal in carrier and install axle.
I would install these also, they will help inner seals last. https://www.youtube.com/watch?v=RGGHXzMyT-U
If you have the smaller u joints now, and you want to upgrade to larger size you will need both side inner and outer axles from an XJ or TJ.
Install locker at the same time is the way to go so you don't have to take it apart twice.
As far as SYE goes you can do that yourself and save some dough and get to know what your working with.
Two wheel low is something that you will probably never need, unless your driving down MT Washington trying not to over heat the brakes.
Yeah I've done the research on it and it seems straightforward enough, but just like you said we're taking our time with it so we only have to take everything apart once. If we do swap to the one-piece I'd like to go the chromoly route for added beef, but that of course comes with additional cost.
 Re: The Oreo (T.J.'s YJ)
I hear you, do it once, been there.
I scored a set of new yukon inner axles, new lockrite locker and a hp 30 a couple years ago.
I just need a set of moly outer axles and gears and i'll start assembling the parts.
I scored a set of new yukon inner axles, new lockrite locker and a hp 30 a couple years ago.
I just need a set of moly outer axles and gears and i'll start assembling the parts.

Mark- Rubicon Trail
- Posts : 1300
Join date : 2011-12-10
Location : Haverhill, MA
 Re: The Oreo (T.J.'s YJ)
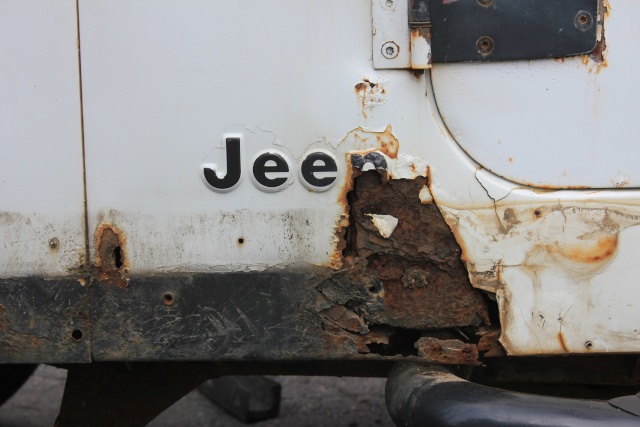
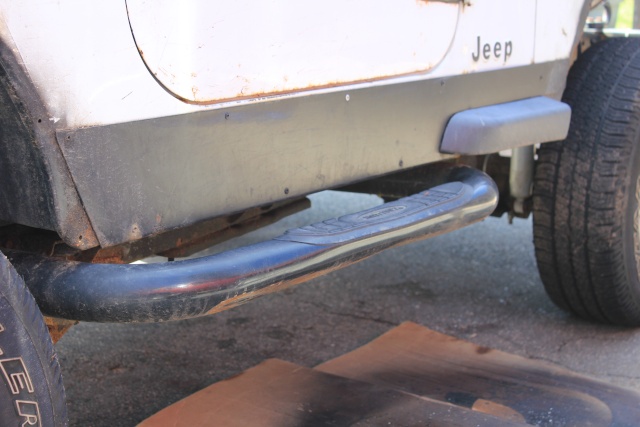
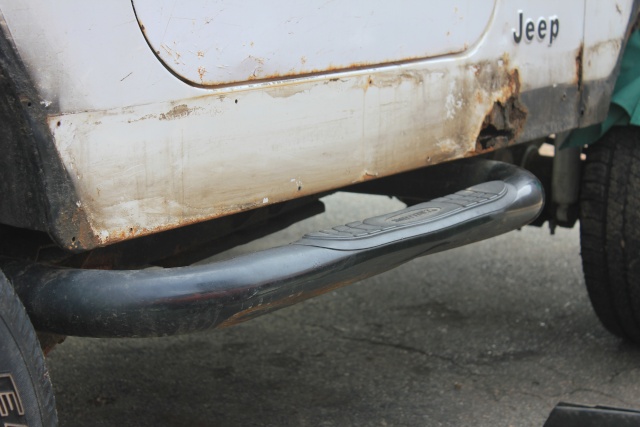
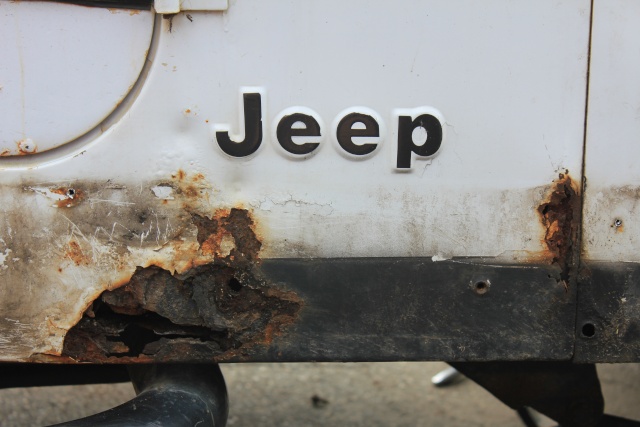
Did some final prep before the the plunge into the body work begins. This involved drilling out the rivets holding the rocker guards in place and the one bolt holding the floor pan that I half-installed on top of the rotted to hell factory driver side pan. This time I did have the wherewithal to take some before and after shots. Warning: graphic images.
Driver rocker:
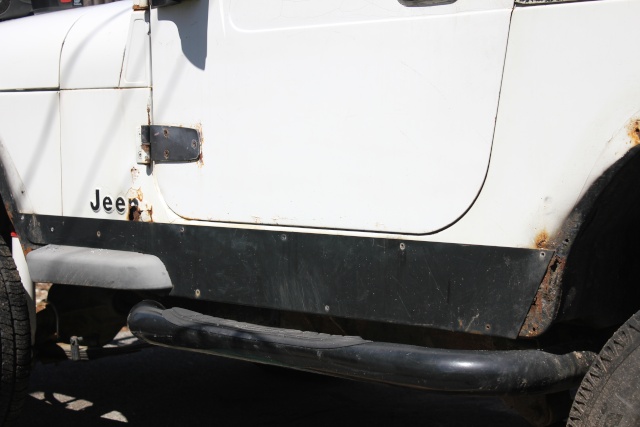
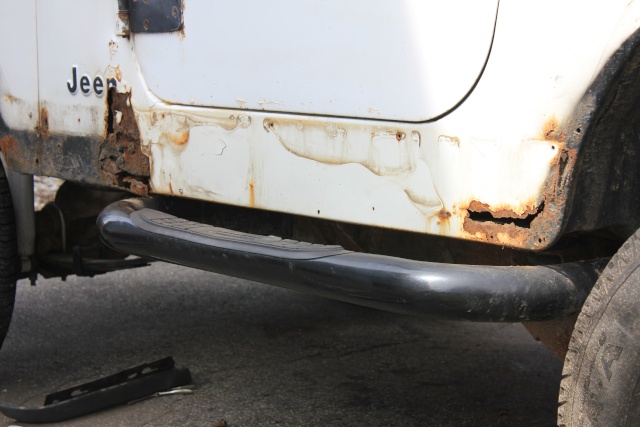
Passenger rocker:
Driver floor:

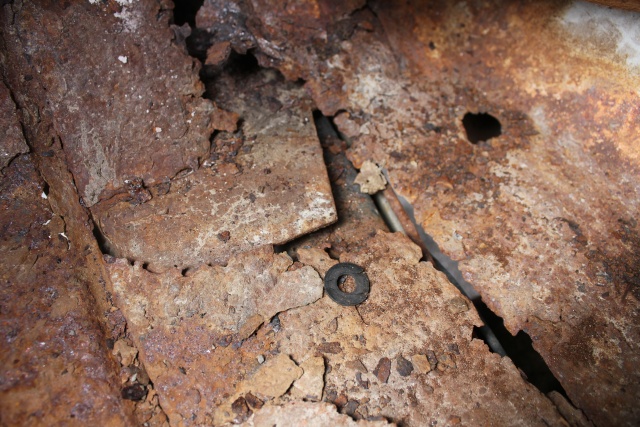
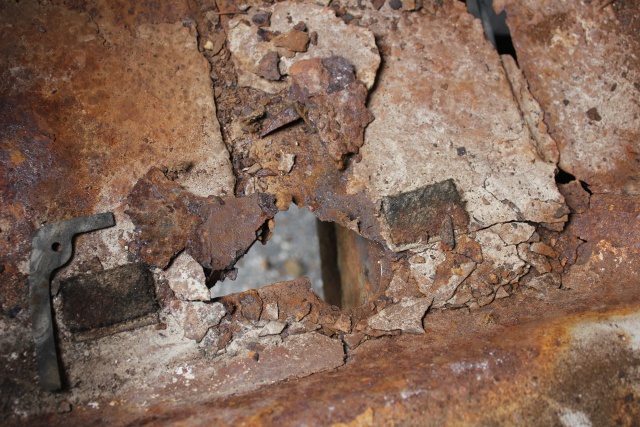
SHITBOX. A few short weeks from now everything will be replaced though and it will look like a million bucks. More important than looks though will be the fact that it will actually have structural integrity. Here's hoping we get the same 24 years out of the fresh sheet metal as we did the factory stuff before it needs this type of work done again.
Driver rocker:


Passenger rocker:


Driver floor:


SHITBOX. A few short weeks from now everything will be replaced though and it will look like a million bucks. More important than looks though will be the fact that it will actually have structural integrity. Here's hoping we get the same 24 years out of the fresh sheet metal as we did the factory stuff before it needs this type of work done again.
 Re: The Oreo (T.J.'s YJ)
Oh man my eyes...put the rocker back on!!
Kudos to taking on this big job, it will definitely be worth it when it's all finished
Kudos to taking on this big job, it will definitely be worth it when it's all finished
Tonellin- Rausch Creek
- Posts : 313
Join date : 2013-01-08
Location : Medford
 Re: The Oreo (T.J.'s YJ)
WOW, that's a tad rusty and then some.
Are you going to line the floor with something when you get it back ?
Are you going to line the floor with something when you get it back ?

Mark- Rubicon Trail
- Posts : 1300
Join date : 2011-12-10
Location : Haverhill, MA
 Re: The Oreo (T.J.'s YJ)
Mark wrote:WOW, that's a tad rusty and then some.
Are you going to line the floor with something when you get it back ?
Yeah I think the plan is going to be to ditch the carpet on the floor pans and hit them with a yet-TBD liner. The passenger side floor (not pictured) doesn't actually have any rot holes in it but it's rusty as hell so it's getting the axe and being replaced as well.
 Re: The Oreo (T.J.'s YJ)
More progress this weekend. We have officially hit "no turning back now" status after I removed all three seats, most of the carpet, the front seat belts, and the rocker guards. Once all that was done, I assisted our mechanic/body work guy in completely removing the driver floor pan (or rather what was left of it) as well as the remnants of the rot near the 'Jeep' symbol and the rear wheel well. While working near the rear wheel well we also discovered some rot on the floor near the seat belt and roll cage mount (previously unknown to us) which will also be patched up at the same time. Interesting to me was that the mechanic believes that the rockers were previously fixed before using what he called "body glue" which I had never heard of (not really surprising). I was wondering why the 'metal' near the rotted rocker almost felt like rubber, and now I know. This damn Jeep has had a tough, hack-filled life.
The good news is that all of the floor braces are extremely solid and in good shape so the welding should go pretty smooth (at least according to the man doing it). I've never heard someone speak so glowingly of this Jeep as this man did when he was removing the floor, commenting on how "smooth" and "easy" the work was going and was going to go. Hopefully that streak continues, but I'm not holding my breath. My father went down yesterday to talk things over regarding the passenger side, and he confirms that it is being move currently via the use of a milk crate. At least the accelerator pedal has been reinstalled.
No pictures unfortunately as I was too busy being bossed around and working to get any, but hopefully within the next few weeks I'll have a status update shot to share on here. It's also looking less and less likely that the thing is going to be ready for MaBell which is a bummer, but I'd much rather things be done right then quick.
 Re: The Oreo (T.J.'s YJ)
Glad your still chipping away at this big project. Is that a no on the XJ for mabell too?

Tonellin- Rausch Creek
- Posts : 313
Join date : 2013-01-08
Location : Medford
 Re: The Oreo (T.J.'s YJ)
I think I'll probably park the XJ at the usual meeting spot, catch a ride to the trail with someone, and play cameraman for the day. I could definitely get up the first obstacle into the open area just past the entrance but she's definitely not heading to the top. Stock friendly runs only while on DD duty 

 Re: The Oreo (T.J.'s YJ)
I can't believe it's been almost A YEAR since I updated this thread, but the time stamp doesn't lie. It's also hard to believe that the Jeep is now officially an antique, as this year it celebrates its 25th birthday. I would describe the past 12 months as the most eventful uneventful year a vehicle could probably have, in that it had major stuff done to it but for the most part basically sat around collecting dust.
FAIR WARNING, THERE IS A WALL OF TEXT INBOUND ON YOUR POSITION.
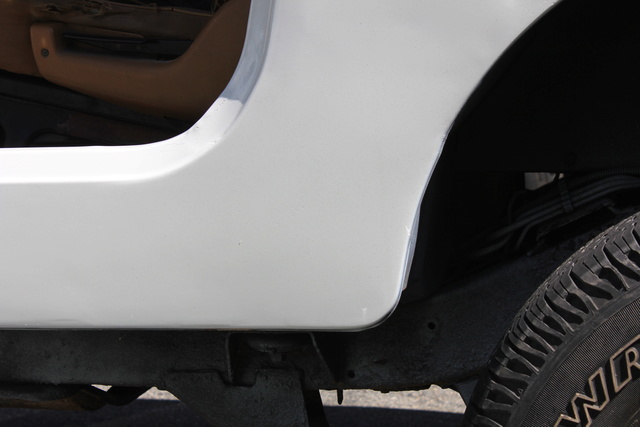
The major item, as was discussed in my post a year ago, was the floor board and rocker replacements. The work took longer than expected, but was worth the wait in the end. It's pretty remarkable how rotted both areas really were, and it's taken some serious getting used to because up until all this work I'd never seen the thing without rot in both areas. The passenger side was actually repaired as far back as the middle of the rear wheel well since there was some decent rust going on there.
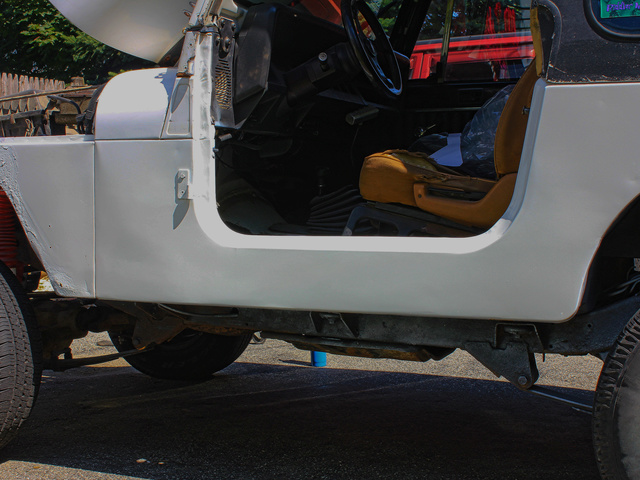
Before bringing the Jeep home and while conveniently at a shop with easily accessible power and air tools, we decided to take advantage of our acquired open-door policy and install the JCR one ton over-the-knuckle steering kit we picked up. Before we even got to the install stage we noticed the kit was missing some components though (zerk fittings and a necessary tie rod end spacer). Not a big deal, JCR sent the missing parts right out. However, when install time came around we discovered an improperly manufactured passenger side TRE that did not allow the nut for the TRE on the drag link to seat properly. This wasn't noticeable of course until after things were zipped together and the threads on the TRE were absolutely boogered. In hopes of just getting the Jeep out of the shop we attempted to grind the surface flat, but even a hefty amount of metal removal couldn't alleviate the issue. After a fair amount of denial from JCR they finally sent out two new TREs for us, which ended up doing the trick. JCR's customer service was decent, but I'm reluctant to buy from them after all the issues we had with the actual product. Regardless, after three long months in the shop the Jeep was finally able to come home.
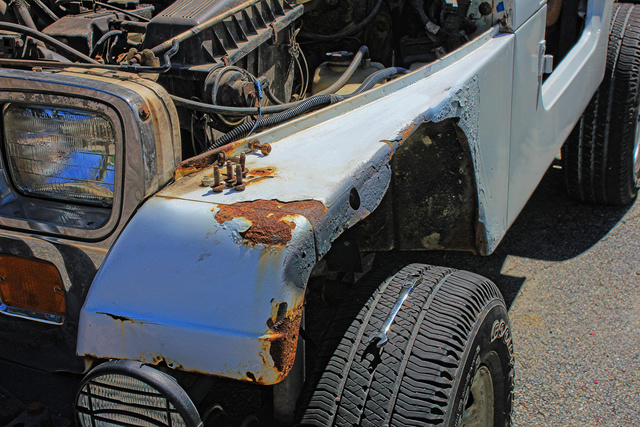
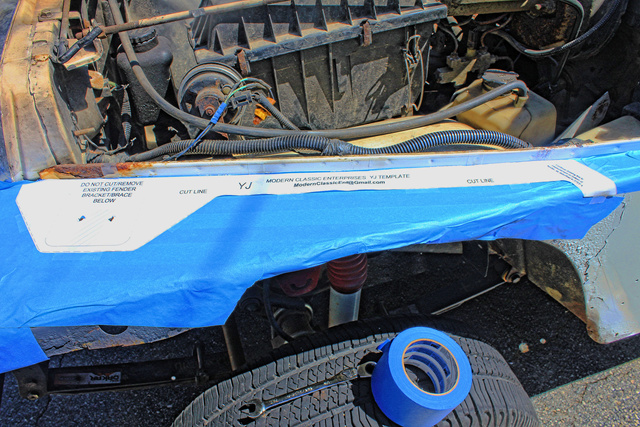
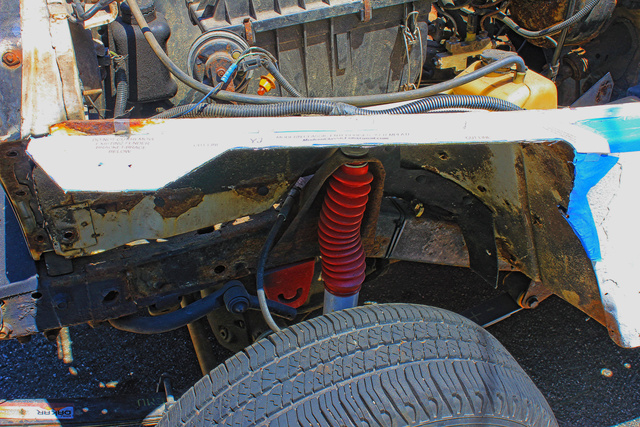
Naturally, the next course of action after having a significant amount of body work done to your Jeep is to once again cut it up. A year and a half ago my father won a prize drawing from 4WD.com for a free set of MCE front and rear fenders. MCE was kind enough to work with us and provide YJ fronts and TJ rears (for the added clearance, and because the rear was already cut to accommodate the TJ flares that were on before). The install went extremely smooth with no hiccups, and I must say I'm getting better and better with an angle grinder. During this time we also coated the floor from front to back (interior and exterior) in spray-on bedliner to help ensure that our investment would last for a good long while.
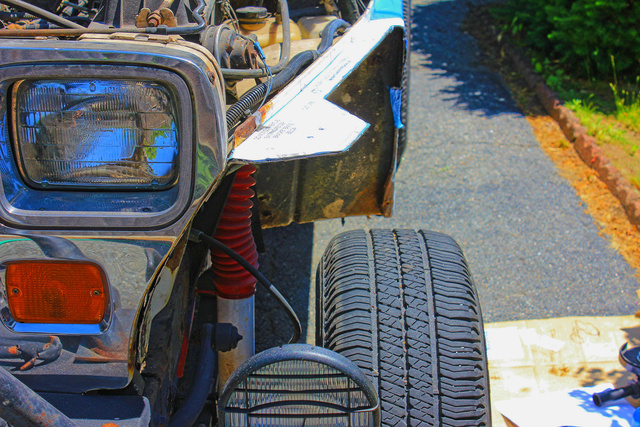
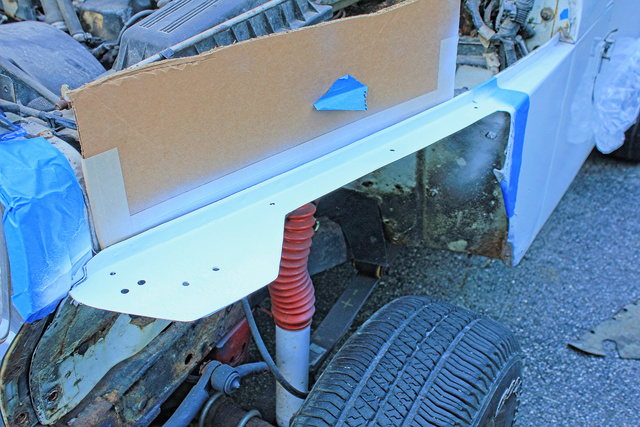
After all that the Jeep basically sat for the next eight months, but man did it look DAMN GOOD while doing it.
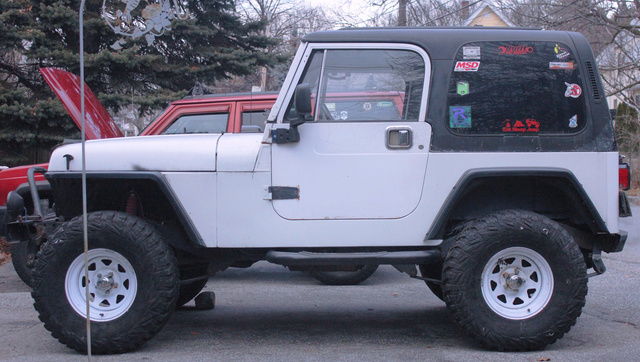
In the last month and half or so we've installed a new fuel filter (the old one had begun leaking) as well as the new Corbeau driver seat we ordered last summer (matching passenger one coming soon). Before it was parked last year we had been dealing with a strange lurching/bucking that would occasionally (and randomly) strike, which eventually evolved into a full-blown stumble/hesitation in all gears at about 2500 RPM. This was thankfully rectified this past weekend by a new distributor cap, rotor, and spark plugs.
During the tune-up work this past weekend we also took the time to remove and inspect the throttle body and sensors for any issues (since I'm convinced the thing just doesn't idle correctly), and during this we discovered that there was a small amount of raw gasoline puddled in the intake manifold just below the throttle body. What this most likely means is that, rather unsurprisingly, one of the undoubtedly tired, warn-out injectors (one of the foremost two) has gone belly-up and is no longer holding pressure after the engine is shut off. Since it makes zero sense to replace only one injector, we're planning on upgrading all four with the Ford four-hole "yellow top" variety (a pretty common and straightforward swap from what I've read on the forums). Add that to the to-do list.
Now on to the real reasons why it's lay dormant for all these months: it is in serious need of a SYE install, but the major reason is the discovery I made during the fender install of some serious frame rot around the steering box. Both of these things are going to be addressed in the coming month or so, along with the installation of a new clutch (likely a Centerforce). I'm not looking forward to the cost of all that work, but it needs to be done and so it shall be.
Once those are taken care of, there's really not much more it needs to be road- and trail-ready other than the installation of some extended brake lines (which we have) and longer sway bar link disconnects. Oh and I want to install some AtoZ full-length rocker guards to make sure those minty-mint rockers stay that way. I'm sure there are other small things I'm forgetting.
I am determined to not let it sit all summer again and intend to hit as many trails as possible with it this wheeling season. It's come a long way in the last year and I can't wait to get back on the trail and beat the living piss out of it and break some more stuff.
FAIR WARNING, THERE IS A WALL OF TEXT INBOUND ON YOUR POSITION.
The major item, as was discussed in my post a year ago, was the floor board and rocker replacements. The work took longer than expected, but was worth the wait in the end. It's pretty remarkable how rotted both areas really were, and it's taken some serious getting used to because up until all this work I'd never seen the thing without rot in both areas. The passenger side was actually repaired as far back as the middle of the rear wheel well since there was some decent rust going on there.


Before bringing the Jeep home and while conveniently at a shop with easily accessible power and air tools, we decided to take advantage of our acquired open-door policy and install the JCR one ton over-the-knuckle steering kit we picked up. Before we even got to the install stage we noticed the kit was missing some components though (zerk fittings and a necessary tie rod end spacer). Not a big deal, JCR sent the missing parts right out. However, when install time came around we discovered an improperly manufactured passenger side TRE that did not allow the nut for the TRE on the drag link to seat properly. This wasn't noticeable of course until after things were zipped together and the threads on the TRE were absolutely boogered. In hopes of just getting the Jeep out of the shop we attempted to grind the surface flat, but even a hefty amount of metal removal couldn't alleviate the issue. After a fair amount of denial from JCR they finally sent out two new TREs for us, which ended up doing the trick. JCR's customer service was decent, but I'm reluctant to buy from them after all the issues we had with the actual product. Regardless, after three long months in the shop the Jeep was finally able to come home.
Naturally, the next course of action after having a significant amount of body work done to your Jeep is to once again cut it up. A year and a half ago my father won a prize drawing from 4WD.com for a free set of MCE front and rear fenders. MCE was kind enough to work with us and provide YJ fronts and TJ rears (for the added clearance, and because the rear was already cut to accommodate the TJ flares that were on before). The install went extremely smooth with no hiccups, and I must say I'm getting better and better with an angle grinder. During this time we also coated the floor from front to back (interior and exterior) in spray-on bedliner to help ensure that our investment would last for a good long while.


After all that the Jeep basically sat for the next eight months, but man did it look DAMN GOOD while doing it.

In the last month and half or so we've installed a new fuel filter (the old one had begun leaking) as well as the new Corbeau driver seat we ordered last summer (matching passenger one coming soon). Before it was parked last year we had been dealing with a strange lurching/bucking that would occasionally (and randomly) strike, which eventually evolved into a full-blown stumble/hesitation in all gears at about 2500 RPM. This was thankfully rectified this past weekend by a new distributor cap, rotor, and spark plugs.
During the tune-up work this past weekend we also took the time to remove and inspect the throttle body and sensors for any issues (since I'm convinced the thing just doesn't idle correctly), and during this we discovered that there was a small amount of raw gasoline puddled in the intake manifold just below the throttle body. What this most likely means is that, rather unsurprisingly, one of the undoubtedly tired, warn-out injectors (one of the foremost two) has gone belly-up and is no longer holding pressure after the engine is shut off. Since it makes zero sense to replace only one injector, we're planning on upgrading all four with the Ford four-hole "yellow top" variety (a pretty common and straightforward swap from what I've read on the forums). Add that to the to-do list.
Now on to the real reasons why it's lay dormant for all these months: it is in serious need of a SYE install, but the major reason is the discovery I made during the fender install of some serious frame rot around the steering box. Both of these things are going to be addressed in the coming month or so, along with the installation of a new clutch (likely a Centerforce). I'm not looking forward to the cost of all that work, but it needs to be done and so it shall be.
Once those are taken care of, there's really not much more it needs to be road- and trail-ready other than the installation of some extended brake lines (which we have) and longer sway bar link disconnects. Oh and I want to install some AtoZ full-length rocker guards to make sure those minty-mint rockers stay that way. I'm sure there are other small things I'm forgetting.
I am determined to not let it sit all summer again and intend to hit as many trails as possible with it this wheeling season. It's come a long way in the last year and I can't wait to get back on the trail and beat the living piss out of it and break some more stuff.
 Re: The Oreo (T.J.'s YJ)
WOW TJ, what a difference in looks!
Seems you have a few things to tackle yet but your getting there for sure.
The mce's look great and body too.
You might want to test injectors before wasting dough on them at the present time or to simply rule out an issue possibility.
Just remove the injector rail with injectors still attached and then cycle the ignition to pressurize
(DO NOT TURN OVER) the fuel rail and look for leakage at injector nozzles. You should drive it to get to operating temp, shut off and let heat soak for a bit and then remove rail and do the test.
Injector o ring kit at auto zone to re install .
Or you could do what i did and install some EV1 injectors
They are called "Neon" or '703 injectors though they come in many Chrysler cars and mini vans.
0280155703.
Plus these retain the clip that secures the injector to the rail like the factory units.
100% drop in and it's super easy to do.
As far as the clutch goes be careful not to get one that takes too much leg effort to disengage because it puts unnecessary stress and wear and tear on the clutch release bearing and the thrust bearings on the crank shaft.
Might add to making the rear main seal leak,,ya never know
Not to mention the fatigue on your leg rock crawling or in stop and go traffic.
MY 02 cents Hope this helps,

Mark- Rubicon Trail
- Posts : 1300
Join date : 2011-12-10
Location : Haverhill, MA
 Re: The Oreo (T.J.'s YJ)
I might have 4 of the 703 injectors, if so your welcome to them, if interested let me know and i'll take a look this weekend. I may have thrown away accidentally last fall when i cleaned out my shed but i can look.

Mark- Rubicon Trail
- Posts : 1300
Join date : 2011-12-10
Location : Haverhill, MA
 Re: The Oreo (T.J.'s YJ)
Mark wrote:I might have 4 of the 703 injectors, if so your welcome to them, if interested let me know and i'll take a look this weekend. I may have thrown away accidentally last fall when i cleaned out my shed but i can look.
That would be awesome Mark, I'd really appreciate it. I haven't done a ton of research but i thought the 703s were mostly put in the 4.0. Have you swapped them into an older 2.5 before? I know the electrical hookups (EV-1 vs. EV-6) changed at some point and I thought the 703s were the newer EV-6 style. All the info on injector swaps on forums online though is ridiculously confusing so your personal experience/knowledge would go a long way on this.
 Re: The Oreo (T.J.'s YJ)
I will look for them tomorrow but i'm kinda thinking they got tossed accidentally.
It's been a couple/few years since i've messed with injectors, porting, intake swapping, header experimenting and all that performance stuff so if im wrong on something here i apologize in advance as it's been a while.
As far as ev 1 verses ev 6 goes, you can get the injector wiring from a doner vehicle in scrap yard.
I got the short wiring loom off an xj that had ev 6 injector plugs and simply spliced the loom into my existing loom "IT'S COLOR CODED the SAME" and now i have 2 plugs for each injector.
I can and have used both styles.
I had only got as far as swapping in a 4.0 throttle body on the yj i had and sold it before i put injectors in it so no i haven't used them on a 2.5.

Mark- Rubicon Trail
- Posts : 1300
Join date : 2011-12-10
Location : Haverhill, MA
 Re: The Oreo (T.J.'s YJ)
TJ,
Don't know if this helps with anything 4 cylinder related as i havent logged in, i found it while searching for something else.
http://www.4bangerjp.com/forums/
Don't know if this helps with anything 4 cylinder related as i havent logged in, i found it while searching for something else.
http://www.4bangerjp.com/forums/

Mark- Rubicon Trail
- Posts : 1300
Join date : 2011-12-10
Location : Haverhill, MA
 Re: The Oreo (T.J.'s YJ)
TJ looks like you've done a lot of work since I've seen the YJ last, looks awesome man keep it up! Currently working on the Comanche again and getting ready for a 4.0 swap, if you need a hand some time let me know!

Rjcinelli- Class 6A
- Posts : 103
Join date : 2013-11-08
Age : 29
Location : Middleton, MA
 Re: The Oreo (T.J.'s YJ)
Well I pretty much failed in my goal of posting more here and not doing what I did last year, but stuff happens. Our plan is to (if all goes according to plan) have the SYE kit and possibly a new clutch installed at the end of August, which leaves only a few little things here and there before it's ready to hit the trails again. It passed inspection again in July so the little shitbox that could just keeps on chugging along. There hasn't been a ton of additions since I last posted in May, but we've done a few smaller things which include:
- Installing a deep cell, AGM Odyssey dual-post battery
- installing the matching driver's seat, so now both fronts are harness-ready Corbeaus
- Purchasing (finally) the correct length sway bar disconnect links (Skyjacker variety)
- Purchasing a Smittybilt 9500 pound X-series winch and winch plate
I've sort of buried the lede here though, as in true Jeeper fashion we decided to continue the "two-steps-forward, one-step-back" approach to this build and picked up a Dana 44 front axle this weekend. And she's a beaut:
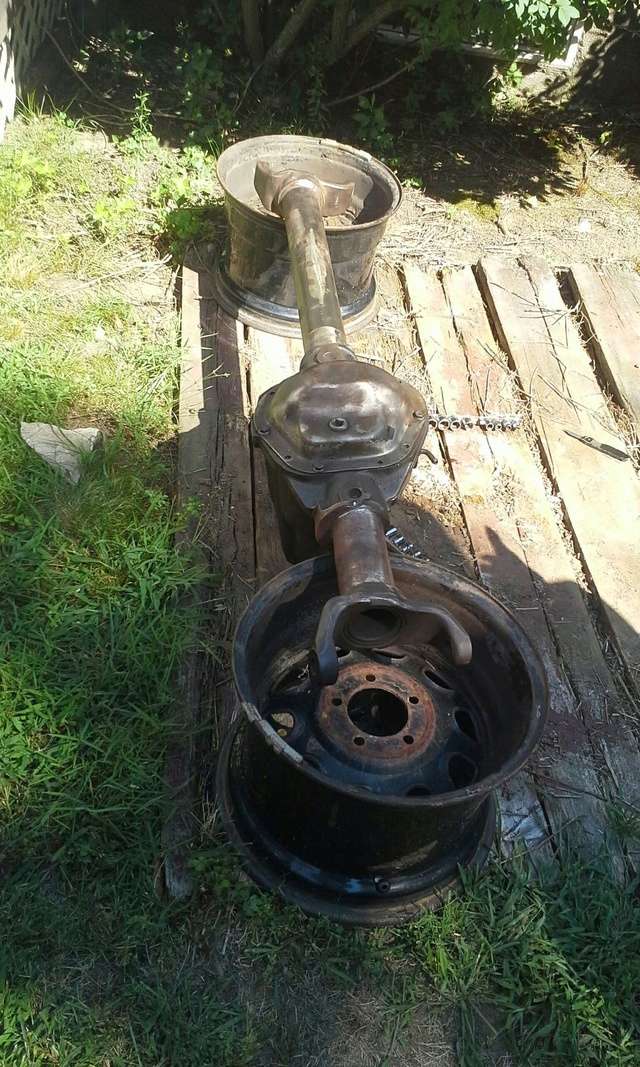
I found a fellow Jeeper in Connecticut selling two 44s: a low pinion from an '87 Waggy and a high pinion from a '78 Bronco. Even though it's a low pinion and some of you will bash me, I wanted the Waggy one because of its nearly identical WMS-to-WMS width to the factory Dana 30. Coincidentally I was in the seller's neck of the woods this past weekend visiting some friends and we came to an agreement on a good price so I couldn't pass it up. The best part of this purchase, however, is that it came with all of the knuckle, brake, hub, and spindle parts from the '78, including upgraded Warn locking hubs, all of which attaches right up to the Waggy Cs with no modifications needed. This is ideal because Dana 44s found in older Broncos and F-150s had Jeep-like steering configurations and most importantly 5 on 5.5" wheel bolt patterns (Waggys had 6 on 5.5") which is a pattern that our Ford 8.8 rear can be easily adapted to. The axle is already stripped of the old mounts and brackets (as the seller was going to truss it and use it on his TJ before his plans changed), which is a nice added bonus because they wouldn't have worked anyway.
The idea is to build the 44 over time with the best parts we can throw at it while we just bash the hell out of the 30 in the meantime. Aside from the added benefits of the rebuild-able locking hubs and generally stronger housing and tubes is also the ability to drop deeper gears in the 44. Because there's no plan to replace the mighty 2.5 engine and we'd eventually like to move to 35" tires, the plan is drop 5.13 gears in (and in the 8.8 of course) and bring the power back. We've never really done any sort of axle work of this magnitude, but we're looking forward to the challenge and will of course ask around when the time comes for assistance here and there.
- Installing a deep cell, AGM Odyssey dual-post battery
- installing the matching driver's seat, so now both fronts are harness-ready Corbeaus
- Purchasing (finally) the correct length sway bar disconnect links (Skyjacker variety)
- Purchasing a Smittybilt 9500 pound X-series winch and winch plate
I've sort of buried the lede here though, as in true Jeeper fashion we decided to continue the "two-steps-forward, one-step-back" approach to this build and picked up a Dana 44 front axle this weekend. And she's a beaut:

I found a fellow Jeeper in Connecticut selling two 44s: a low pinion from an '87 Waggy and a high pinion from a '78 Bronco. Even though it's a low pinion and some of you will bash me, I wanted the Waggy one because of its nearly identical WMS-to-WMS width to the factory Dana 30. Coincidentally I was in the seller's neck of the woods this past weekend visiting some friends and we came to an agreement on a good price so I couldn't pass it up. The best part of this purchase, however, is that it came with all of the knuckle, brake, hub, and spindle parts from the '78, including upgraded Warn locking hubs, all of which attaches right up to the Waggy Cs with no modifications needed. This is ideal because Dana 44s found in older Broncos and F-150s had Jeep-like steering configurations and most importantly 5 on 5.5" wheel bolt patterns (Waggys had 6 on 5.5") which is a pattern that our Ford 8.8 rear can be easily adapted to. The axle is already stripped of the old mounts and brackets (as the seller was going to truss it and use it on his TJ before his plans changed), which is a nice added bonus because they wouldn't have worked anyway.
The idea is to build the 44 over time with the best parts we can throw at it while we just bash the hell out of the 30 in the meantime. Aside from the added benefits of the rebuild-able locking hubs and generally stronger housing and tubes is also the ability to drop deeper gears in the 44. Because there's no plan to replace the mighty 2.5 engine and we'd eventually like to move to 35" tires, the plan is drop 5.13 gears in (and in the 8.8 of course) and bring the power back. We've never really done any sort of axle work of this magnitude, but we're looking forward to the challenge and will of course ask around when the time comes for assistance here and there.
 Re: The Oreo (T.J.'s YJ)
Keep up the good work Tj, it will all come together soon and then you'll be golden.

Mark- Rubicon Trail
- Posts : 1300
Join date : 2011-12-10
Location : Haverhill, MA
Page 11 of 11 •  1, 2, 3 ... 9, 10, 11
Page 11 of 11
Permissions in this forum:
You cannot reply to topics in this forum
 Home
Home