
 Portal
Axle build

Axle build
![]() CrawlingForward 3/27/2012, 6:36 pm
CrawlingForward 3/27/2012, 6:36 pm
We have the run on April 21, so the axle needs to be put in on the 14th, so that gives me 3 weeks, or basically 20 days, because my weekends are booked between then and now. I'm hoping I can make it. It's your job (the reader) to bug me until I do, ha ha.
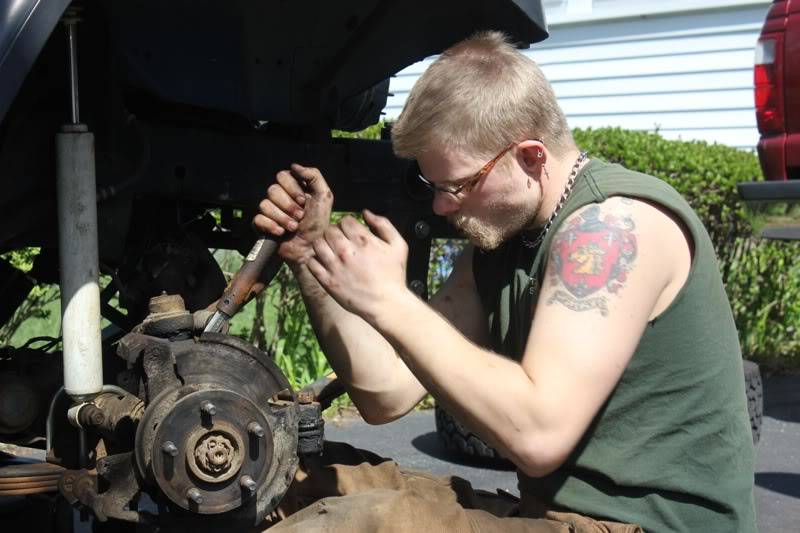
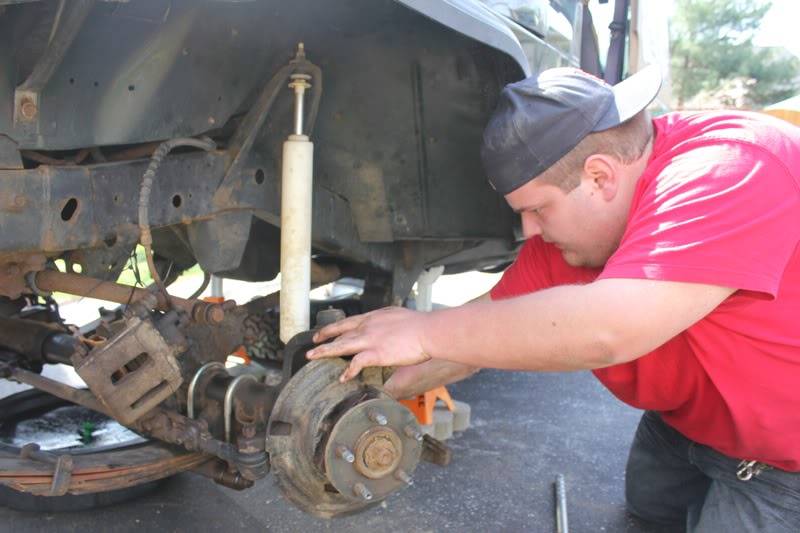
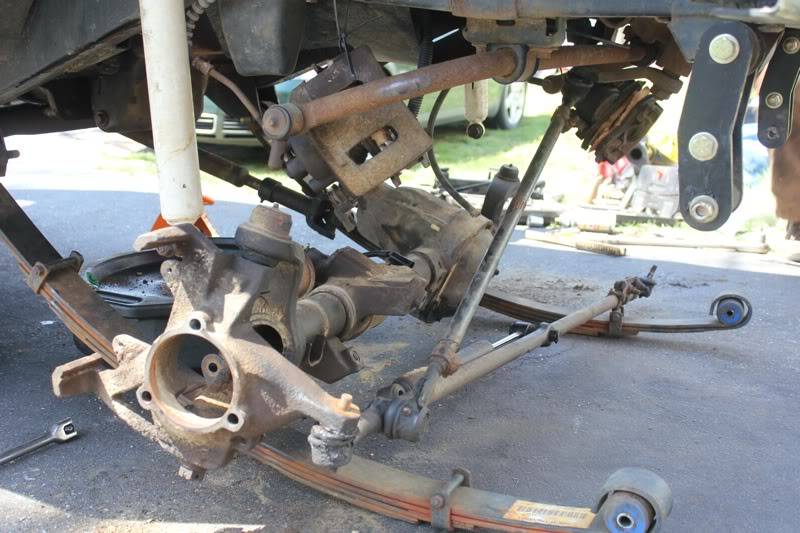
So this is where I've been for the last couple weeks:

In one cathartic, back-straining evening, I carried the axle with all the hardwear still attatched out into the front lawn and stripped it down to the bare axle, breaking my hi-lift jack in the process (it works for removing hubs, but evidently not removing knuckles, ha ha) And there it remained while the rear driveshaft/motorcycle fork/pinion angle/freelance work all decided they wanted to blow up all at the same time.
So last night I finally got a chance to get some work done on the axle. First thing I did was pulled the Central Axle Disconnect housing to clean it out, only to be confronted by this strange thing:

Nothing actually meshes into that, it's a bushing, I guess? The shaft directly sits and spins on it. I did some further reading and despite being completely confusing it *is*, in fact, supposed to be there. The only thing I can think of is why a bushing would be shaped like that is to allow the axleshaft to be supported but still allow fluid to flow past. Further more, it's the bushing for 90-95 YJs, narrowing down my donor axle year to 90-95.
This is what my passenger side axle seal looked like, btw. I think I figured out why it was leaking, ha ha.

And the inside of the tube....

Pulled out the seal

Cleaned everything up

Next came the knuckles

(About as dirty as my own knuckles)
Took out the steering stops (I'll need to put in new ones and adjust them once the axle is in)

And a few minutes later:

So now both knuckles are complete and the CAD is cleaned up with the seal out.
Next steps: remove old ball joints (I just ordered the new ball joints and u-bolts), grind down axle and diff cover, replace driver's side seal and clean tube in the process, then primer, paint, ball-joints.
BUG ME IF YOU DON'T SEE PROGRESS!!!!

Last edited by CrawlingForward on 6/25/2013, 6:30 pm; edited 2 times in total

CrawlingForward- Moab Dessert
- Posts : 822
Join date : 2011-12-09
Age : 39
Location : Flushing, MI -

Re: Axle build
![]() Ryan McKee 3/27/2012, 8:43 pm
Ryan McKee 3/27/2012, 8:43 pm
Bug......
Bug..........
Bug..............
Sorry about setting that ultimatum
Ryan McKee- Admin
- Posts : 1242
Join date : 2011-12-09
Location : Reading, MA -
CrawlingForward- Moab Dessert
- Posts : 822
Join date : 2011-12-09
Age : 39
Location : Flushing, MI -
Re: Axle build
![]() CrawlingForward 3/29/2012, 12:01 pm
CrawlingForward 3/29/2012, 12:01 pm
Pressed out the old ball-joints last night:

The trick is to do the uppers first, because you need to put the screw part of the clamp through the vacant ball-joint spot in order to do the lowers.

I have really bad spacial intelligence, so it took me a bit to get all the pieces in the right order, but once I figured it out, everything went smoothly. The first lower I did, I actually had it backwards (I was trying to push it out from the wrong side)
But I'm finally starting to learn the lesson that most of the time, if you have to use excessive force, you're probably doing it wrong (pitman arms excluded, of course). I rearranged the pieces and got everything out.
I actually made my life a little easier by using a socket to press it out after it had broken loose, that way it could be pressed all the way into the reciever.

And the only other progress of the night was to do a little bit more cleaning of the axle tubes. I found the *perfect* tool. Just a $4 toilet brush from Lowes. Fits like a glove with really stiff bristles. Rotate it as you pull it and there's just a shower of greasy little granules when you pull it out. Works *incredibly* well!

Last edited by CrawlingForward on 6/25/2013, 6:31 pm; edited 2 times in total
CrawlingForward- Moab Dessert
- Posts : 822
Join date : 2011-12-09
Age : 39
Location : Flushing, MI -
dana 30
![]() Mark 3/29/2012, 12:53 pm
Mark 3/29/2012, 12:53 pm
If you get some stock front axles from a non disconnect tj dana 30 you can get rid of disconnect.
Then you will have a one piece right axle, no more having to wait to engage front end.
you can then use outer axle tube seals (alloy usa) and not have to worry about getting debris in there that will wipe out inner seals.
You just have to manufacture a block off plate where vac disconnect goes, no big deal to do.
Depending on what size u joints you have now ( do'nt know)tj u joints are larger and stronger.
I am going to do this to my friends yj in a week or so .
You need inner and outer axles from tj or xj w/o disconnect .
Just a thought , while you are allready in there.
MARK

Mark- Rubicon Trail
- Posts : 1300
Join date : 2011-12-10
Location : Haverhill, MA
Re: Axle build
![]() CrawlingForward 3/29/2012, 1:06 pm
CrawlingForward 3/29/2012, 1:06 pm
Markmmaark wrote:Hey GEOFF
If you get some stock front axles from a non disconnect tj dana 30 you can get rid of disconnect.
Then you will have a one piece right axle, no more having to wait to engage front end.
you can then use outer axle tube seals (alloy usa) and not have to worry about getting debris in there that will wipe out inner seals.
You just have to manufacture a block off plate where vac disconnect goes, no big deal to do.
Depending on what size u joints you have now ( do'nt know)tj u joints are larger and stronger.
I am going to do this to my friends yj in a week or so .
You need inner and outer axles from tj or xj w/o disconnect .
Just a thought , while you are allready in there.
MARK
Hey Mark,
Yeah, I've been doing a bit of research on the single-shaft conversion and the outer-tube seals is probably the biggest reason why it's appealing to me.
Honestly, though, I've never had an issue with the CAD and I've already got the stronger '95 u-joints so I'm not worried about that part.
I definitely haven't rule it out for the future, and it's totally against my MO to not upgrade when you've got something already apart on the bench, but money's been kinda tight the past couple months and I just can't justify spending the extra time and money sourcing the parts when my current setup still works great.
If the new seals start leaking a few years down the road, though, I'll probably use that opportunity to upgrade.
CrawlingForward- Moab Dessert
- Posts : 822
Join date : 2011-12-09
Age : 39
Location : Flushing, MI -
Re: Axle build
![]() CrawlingForward 3/30/2012, 1:02 pm
CrawlingForward 3/30/2012, 1:02 pm
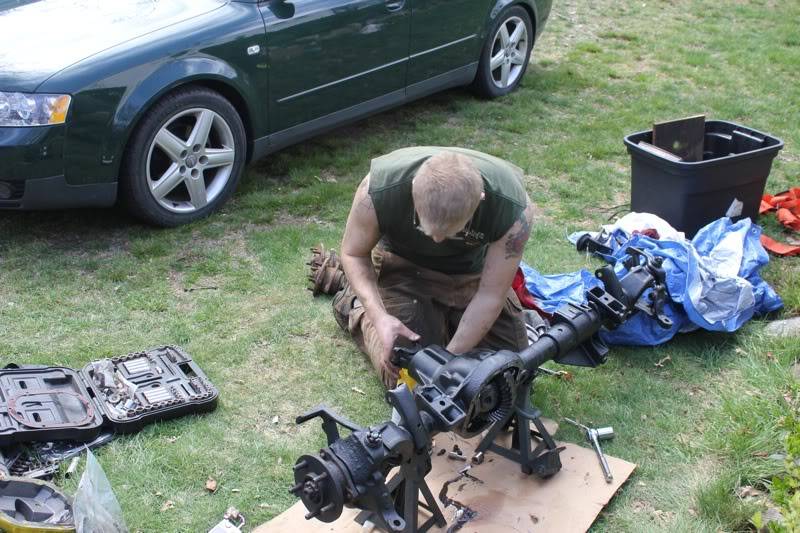
Very happy to find out at the D30, when fully stripped, easily fits on my workbench!

This allowed me an easy, uninterrupted, and artificially lit work session that actually got the whole thing wirewheeled in one night! (I wasn't at all expecting this, as the 8.8 took 2 or 3 evenings. Partially because it was slathered in copious amounts of flaking POR-15, and partially because it took me a chunk of time to get it set up, and large chunk of time to break my middle-of-the-basement setup down and vacuum and wipe the walls, ha ha)
There's still quite a bit that the wire wheel couldn't get to (inside perches, sharp corners, etc.) but for the most part, all the flaking stuff is off and I'll be putting on a layer of Rust Reformer before the primer anyhow.

After getting it wirewheeled, I decided it was time to remove the diff cover again and clean that up so I could put on the LubeLocker. While trying to scrape off the RTV, I kept getting stuck on the outside lip of the diff, as in, the edge was nicked and folded and not at all flat. The axle was *clearly* pretty well abused by it's previous owner and saw quite a few rocks.

As you can see, the edges of the diff have been almost smeared over...

So on the diff side, I remedied this with a quick passover of the edge with the grinder, just on the edge to make sure that something could sit flush on it.
When I got to the cover, though, there was quite a bit of damage/distortion to the lip in additional to a whole lot of pitting and rust inside of the actual cover. I've been trying to not spend money, but the condition of the cover was something I just wasn't completely comfortable with. So I did some research today and found a SOLID diff cover on sale on their site for $60, which is about as cheap as you can get. Even getting scalped with $20 shipping it's still cheaper than most.

It comes powedercoated, but I'm pretty sure I'm going to just scuff it up and then paint it to match the 8.8 cover. We'll see what time allows.
Also, I got a chance to check out the chipped tooth again. It's just the one and it was obviously old because the tooth was not in the cover when I got it. This isn't a ticking time-bomb or anything, right?

A bit of quick reading says that that kind of break, with a crystalline structure, is often the result of a shock load, which, considering it was previously locked and running 37s, is pretty easy to believe.
Next up should be a final cleaning/degreasing and then primer!
Last edited by CrawlingForward on 2/11/2013, 4:23 pm; edited 1 time in total
CrawlingForward- Moab Dessert
- Posts : 822
Join date : 2011-12-09
Age : 39
Location : Flushing, MI -
Re: Axle build
![]() CrawlingForward 3/30/2012, 1:32 pm
CrawlingForward 3/30/2012, 1:32 pm
Bought it along with the 8.8 already regeared to 4.88 with a "posi-locker".

Opened it up and...surprise! Aussie locker! Turns out it has a Posi-Lock *and* a locker and the kid just didn't know enough and thought they were the same. I'm still debating whether to install the Posi-Lock. I should just be able to remove my old CAD mechanism and plop it on the new axle. If I do decide I want to go with the Posi-Lock, it probably won't be in phase 1, though, since it's missing a few pieces that I still need to hunt down.

Broke my hi-lift during the stripping process. It worked great for removing hubs, but faltered at removing knuckles.

Examined the ball-joints and got this, ha ha:
(Hence why I'm changing out my ball-joints)
Last edited by CrawlingForward on 2/11/2013, 4:24 pm; edited 1 time in total
CrawlingForward- Moab Dessert
- Posts : 822
Join date : 2011-12-09
Age : 39
Location : Flushing, MI -
ball joints
![]() Mark 3/30/2012, 3:55 pm
Mark 3/30/2012, 3:55 pm
LOOKS LIKE YOU WERE GETTING A BIT IN TO IT hahaha
Mark- Rubicon Trail
- Posts : 1300
Join date : 2011-12-10
Location : Haverhill, MA
Re: Axle build
![]() CrawlingForward 4/3/2012, 12:04 pm
CrawlingForward 4/3/2012, 12:04 pm
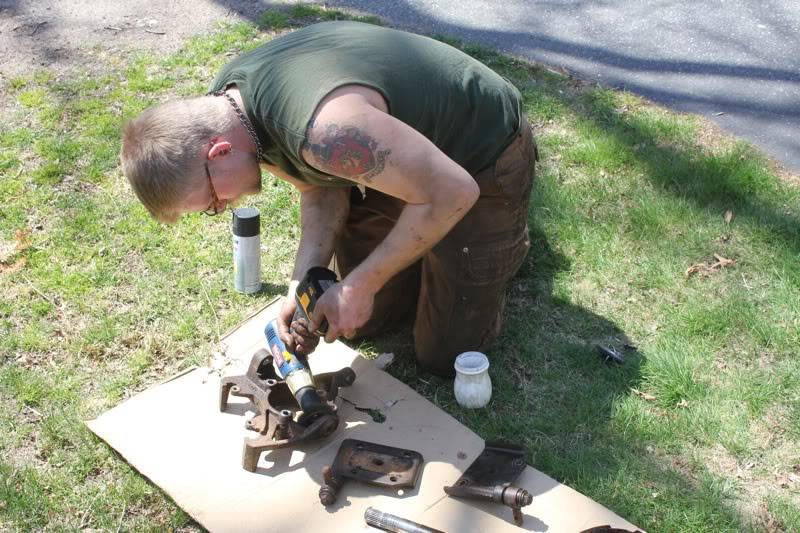
Wiped the axle down and cleaned it up

Then gave it a good first coat of Rustoleum's Rust Reformer. Stuff is awesome.

(Note the CAD housing isn't painted. That's because I'll probably just go with the stock one that's already hooked up and definitely working.)
Started prepping the knuckles for painting when I found this....

A closer look....

Crap. So that's what the kid meant when he said "the guy said it needs a new knuckle". He was kind of a N00B, so I figured he meant the seal was bleeding onto the knuckle.
Luckily, it's a straight swap, so I'll just grab one from my existing axle, quick Rust Reformer it, and then swap it over during the switch.
Balljoints just came in yesterday, but I'll wait until everything is painted to throw them in.
Next up: second layer of paint!
Last edited by CrawlingForward on 2/11/2013, 4:25 pm; edited 1 time in total
CrawlingForward- Moab Dessert
- Posts : 822
Join date : 2011-12-09
Age : 39
Location : Flushing, MI -
Mark- Rubicon Trail
- Posts : 1300
Join date : 2011-12-10
Location : Haverhill, MA
Re: Axle build
![]() CrawlingForward 4/9/2012, 3:00 pm
CrawlingForward 4/9/2012, 3:00 pm


(I did prime before the yellow, but I forgot to grab a picture)


The old seal next to the new seals (I haven't pulled the one next to the diff yet)

Painting is completely finished (except for perhaps the hardware and the steering components that will get hit with Rust Reformer the day of the swap). All that's left is to do the seals and the ball joints!
Last edited by CrawlingForward on 2/11/2013, 4:25 pm; edited 1 time in total
CrawlingForward- Moab Dessert
- Posts : 822
Join date : 2011-12-09
Age : 39
Location : Flushing, MI -
Re: Axle build
![]() CrawlingForward 4/11/2012, 10:39 am
CrawlingForward 4/11/2012, 10:39 am
Tried this:


Would not seat correctly because it would always seat at the same angle, so....
Pulled out this:

And popped them in with a long threaded rod and a 1 1/2" socket. I needed a 1 7/16", because it didn't fit the driver-side seal.
But it is now all seated and ready to rock!

Ball-joints tonight followed by paint touchups and I should be done until Saturday!
Btw, anyone want to help out on Saturday, pretty please?
Last edited by CrawlingForward on 2/11/2013, 4:26 pm; edited 1 time in total
CrawlingForward- Moab Dessert
- Posts : 822
Join date : 2011-12-09
Age : 39
Location : Flushing, MI -
Re: Axle build
![]() CrawlingForward 4/17/2012, 2:48 pm
CrawlingForward 4/17/2012, 2:48 pm
Got it up on jackstands without the stupidly dangerous hi-lift situation we ran into last time, ha ha.

The hub bolts were ridiculously tight and required a 3 foot breaker bar to make get them started and then a pipe over the ratchet to continue, but we got them all out.
Wayne places the socket extension for the popping-the-hub trick.
Our first major snag: 3 of the 4 bolts on the CAD shear off with the slightest bit of effort. Luckily, the cover isn't threaded and I had the bolts from the donor axle. So we just pried off the cover and used a vice-grip to remove the bolts (and sliced my finger prettily on the gasket, which it turns out, is not just cork, but cork on top of sharp metal). I just RTV'd it back on, not with a gasket, so we'll see how well it holds.

Banged on the knuckle for a bit, but it needed a bit of help before it popped out.
Once stripped and the donor parts removed, we dropped the springs for removal. It was pretty well fused to the locating pins and leaf, but a bit of banging and prying got it loose.
Next we cleaned up the donor parts and gave them a coating of Rustoleum Rust Reformer.

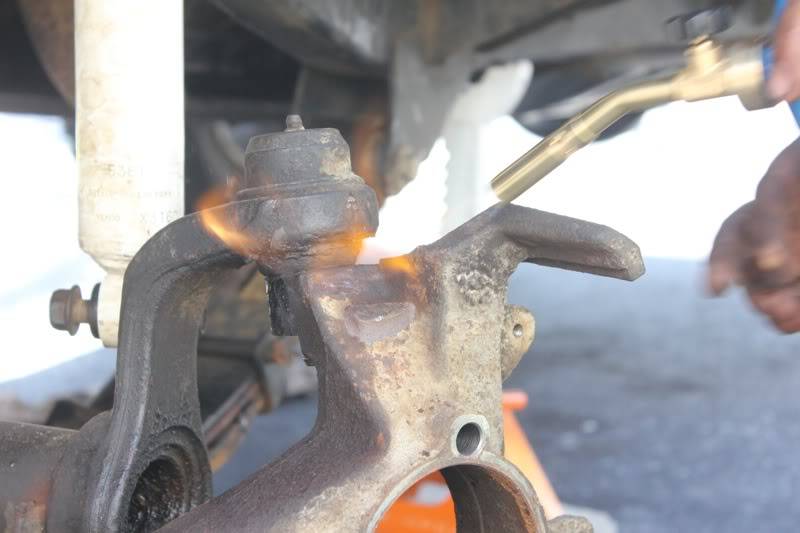
We got the tie-rod removed with a couple quick taps of the hammer, but the steering stabilizer would not budge (I replaced it because the old one was leaking) even with heat, prying, and blunt force.
Luckily (or unluckily), tapping out the tie-rod broke the spot welds on both ends of the tie-rod, rendering the TREs kaput. So I ended up reluctantly purchasing a whole new tie-rod, which negated the whole steering-stabilizer issue.

Prepping the new axle with the donor knuckle and cleaned up original axle-shafts
Axle back in and buttoned up.
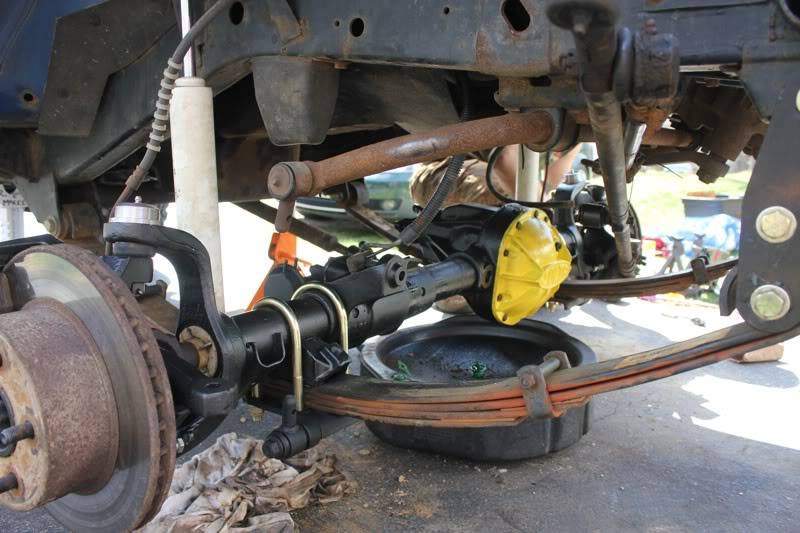
All back together with the new tie-rod.

So there you have it, the axle build/swap is "done". Still left to do before the run this weekend (I'm still riding the motorcycle this week)
- One of the grease zerk had messed up threads, so I need to re-tap the TRE and install
- Finish filling diff (I ran out of fluid about halfway-through)
- Adjust Steering Stops
- Properly torque various bolts (Ryan doesn't believe in torque, ha ha)
- And get a proper alignment
Thank you again *so* much Wayne & Ryan for all your help. Ryan, I have no idea how you went from my axle swap, to working for a day straight, then straight to helping Jarret. You're a beast. And as always, thank you for documenting with photos!
CrawlingForward- Moab Dessert
- Posts : 822
Join date : 2011-12-09
Age : 39
Location : Flushing, MI -
Re: Axle build
![]() CrawlingForward 4/24/2012, 10:43 am
CrawlingForward 4/24/2012, 10:43 am
So Saturday morning Dianna and I got up early and got the dogs ready and piled into the YJ to head off for the first wheeling of the season and because the YJ has been having vibrations above 55ish, we had to take back-roads, so we left a bit earlier. As we were going along, I realized I was now getting vibrations above 40mph, which I chocked up to being the new front locker spinning the axle.
Then I realized that...wait. I had been driving 60+mph on the highway with that same driveshaft with no vibes, so why was I getting vibes at 40? Maybe the gear change making it spin fast was doing it. Mental note to balance it when I get back.
But then I started hearing the locker clicking in the front at various speeds....while going straight. That's not supposed to happen. ****.
So I pull over to investigate, and it's a damn good thing I did because while I'm under there I notice this:

Sh*tsh*tsh*t. That is diff fluid not dripping, but *pouring* out of the passenger side. Looks like I'm not wheeling today.
So I start doing some reading while waiting for the tow truck and as it turns out, I'm an idiot.
The new diff cover has a higher fill plug and I just filled it until it reached the plug, thinking it was a higher volume cover. Evidently you're not supposed to do that and overfilling can blow out axle seals. Even brand new ones in just-rebuild axles. :brickwall
But wait...(about 10 lbs? :fistlaugh:)
The locker was clicking...does that mean that I burnt up bearings and something's sticking? Shouldn't be if it's still got enough fluid to be pouring out.
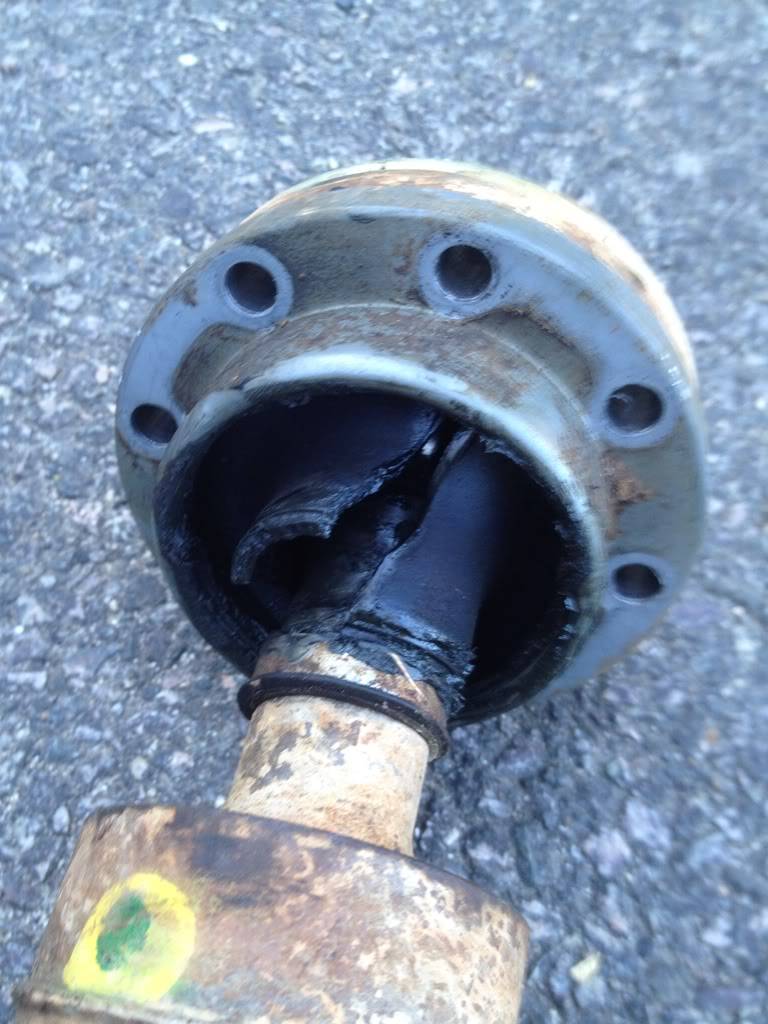
So I pulled the front driveshaft (which I've done a few times already this spring), but this time I had to really work to pop it off the t-case side and when I did, both caps popped off the u-joint (and one even stayed stuck in the yoke).
Located both caps and this is what I found:

Doesn't look spectacularly bad, but there's definitely almost no grease left on the one cap. I'm pretty sure it's the original u-joints on that shaft. I'm wondering if that might have been enough to make it bind and therefore make the locker click.

It doesn't look like it burnt it up badly or anything, so I'm not sure if that was, in fact, the issue. In any case, I've got the longer driveshaft from the donor AX-15 (the 6 cyl version is longer), and I'm now in the process of rebuilding it, probably using the axle-side yoke from my original. I'll have more pictures and progress of that later.
I didn't end up doing anything to it this weekend because I just needed to walk away for a bit and I wanted to actually spend some time with my wife instead of just being under the Jeep for (another) whole weekend.
I did, however, get a chance to drop the cover just to make sure that it was just the shaft and the diff and gears were ok.

Fluid looked good, everything moved smoothly and properly, so it looks like just a $10 mistake for the seal and 2 new u-joints for the front driveshaft that I was planning on rebuilding anyhow. There are worse things.
Last edited by CrawlingForward on 2/11/2013, 4:28 pm; edited 1 time in total
CrawlingForward- Moab Dessert
- Posts : 822
Join date : 2011-12-09
Age : 39
Location : Flushing, MI -
Re: Axle build
![]() CrawlingForward 4/24/2012, 10:46 am
CrawlingForward 4/24/2012, 10:46 am
Took my old 4 cyl driveshaft apart to combine with the donor AX-15s 6 cyl driveshaft (I did an AX-15 conversion a while back, but the 6 cyl is a few inches longer)

Hammered out the old u-joints, pulled off the axle yokes, brake cleaner and wiped the crap out of it, saran wrapped the splines, wirewheeled the rust off and emery clothed the yoke cap holes, and wiped it all down with denatured alcohol and got this much prettier thing!

Then I hit that with a couple coats of Rust Reformer tapped in the new u-joints (every driveshaft specialist and mechanic I've talked to advises against using the press and recommends just a hammer and couple of sockets. Surprisingly, it worked great and even drove out all 4 OEM New England u-joints!)
These were my first ever u-joints and I had to redo one that I drove in the cap too far the first time and it was too tight to move. The secret seems to be to *almost* seat the first cap, then flip and *almost* seat the second cap, then just alternately lightly tap in each side until the point where you can insert snap rings. Result: extremely smooth motion u-joints!
And the finished prettiness!

Hopefully taking it to Montrose on my lunch break to get it balanced.
Last edited by CrawlingForward on 2/11/2013, 4:29 pm; edited 1 time in total
CrawlingForward- Moab Dessert
- Posts : 822
Join date : 2011-12-09
Age : 39
Location : Flushing, MI -
Re: Axle build
![]() ArticRubi 5/1/2012, 1:59 pm
ArticRubi 5/1/2012, 1:59 pm
ArticRubi- Mall Crawler
- Posts : 64
Join date : 2011-12-12
Location : Somerville
Re: Axle build
![]() CrawlingForward 5/1/2012, 2:15 pm
CrawlingForward 5/1/2012, 2:15 pm
ArticRubi wrote:Is there not a breather on the D30? If there is, is it blocked up possibly? Usually in an overfill situation it'll just spit the excess out of the breather rather than blow an axle seal
There is, and I was surprised that there wasn't any overflow or mess around the tube. I pulled it off and checked the tube and it was perfectly clear. Could blow through it just fine. The hole was clear and everything was good.
.....that's how badly I overfilled it, ha ha. It just immediately blew out the seal.
I also have some play in my intermediate axleshaft bushing, which can cause the axle seal to fail, especially under the excessive overfill it was up against.
I have slight play in my D30 pinion yoke, which means I will likely have to replace my pinion bearings soon enough. When that time comes I'll replace the bushing and seals as well. If the seal fails before then....eh, I'll probably just let it leak.
CrawlingForward- Moab Dessert
- Posts : 822
Join date : 2011-12-09
Age : 39
Location : Flushing, MI -
Re: Axle build
![]() ArticRubi 5/1/2012, 2:25 pm
ArticRubi 5/1/2012, 2:25 pm
CrawlingForward wrote:
There is, and I was surprised that there wasn't any overflow or mess around the tube. I pulled it off and checked the tube and it was perfectly clear. Could blow through it just fine. The hole was clear and everything was good.
.....that's how badly I overfilled it, ha ha. It just immediately blew out the seal.
I also have some play in my intermediate axleshaft bushing, which can cause the axle seal to fail, especially under the excessive overfill it was up against.
I have slight play in my D30 pinion yoke, which means I will likely have to replace my pinion bearings soon enough. When that time comes I'll replace the bushing and seals as well. If the seal fails before then....eh, I'll probably just let it leak.
Ouch! That was a highly overfilled axle! Still very surprising there was nothing coming out of the breather. Ouch! It sounds like a master overhaul kit might be in your future. I picked up two for my D44's through Superior for $240 each I think. A bit more expensive that doing portions, but at least then you're not chasing shimmies and leaks.
Oh, BTW, very nice write up, you really know what you're doing there!
ArticRubi- Mall Crawler
- Posts : 64
Join date : 2011-12-12
Location : Somerville
Re: Axle build
![]() CrawlingForward 5/1/2012, 2:49 pm
CrawlingForward 5/1/2012, 2:49 pm
ArticRubi wrote:Ouch! That was a highly overfilled axle! Still very surprising there was nothing coming out of the breather. Ouch! It sounds like a master overhaul kit might be in your future. I picked up two for my D44's through Superior for $240 each I think. A bit more expensive that doing portions, but at least then you're not chasing shimmies and leaks.
Oh, BTW, very nice write up, you really know what you're doing there!
Ha ha, yeah. Do you see how high the fill plug is on the SOLID cover? I filled it until it flowed out the fill plug.

So I'm quickly learning what I'm doing, but I definitely still make the occasional rookie mistake.
A lot of it would have been nice to know beforehand, while I had things on the bench, but at least it makes me learn. Hopefully within the next year or so we'll get a house with a garage and the ability to get another vehicle, so the YJ can stop being a DD and I can do these projects without worry.
CrawlingForward- Moab Dessert
- Posts : 822
Join date : 2011-12-09
Age : 39
Location : Flushing, MI -
Re: Axle build
![]() ArticRubi 5/1/2012, 3:10 pm
ArticRubi 5/1/2012, 3:10 pm
Speaking of which, I'll be on jack stands next weekend:
Reid knuckles (raise tie rod above axle center line, improved drag link flip geometry)
Synergy ball joints (stock JK's are CRAP, mine are about shot with only 10k on lift and larger tires)
RCV's (super pumped about these, supposed to be BUTTER smooth even approaching full lock)
Also have a couple of 1310 driveshafts to put in, my front shaft took a dump after the last wheeling trip. JK's use a CV joint at the transfer case side of the front driveshaft (and for both on the rear) and the front doesn't deal well with the added angle caused by a lift.
ArticRubi- Mall Crawler
- Posts : 64
Join date : 2011-12-12
Location : Somerville
Re: Axle build
![]() CrawlingForward 5/1/2012, 3:14 pm
CrawlingForward 5/1/2012, 3:14 pm
Let us know if you'd like any extra hands to help out! It'd be nice to work on a rig where I wasn't paying for the parts for once, ha ha.
CrawlingForward- Moab Dessert
- Posts : 822
Join date : 2011-12-09
Age : 39
Location : Flushing, MI -
Re: Axle build
![]() ArticRubi 5/1/2012, 3:25 pm
ArticRubi 5/1/2012, 3:25 pm
ArticRubi- Mall Crawler
- Posts : 64
Join date : 2011-12-12
Location : Somerville
Follow-up
![]() CrawlingForward 2/11/2013, 4:31 pm
CrawlingForward 2/11/2013, 4:31 pm
Ended up being loose lugnuts on the driver rear tire, clicking as the tire shifted. (aka BAD)
Luckily caught it in time before I died on the highway and all is well with the tire and the axle.
CrawlingForward- Moab Dessert
- Posts : 822
Join date : 2011-12-09
Age : 39
Location : Flushing, MI -
Re: Axle build
![]() Mark 2/11/2013, 6:02 pm
Mark 2/11/2013, 6:02 pm
Didn't you notice the squirrels following you around trying to get your nuts!!
Mark- Rubicon Trail
- Posts : 1300
Join date : 2011-12-10
Location : Haverhill, MA