Jake's 99 XJ continuing build
+9
THOOPY3
dongalonga
desertzj
RidingOnLeafs
Tonellin
saxmanclay
Andrew Miller
CrawlingForward
Mark
13 posters
Page 6 of 7
Page 6 of 7 •  1, 2, 3, 4, 5, 6, 7
 Re: Jake's 99 XJ continuing build
Yeah, I was inclined towards just running them as is, but I never heard back from ecgs and ended up ordering some new spiders via amazon prime. They do spin full time, even if not under load so eh. Whatever, 100% new front dif.
Hopefully be done getting the gears done tomorrow.
Hopefully be done getting the gears done tomorrow.
Jake- Rausch Creek
- Posts : 323
Join date : 2013-05-19
Location : Beverly
 Re: Jake's 99 XJ continuing build
Surprise surprise didn't get stuff done when I was planning. Gear pattern came out well on the first try though which was fantastic. Unfortunately because of damage to the one of the old carrier bearings it was a little shorter than it should have been, need to confirm that the shim stacks will be right when I press the real carrier bearings on.

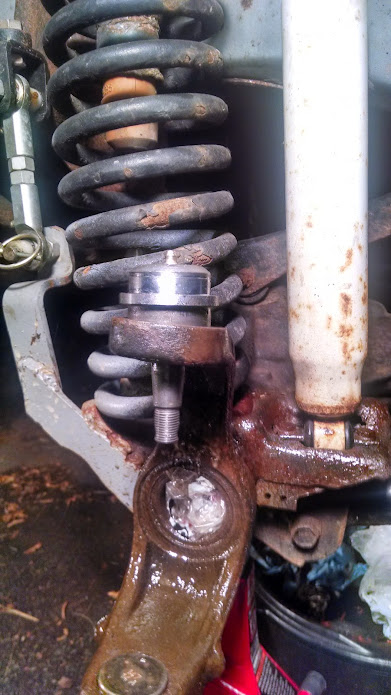
While waiting for some tools to be available I got started on the ball joints/new knuckles. Let me say that the autozone rental is missing way too many adapters to be worth using.. I was able to get the old balljoints out and almost all of the new ones in.. but it required a custom spacer setup for almost all of them.
This happened on the last one and I didn't notice until after cranking on it, not sure how to get it out without damaging it. I was using the washer shim method of compensating for the angle.
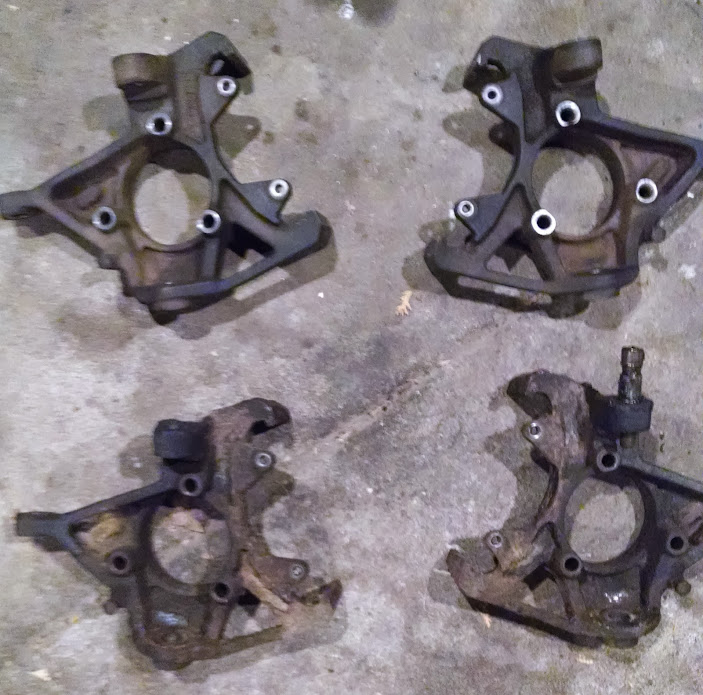
New knuckles came though and they're practically new! Turns out that the mega rust on my old ones was mostly external buildup though, oh well, new ones are nice and clean at least.

Can't see much on this comparison picture unfortunately.

While waiting for some tools to be available I got started on the ball joints/new knuckles. Let me say that the autozone rental is missing way too many adapters to be worth using.. I was able to get the old balljoints out and almost all of the new ones in.. but it required a custom spacer setup for almost all of them.
This happened on the last one and I didn't notice until after cranking on it, not sure how to get it out without damaging it. I was using the washer shim method of compensating for the angle.

New knuckles came though and they're practically new! Turns out that the mega rust on my old ones was mostly external buildup though, oh well, new ones are nice and clean at least.

Can't see much on this comparison picture unfortunately.

Jake- Rausch Creek
- Posts : 323
Join date : 2013-05-19
Location : Beverly
 Re: Jake's 99 XJ continuing build
It's going back together nicely. Are you not able to press out the ball joint and try again?
dongalonga- Rubicon Trail
- Posts : 1047
Join date : 2012-03-20
Age : 40
Location : Lowell, MA
 Re: Jake's 99 XJ continuing build
It should be possible but the press I have didn't come with a decent selection of adapters. When I removed the old ones I didn't care about screwing them up, I haven't figured out how I'm going to get this one back out without damaging it.. that's tonight's project I guess.

Jake- Rausch Creek
- Posts : 323
Join date : 2013-05-19
Location : Beverly
 Re: Jake's 99 XJ continuing build
I would first try working a large pry bar on the low side to pop it up. If that did work I'd try hitting it with a dead blow hammer on the side while prying up with the bar.

Posimoto- Mall Crawler
- Posts : 55
Join date : 2014-09-28
 Re: Jake's 99 XJ continuing build
Thanks for the suggestions, I ended up getting it with the press and big deep socket (but not after whacking it with the mini sledge =/). Tuns out the dust cover just pops off and there's a good surface to press on underneath.
Now.. this was my pattern when I was using setup bearings:
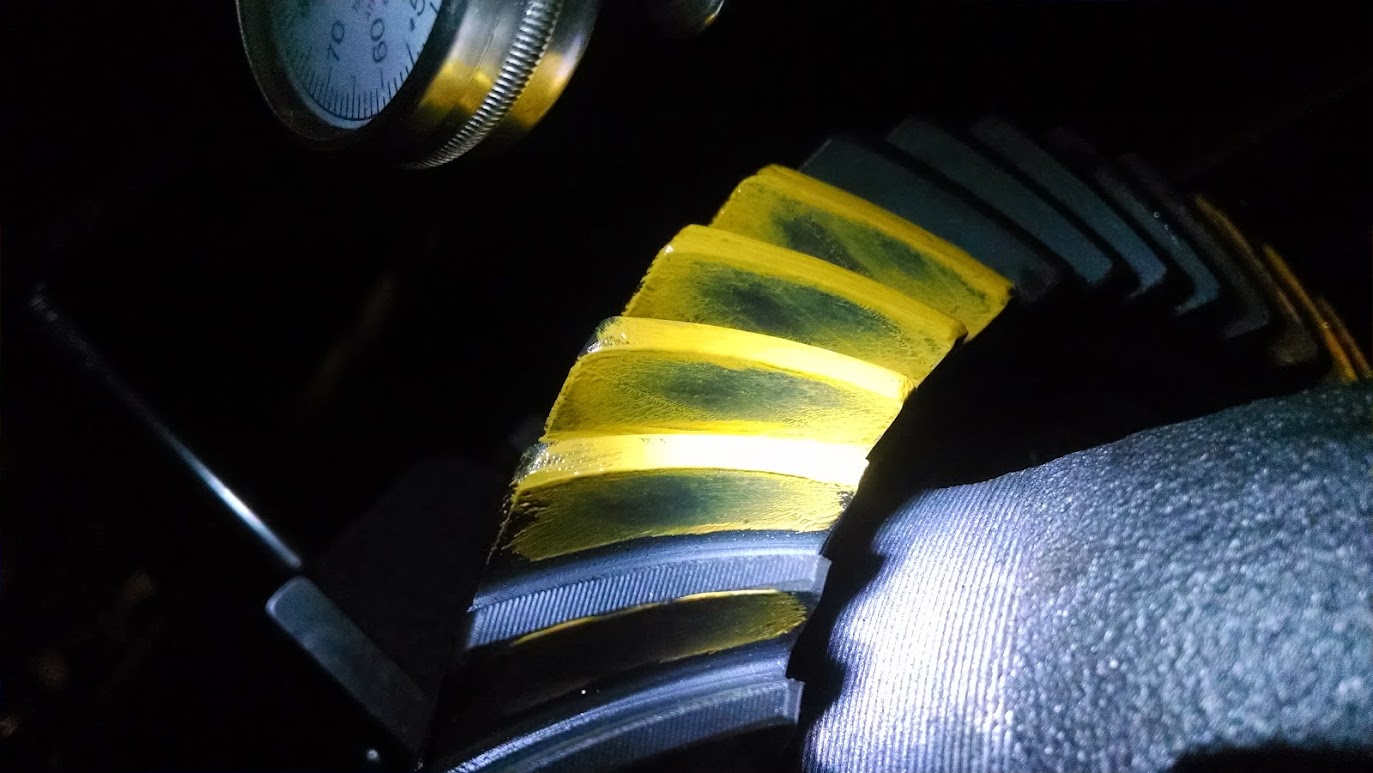
With the real bearings and races pressed in I ended up with .0035" of ring gear runout on the diameter (can't find an allowable spec for this). Backlash measures .005-.007 (measured in like 10 different locations..) which is just barely in spec (.002 difference allowable, .005-.008 backlash desired). However my pattern went to this:
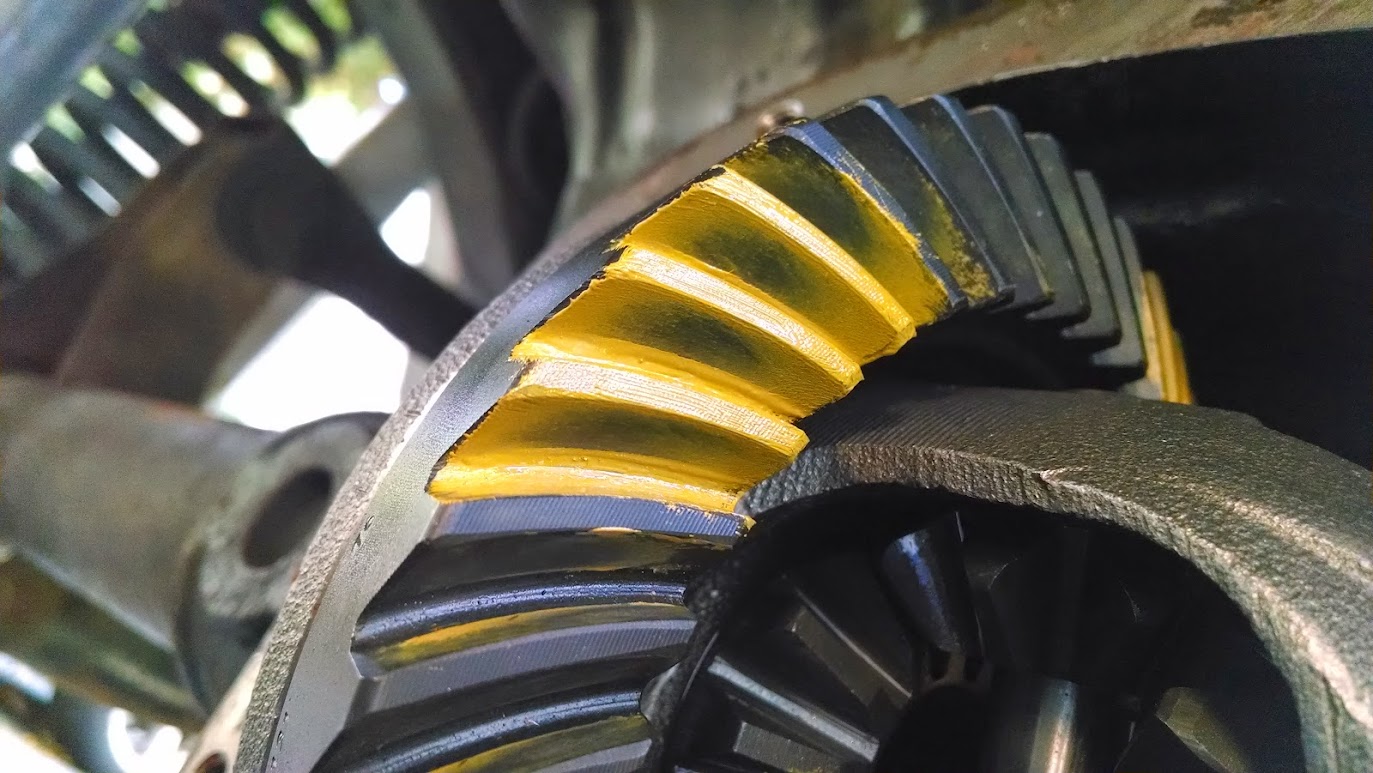


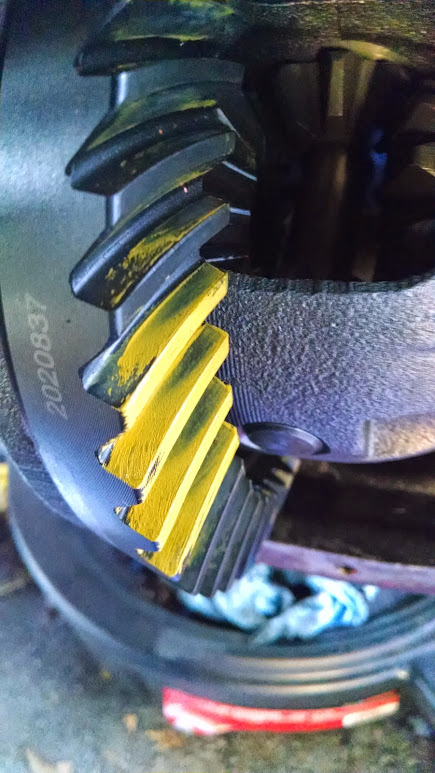
Looks like I need to back the pinion off a hair, but its close, some spots look more passable than others. Only problem is I don't think I can get the inner pinion race out without mangling the baffle.. which I would need to order a replacement for.
Anyone have experience with gear setup/thoughts?
Now.. this was my pattern when I was using setup bearings:
With the real bearings and races pressed in I ended up with .0035" of ring gear runout on the diameter (can't find an allowable spec for this). Backlash measures .005-.007 (measured in like 10 different locations..) which is just barely in spec (.002 difference allowable, .005-.008 backlash desired). However my pattern went to this:


Looks like I need to back the pinion off a hair, but its close, some spots look more passable than others. Only problem is I don't think I can get the inner pinion race out without mangling the baffle.. which I would need to order a replacement for.
Anyone have experience with gear setup/thoughts?

Jake- Rausch Creek
- Posts : 323
Join date : 2013-05-19
Location : Beverly
 Re: Jake's 99 XJ continuing build
Also.. my advice to anyone doing gears would be to get proper setup bearings (or make them from new bearings) if the ones you have are worn at all. Too much variation makes it really hard to set up properly.
I measured the bad bearing that I posted a while ago on the surface plate at work and it came in .007" thinner than a new bearing. I compensated for it by removing shims when I pressed the real bearings on. But my pattern got thrown and I don't have a bearing puller. May need to buy one if I can't get stuff set up right.
I measured the bad bearing that I posted a while ago on the surface plate at work and it came in .007" thinner than a new bearing. I compensated for it by removing shims when I pressed the real bearings on. But my pattern got thrown and I don't have a bearing puller. May need to buy one if I can't get stuff set up right.

Jake- Rausch Creek
- Posts : 323
Join date : 2013-05-19
Location : Beverly
 Re: Jake's 99 XJ continuing build
You have heel contact on the drive pattern. This tells me you need to move the ring gear closer to the pinion by adding shims to the ring gear side and removing that same amount from the non-ring gear side, therefore decreasing backlash. I've used 4-9 thousands for a guide, if your not over 2 thou in at least of two spots your good.
Always use new bearings saved down for setup. Easiest way is to have a machine shop take then down.
Always use new bearings saved down for setup. Easiest way is to have a machine shop take then down.

Posimoto- Mall Crawler
- Posts : 55
Join date : 2014-09-28
 Re: Jake's 99 XJ continuing build
Thanks! Correct me if i'm wrong, but I think that's actually toe contact which means I want more backlash? I'm thinking the new inner pinion race pushed the pinion in--if I remove 3-5 thou from the pinion spacer stack I should get a little more backlash and pull the pattern out a bit?

Jake- Rausch Creek
- Posts : 323
Join date : 2013-05-19
Location : Beverly
 Re: Jake's 99 XJ continuing build
That's correct too much toe. That's the results of working in the shop and playing on the computer at the same time. Because your backlash is within specs I'd agree the pinion is too close, decrease the pinion shims thickness, 5 thou is a good bet. It will take a few times to fine tune the pattern.

Posimoto- Mall Crawler
- Posts : 55
Join date : 2014-09-28
 Re: Jake's 99 XJ continuing build
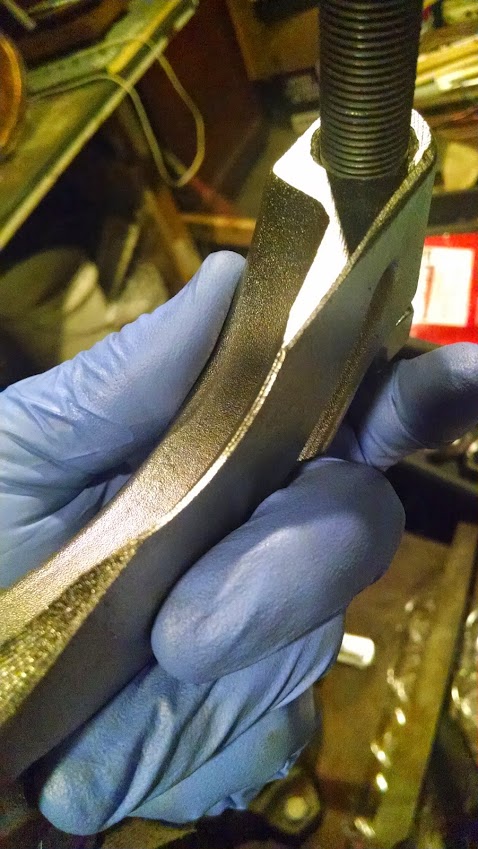
Buttoned it up last night, this was the final pattern I went with:


Not perfect, but a friend of a friend who's a certified tech/does a lot of gears said it looked good to him so I said eh and called it there. Increased backlash from min spec to max spec and pulled the pinion away a tad. Pattern does look better than before, drive side is more centered, though not perfect perhaps.

Picked up a cheap indicator/base on amazon, broke the base second day using it. Luckily for me my friend had forgotten his Starrett base in my garage, which as a given, is much easier to get good readings with. Don't skimp on your mag base, I hadn't used a shitty one before, but it makes a big difference. That said the indicator itself was totally fine, I checked it out using a gauge block/surface plate at work and it was within half a thou over 1" of travel.
Also, maybe I was just spoiled by the Snap-on bearing seperator that I borrowed at the start of this project, but the OTC 'made in america' splitter I got to finish things up was not nearly as nice. I had to sharpen it with an angle grinder to get it to clamp behind one of the carrier bearings. Pretty lame.. Oh yeah, and it turned out to be 'made in america from globally sourced parts.' I can't imagine what they did in the US other than stick the parts in a cardboard box, as it came completely disassembled. /rant
Not even close to sharp enough..
That all said, it was fantastic being able to drive to work today! Still have to swap the front shocks out for the Bilsteins, but I call it temporarily done once those go in.


Not perfect, but a friend of a friend who's a certified tech/does a lot of gears said it looked good to him so I said eh and called it there. Increased backlash from min spec to max spec and pulled the pinion away a tad. Pattern does look better than before, drive side is more centered, though not perfect perhaps.

Picked up a cheap indicator/base on amazon, broke the base second day using it. Luckily for me my friend had forgotten his Starrett base in my garage, which as a given, is much easier to get good readings with. Don't skimp on your mag base, I hadn't used a shitty one before, but it makes a big difference. That said the indicator itself was totally fine, I checked it out using a gauge block/surface plate at work and it was within half a thou over 1" of travel.
Also, maybe I was just spoiled by the Snap-on bearing seperator that I borrowed at the start of this project, but the OTC 'made in america' splitter I got to finish things up was not nearly as nice. I had to sharpen it with an angle grinder to get it to clamp behind one of the carrier bearings. Pretty lame.. Oh yeah, and it turned out to be 'made in america from globally sourced parts.' I can't imagine what they did in the US other than stick the parts in a cardboard box, as it came completely disassembled. /rant
Not even close to sharp enough..

That all said, it was fantastic being able to drive to work today! Still have to swap the front shocks out for the Bilsteins, but I call it temporarily done once those go in.

Jake- Rausch Creek
- Posts : 323
Join date : 2013-05-19
Location : Beverly
 Re: Jake's 99 XJ continuing build
Good to see it is back on the road 

dongalonga- Rubicon Trail
- Posts : 1047
Join date : 2012-03-20
Age : 40
Location : Lowell, MA
 Re: Jake's 99 XJ continuing build
A little update, finished installed the Bilstein 5100's all around. Definitely takes the edge off spine shattering bumps, but ride is still pretty bad with the short arm lift. They're also a bit too soft for my liking tbh. Small bump sensitivity is not good enough to justify how they're damped.
Also, drove 500 miles this past weekend and when I got back my water pump was on the way out, terrible bearing noise. I'm paying to have that done right now as I don't time to deal with it. I'm driving to Utah in a couple weeks though so I'm really glad the water pump came up now and not halfway across the country.
Also, drove 500 miles this past weekend and when I got back my water pump was on the way out, terrible bearing noise. I'm paying to have that done right now as I don't time to deal with it. I'm driving to Utah in a couple weeks though so I'm really glad the water pump came up now and not halfway across the country.

Jake- Rausch Creek
- Posts : 323
Join date : 2013-05-19
Location : Beverly
 Re: Jake's 99 XJ continuing build
Been living in Alta, Utah for the since the beginning of December so the Jeep hasn't seen too much love, however I'm looking forward to some Moab trips a bit later in the season. Starting to get my rear bump stops sorted out. I also need to decide on a tcase skid-it pains me to buy one when its such a simple part, but without access to a shop there's not much I can do.
Plugged a hole in the side of 242 yesterday right next to the shift lever, apparently should be a rubber plug in there, glad to have an easy fix to that leaking fluid though.
Exhaust is falling apart nicely, one of my hangers broke off and an exhaust clamp gave up hold, gotta get that stuff welded, again annoying not to have the tools to do it myself.

Jake- Rausch Creek
- Posts : 323
Join date : 2013-05-19
Location : Beverly
 Re: Jake's 99 XJ continuing build
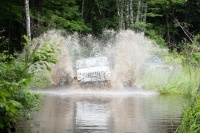
Hi Jake, how's it going way over there ?
I thought Geoff was the only long distance member.
I thought Geoff was the only long distance member.
Mark- Rubicon Trail
- Posts : 1300
Join date : 2011-12-10
Location : Haverhill, MA
 Re: Jake's 99 XJ continuing build
Ironically not enough snow.. Came for the skiing and its currently the worst year on record for Alta.
I'l be back in Mass eventually... Currently planning to spend a month+ in southern Utah after the ski season ends wheeling and mountain biking, looking forward to it.
I'l be back in Mass eventually... Currently planning to spend a month+ in southern Utah after the ski season ends wheeling and mountain biking, looking forward to it.

Jake- Rausch Creek
- Posts : 323
Join date : 2013-05-19
Location : Beverly
 Re: Jake's 99 XJ continuing build
Picked up a factory gas tank skid for $50, got that mostly installed tonight (didn't have a drill where I was working to add another hole to the skid mount to get the hitch bolts through). I'm told the factory skid holds up quite well. Guy I picked it up from had a sweet garage setup and ended up welding my exhaust back up for free, pretty sweet.

Also picked up what looks like rusty's tcase skid however my test fit had it hanging 3-4" lower than necessary which is pretty lame. That bend they have to give the tcase extra clearance is completely unnecessary.. probably end up cutting it up and welding it back together to add clearance. I'm trying to thing of a ghetto rig I could use to bend the long angled section flat, 3/16" ain't no joke though.
The 242 is supposed to hang lower than the 231 which necessitates different tcase skids, for whatever reason though my 242 is tucked completely above the crossmember. Kinda confusing as it seems like I would have no issue running a 231 skid, wish I had known that as they're way easier to find.

Also picked up what looks like rusty's tcase skid
 however my test fit had it hanging 3-4" lower than necessary which is pretty lame. That bend they have to give the tcase extra clearance is completely unnecessary.. probably end up cutting it up and welding it back together to add clearance. I'm trying to thing of a ghetto rig I could use to bend the long angled section flat, 3/16" ain't no joke though.
The 242 is supposed to hang lower than the 231 which necessitates different tcase skids, for whatever reason though my 242 is tucked completely above the crossmember. Kinda confusing as it seems like I would have no issue running a 231 skid, wish I had known that as they're way easier to find.

Jake- Rausch Creek
- Posts : 323
Join date : 2013-05-19
Location : Beverly
 Re: Jake's 99 XJ continuing build
So the 242 skid I got hung way too low. Was going to chop it up and make it flat, but I ended up finding another rustys 231 skid for $50 so I picked that up and threw it on. Anyone need a 242 xj tcase skid?
242 skid:
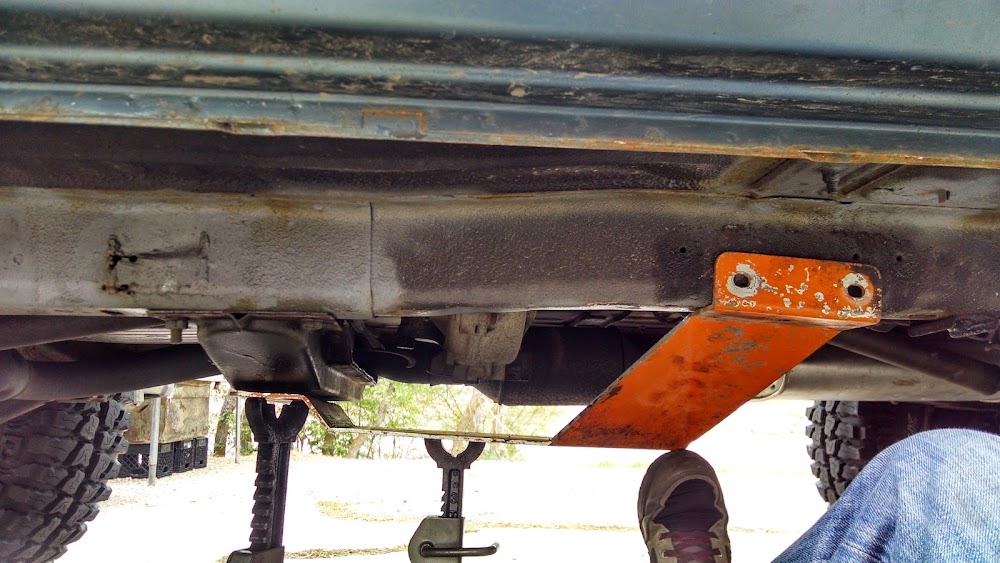
231 skid:

Sits a bit higher when bolted up, wayyyy better than the 242 skid. Unfortunately though rustys skid is designed to compensate for a dropped xmember so the whole thing angles down a bit, kindof annoying but not really a big deal. Glad to have the tcase protected now.

Flex out on a loading dock to measure for bumpstops:


Gonna need 3.5" of spacer underneath the already extended bumpstops. Also somewhat concerned about the bumpstops landing on the angled surface of the truss, wondering if I need to make flat landing pads?
242 skid:

231 skid:

Sits a bit higher when bolted up, wayyyy better than the 242 skid. Unfortunately though rustys skid is designed to compensate for a dropped xmember so the whole thing angles down a bit, kindof annoying but not really a big deal. Glad to have the tcase protected now.

Flex out on a loading dock to measure for bumpstops:


Gonna need 3.5" of spacer underneath the already extended bumpstops. Also somewhat concerned about the bumpstops landing on the angled surface of the truss, wondering if I need to make flat landing pads?

Jake- Rausch Creek
- Posts : 323
Join date : 2013-05-19
Location : Beverly
 Re: Jake's 99 XJ continuing build
Wow, that really is a huge difference in skid height. I had seen write-ups on other forums about people complaining that even the 231 skid hung a little too low, but I think that issue was awhile ago and addressed in a redesign. And like you said, better to have the protection and lose a little bit of clearance than smash the transfer case on a rock with no protection at all.
Rusty's actually makes a crossmember that the company claims provides the same ground clearance as the factory one but provides a 1-inch drop. It's designed to work with the skid you just installed which I believe is why it angles down a bit. I'm not exactly sure how the whole "same ground clearance with 1-inch drop" is possible, but it's one of the things I'm considering in the future to eliminate the lowering pucks I have on my Cherokee. My plan is to run it in conjunction with the 231 skid you installed as well.
Rusty's actually makes a crossmember that the company claims provides the same ground clearance as the factory one but provides a 1-inch drop. It's designed to work with the skid you just installed which I believe is why it angles down a bit. I'm not exactly sure how the whole "same ground clearance with 1-inch drop" is possible, but it's one of the things I'm considering in the future to eliminate the lowering pucks I have on my Cherokee. My plan is to run it in conjunction with the 231 skid you installed as well.
 Re: Jake's 99 XJ continuing build
Dang, that's an *enormous* difference.
I've been so good with not spending money on the Jeeps, even though I recently bought new tires for the YJ. I can justify those because of the mud down here, but now you're making me want to put in a full set of skids, which I really can't justify right now.
I used to live in Salt Lake City and work in Provo and miss it *terribly*. Any awesome pictures to placate my nostalgia?
 Re: Jake's 99 XJ continuing build
Looking good. This is going to be a nice wheeler.

dongalonga- Rubicon Trail
- Posts : 1047
Join date : 2012-03-20
Age : 40
Location : Lowell, MA
 Re: Jake's 99 XJ continuing build
Thoopy, don't you have like 6" of lift? I didn't know you could go that high without an SYE? The trans mount sits on top of the stock crossmember so I bet they recess it into theirs to save some height. Honestly if I had more money I would have liked to go with the JCR skid or even the T&T skid which totally replaced the crossmember and has mount locations for their long arm kit, which is something I would like to do down the road. These two skids are the only ones I was able to find used though.
CrawlingForward, I'm planning on spending a month or so down in moab when the ski season ends and I really felt that I needed to cover up the weak spots on the cherokee, gas tank and tcase are the most vulnerable things, and pretty critical for getting home. Assuming I can get rid of the 242 skid for what I paid I'm only $100 into armoring the thing up, which I think is definitely worth it. Only pictures I have are of LCC and skiing, haven't spent much time in the valley!
Worst season on record for alta but its still been fun!


Jake- Rausch Creek
- Posts : 323
Join date : 2013-05-19
Location : Beverly
 Re: Jake's 99 XJ continuing build
It was at 6.5" in the rear and 4.5" in the front when I bought it, but I took off the 2" lift shackles for stock ones so it's 4.5" front and rear now. I haven't noticed any vibes with the drop, but had I been the one who installed the lift I would have put a SYE from the start. Eventually I'll go that route and probably run a stock front shaft in the rear.
 Re: Jake's 99 XJ continuing build
That skid looks way better, I'm sure you'll be real happy with that extra room
Nice skiing shots, what sticks are those? My 4frnt MSP's are pretty wide but my brother has a pair of ON3P billy goats which are ridiculously wide at 116 underfoot and 142 at the tip...looks similar to yours
Nice skiing shots, what sticks are those? My 4frnt MSP's are pretty wide but my brother has a pair of ON3P billy goats which are ridiculously wide at 116 underfoot and 142 at the tip...looks similar to yours
Tonellin- Rausch Creek
- Posts : 313
Join date : 2013-01-08
Location : Medford
 Re: Jake's 99 XJ continuing build
Tonellin wrote:That skid looks way better, I'm sure you'll be real happy with that extra room
Nice skiing shots, what sticks are those? My 4frnt MSP's are pretty wide but my brother has a pair of ON3P billy goats which are ridiculously wide at 116 underfoot and 142 at the tip...looks similar to yours
Those are the 2013 Moment exit world, I mostly use them out of bounds for touring, but they're actually one of my favorite skis overall (have 8 pairs at last count lol). Out here you definitely want a wider ski, the ones I use most days are 117 and 118 undefoot. I too have a pair of MSP's, still love them, also ON3P definitely makes some really nice skis--was considering a pair at the beginning of the season but I couldn't find any deals.

Jake- Rausch Creek
- Posts : 323
Join date : 2013-05-19
Location : Beverly
Page 6 of 7 •  1, 2, 3, 4, 5, 6, 7
Page 6 of 7
Permissions in this forum:
You cannot reply to topics in this forum|
|
|

 Home
Home