
 Portal
Little Red (T.J.'s XJ)
+7
CrawlingForward
Tonellin
Scarytallman
Jake
dongalonga
Andrew Miller
THOOPY3
11 posters
Page 8 of 9
Page 8 of 9 •  1, 2, 3, 4, 5, 6, 7, 8, 9
 ![]()
Re: Little Red (T.J.'s XJ)
![]() Jake 6/6/2015, 6:32 pm
Jake 6/6/2015, 6:32 pm
Damn thats a bummer. The trans pan is such a pain to get off, really poorly thought out lol.
Jake- Rausch Creek
- Posts : 323
Join date : 2013-05-19
Location : Beverly
Re: Little Red (T.J.'s XJ)
![]() THOOPY3 6/11/2015, 10:07 am
THOOPY3 6/11/2015, 10:07 am
Jake wrote:Damn thats a bummer. The trans pan is such a pain to get off, really poorly thought out lol.
The worst part was actually trying to get the dipstick tube detached. When the replacement motor went in the shop broke the hold down for the tube (they told me about it upfront so this wasn't a surprise) so I had to have my old man pull up on the tube while I yanked down on the pan. If it wasn't for struggling with that until I got some help it would have taken like half an hour tops to drop it. A pivot joint on the ratchet made things pretty simple. Luckily my leak ended up being just the missing washer, and once I got it and the new plug on there all has been well. I barely lost any tranny fluid in the process too which was nice.
In other news, for the first time since I've owned this thing the check engine light has decided to actually go out on its own without me unplugging the battery to reset the PCM. This miraculous occurrence has happened twice now, the most recent being yesterday after the thing sat for four days (no unplugging of the battery involved). The light came on about 100 miles after the solenoid work I did. I had the codes checked and again got the transmission code (which really pissed me off) and P0420 for a bad catalytic converter.
My best guess is that I didn't leave the battery unplugged long enough when I did the solenoid work and the tranny code just never cleared, and that now it's the cat code that keeps intermittently tripping the light. The tranny code is a serious enough issue that the light would stay on constantly if it was still detecting that, so it seems that issue is officially taken care of. My EVAP code hasn't popped up either, which is also a serious enough code to keep the light on constantly. I think that one's just a matter of time though, and I do plan to address it before the end of the summer so I can finally get this light to stay off for good.
So I may be doing exhaust work sooner than I would have liked, but it probably needs it seeing as the tail pipe was rotted off when I bought the thing and there's no telling how long everything has been on there. I do have a bit of a stumble at idle which may be related to the cat situation, and I find it more than a coincidence that I replaced both 02 sensors a few months ago and within a few weeks started getting a code for a bad cat.

THOOPY3- Moab Dessert
- Posts : 626
Join date : 2012-03-13
Age : 34
Location : Woburn, MA -

Re: Little Red (T.J.'s XJ)
![]() dongalonga 6/16/2015, 1:41 pm
dongalonga 6/16/2015, 1:41 pm
Just think there won't be a sensor left to replace soon!

dongalonga- Rubicon Trail
- Posts : 1047
Join date : 2012-03-20
Age : 40
Location : Lowell, MA
Re: Little Red (T.J.'s XJ)
![]() Jake 6/17/2015, 1:13 am
Jake 6/17/2015, 1:13 am
THOOPY3 wrote:Jake wrote:Damn thats a bummer. The trans pan is such a pain to get off, really poorly thought out lol.
The worst part was actually trying to get the dipstick tube detached. When the replacement motor went in the shop broke the hold down for the tube (they told me about it upfront so this wasn't a surprise) so I had to have my old man pull up on the tube while I yanked down on the pan. If it wasn't for struggling with that until I got some help it would have taken like half an hour tops to drop it. A pivot joint on the ratchet made things pretty simple. Luckily my leak ended up being just the missing washer, and once I got it and the new plug on there all has been well. I barely lost any tranny fluid in the process too which was nice.
In other news, for the first time since I've owned this thing the check engine light has decided to actually go out on its own without me unplugging the battery to reset the PCM. This miraculous occurrence has happened twice now, the most recent being yesterday after the thing sat for four days (no unplugging of the battery involved). The light came on about 100 miles after the solenoid work I did. I had the codes checked and again got the transmission code (which really pissed me off) and P0420 for a bad catalytic converter.
My best guess is that I didn't leave the battery unplugged long enough when I did the solenoid work and the tranny code just never cleared, and that now it's the cat code that keeps intermittently tripping the light. The tranny code is a serious enough issue that the light would stay on constantly if it was still detecting that, so it seems that issue is officially taken care of. My EVAP code hasn't popped up either, which is also a serious enough code to keep the light on constantly. I think that one's just a matter of time though, and I do plan to address it before the end of the summer so I can finally get this light to stay off for good.
So I may be doing exhaust work sooner than I would have liked, but it probably needs it seeing as the tail pipe was rotted off when I bought the thing and there's no telling how long everything has been on there. I do have a bit of a stumble at idle which may be related to the cat situation, and I find it more than a coincidence that I replaced both 02 sensors a few months ago and within a few weeks started getting a code for a bad cat.
I was never able to get the dipstick to separate on mine, ended up pulling the whole thing out as one piece, huge pain. Sucked to get back in too..
Jake- Rausch Creek
- Posts : 323
Join date : 2013-05-19
Location : Beverly
Re: Little Red (T.J.'s XJ)
![]() THOOPY3 6/17/2015, 10:51 am
THOOPY3 6/17/2015, 10:51 am
Well it's still playing games with me. Engine light came on yesterday just sitting in traffic down the road from my apartment. Codes this time were P0420 and P0442 (same old shit). Usually seeing an engine light is a bad thing, but I was quite pleased at this (much to the surprise of the AutoZone employee) because my transmission code has cleared itself. And wouldn't you know it, this morning the engine light is back out.
So now I'm not sure which code is actually triggering the light. My guess would be the P0420 for the cat, but I don't understand why it happens intermittently...either the cat is bad or it isn't. That leads me to think though that maybe it's not the cat but something else triggering the light, and determining the cause is really going down a rabbit hole. The P0420 code is directly related to the downstream O2 sensor getting strange readings. It could be detecting fuel, oil, or it could just be a bad cat. Nothing's ever easy.
Only I would complain and get angry at an engine light going out.
THOOPY3- Moab Dessert
- Posts : 626
Join date : 2012-03-13
Age : 34
Location : Woburn, MA -
Re: Little Red (T.J.'s XJ)
![]() onlytopher 6/17/2015, 3:22 pm
onlytopher 6/17/2015, 3:22 pm
I am also fighting the engine light gremlins. I cleared the codes(all o2 codes) and went to get it inspected. A 2000 no longer needs to pass via the computer. I did not think i would get a sticker this year. The inspection shop also gave me a sheet about a recall on the computer because of such things.
onlytopher- Mall Crawler
- Posts : 79
Join date : 2012-09-06
Location : Salem MA
Re: Little Red (T.J.'s XJ)
![]() THOOPY3 6/17/2015, 3:37 pm
THOOPY3 6/17/2015, 3:37 pm
onlytopher wrote:I am also fighting the engine light gremlins. I cleared the codes(all o2 codes) and went to get it inspected. A 2000 no longer needs to pass via the computer. I did not think i would get a sticker this year. The inspection shop also gave me a sheet about a recall on the computer because of such things.
Yeah luckily I don't have to worry about emissions testing either, I'm just doing it because it would be nice to drive the thing for an extended stretch without seeing an engine light. That and the light being constantly on actually kept me from realizing I was throwing the transmission and cat codes in the first place. Being able to know when there's a legitimate issue would be beneficial.
Also Topher, I have not forgotten about the control arms. Do you still have them? I know it was awhile ago when we talked. I still want them if you have them.
THOOPY3- Moab Dessert
- Posts : 626
Join date : 2012-03-13
Age : 34
Location : Woburn, MA -
Re: Little Red (T.J.'s XJ)
![]() onlytopher 6/17/2015, 3:52 pm
onlytopher 6/17/2015, 3:52 pm
I do still have them Give me a call 9789797399
onlytopher- Mall Crawler
- Posts : 79
Join date : 2012-09-06
Location : Salem MA
Re: Little Red (T.J.'s XJ)
![]() THOOPY3 6/22/2015, 11:16 am
THOOPY3 6/22/2015, 11:16 am
Well, the failure I have been dreading and praying to the Jeep gods to prevent has officially happened: the heater core finally gave up the ghost on Saturday.
The back story is that I've had a slow coolant leak pretty much since I bought the thing this time last year. Replacing the water pump and freeze plugs sort of stopped it for awhile, but it's been there basically throughout everything. About once a month I'd lose a decent amount of coolant, and it wasn't really a steady, slow amount, but rather all of a sudden the thing would be down like two inches from the full line on the overflow out of nowhere over the course of like two days. I feared a head gasket issue but nothing pointed to that being the case.
Lately though (and in the past as well, just not as bad) I've been getting build up on my windshield while the thing was running, located only near the top dash defrost vents. I initially thought this may have just been hot air coming in from my engine compartment because my defrost door/actuator is broken, and it would disappear if I ran the defrost for a few minutes. The build up only started happening after I removed my Jerry-rigged piece of strapping to keep the door open so I could have defrost during the winter, which is why I sort of just played it off as the broken door scenario. It also didn't really have that typical green-ish hue that people usually describe when a core goes, nor was it fogging up without the thing running. Looks like my diagnosis was wrong.
I've never seen any coolant inside the thing until yesterday morning when I came out to it to find three small areas where drips from under the dash had fallen. Further inspection showed that the HVAC mechanisms under the passenger side are covered in coolant, and that a small amount of coolant was leaking out of the passenger side floor vent (I could see the damp trail still in there). All signs have been pointing to the core for a long time so this just makes it official.
If there's a silver lining in this it's that it decided to let go during the summer and not this past winter. Because I am the way I am I had a heater hose repair kit in my toolbox, so for now the hoses leading into and out of the core are unhooked and plumbed together to bypass it and keep things running. I am not looking forward to this repair job, but there's no way I'm taking it to a shop and paying them like $1000. Since I have to tear the dash apart anyway I'm planning on replacing the A/C evaporator and the broken defrost door/actuator. Not sure when I'm gonna go around to doing this, but it will be soon and most definitely before fall rolls around. I think I'll be making a trip to Pennsylvania sometime in August so that's my preliminary due date.
THOOPY3- Moab Dessert
- Posts : 626
Join date : 2012-03-13
Age : 34
Location : Woburn, MA -
dongalonga- Rubicon Trail
- Posts : 1047
Join date : 2012-03-20
Age : 40
Location : Lowell, MA
Re: Little Red (T.J.'s XJ)
![]() THOOPY3 8/11/2015, 11:41 am
THOOPY3 8/11/2015, 11:41 am
So I realized I haven't posted to either of the build threads in awhile so I figured I should update you all on what's been driving me crazy with the Cherokee these days.
So far about a month now I have been trying to track down what can only be described as the most annoying noise any vehicle can make. It is a chirping noise (similar to a bad u-joint) that only appears from 1500 rpm and up, is not constant with any rotational item, and only occurs when the vehicle is moving and there's load on the drivetrain. Everywhere I go it follows me and it is actually embarrassing driving down the road seeing mothers and their children watch me drive past them with looks on their faces as if their lives are in mortal danger.
Drive shaft u-joint or CV joint you say? Pulled both shafts (at separate times) and drove the thing and it's still there.
Shifting brake pads you say? Replaced and shimmed them this past weekend and it's still there (my pads were squealing like pigs so they needed to be replaced anyway, but that's not the point).
Rear shoes rubbing the backing plate you say? Replaced a broken self-adjuster cable over the weekend (that was a neat find) and every spring and clip in the left rear assembly last night, and it's still there. (As an interesting side note, putting the rear end on stands to try to isolate the noise yesterday revealed that the left rear brakes were not functioning at all, as in right tire completely locked, left tire spinning with zero resistance.)
I know it's not a front end u-joint or hub assembly because I had all of those items replaced four months ago, and I've pretty much isolated the noise to the left rear. But of course when I had the thing on stands last night in gear it made no chirp at all, so I've now also ruled out a bad wheel bearing or bearing in the rear end itself. I'm now under the impression that this goddamn constant angry mouse that I've been listening to for the last month is either a failed shock, bad spring or shackle bushing, bad spring or shackle bolt, or the spring itself. It's not a u-bolt either since I've snugged those down a few times just as a precaution and they're all to factory spec.
Normally I'd just say this is a Jeep thing and move on with my life but this is next level annoying. I'm dreading having to do this but I've had new shocks ready to stick on the rear for a few months now. I just know every one of those bolts upper bolts is going to snap and cause me a migraine, but I guess I'll just have to nut up and do it and see if it solves the mystery.
At some point in the near future I will also be replacing my factory (yikes) upper control arms, fixed lower control arms (Rough Country), and factory (yikes) track bar all with adjustable ones (thanks to Topher). I also have to address that slight issue of not having a heater core. So far my hack of a heater core bypass has held up, but it's on borrowed time for sure.
THOOPY3- Moab Dessert
- Posts : 626
Join date : 2012-03-13
Age : 34
Location : Woburn, MA -
Re: Little Red (T.J.'s XJ)
![]() Jake 8/13/2015, 12:50 am
Jake 8/13/2015, 12:50 am
Weird noises are such a pain. I have a noise myself that I haven't figured out yet.
Rear shock bolts will probably shear right off, I didn't have too much trouble fishing new hardware in from the top though, hopefully it's not too bad for you either.
Rear shock bolts will probably shear right off, I didn't have too much trouble fishing new hardware in from the top though, hopefully it's not too bad for you either.
Jake- Rausch Creek
- Posts : 323
Join date : 2013-05-19
Location : Beverly
Re: Little Red (T.J.'s XJ)
![]() THOOPY3 8/13/2015, 9:59 am
THOOPY3 8/13/2015, 9:59 am
Jake wrote:Weird noises are such a pain. I have a noise myself that I haven't figured out yet.
Rear shock bolts will probably shear right off, I didn't have too much trouble fishing new hardware in from the top though, hopefully it's not too bad for you either.
Well just a little while ago I narrowed it down to something in the suspension. In frustration I attempted to give the thing shaken baby syndrome and rocked the piss out of it in the parking garage where I work and in doing so I perfectly recreated the noise I'm getting. My witch hunt will continue tomorrow and this weekend.
A few weeks back I discovered that my passenger upper control arm has a pretty good clunk going on, but I'd swear the chirp is coming from the left rear but god knows at this point. Said clunk is the reason why I'm planning on swapping out all of the control arms for the adjustable variety.
I know the rear shocks have been off sometime in the last few years and all the factory bolts are still there, so I'm hoping they won't snap but I'm never that lucky. I've been PB-ing the piss out of all the shock bolts and all the control arm bolts since Monday so here's hoping everything goes smoothly.
THOOPY3- Moab Dessert
- Posts : 626
Join date : 2012-03-13
Age : 34
Location : Woburn, MA -
Re: Little Red (T.J.'s XJ)
![]() THOOPY3 9/13/2015, 3:31 pm
THOOPY3 9/13/2015, 3:31 pm
It's once again been awhile since I provided a status update on the Cherokee and I do have a few items to report on.
I ended up figuring out that the godforsaken squeak the thing was making was coming from the left rear leaf spring. I'm assuming it was a spring pad issue, but frankly at the time I didn't really give a shit so the squeak was taken care of with a few good blows from a BFH. Hasn't made a peep since.
Helping keep the squeak away are the new Skyjacker rear shocks that I finally got around to having installed. At the same time I installed bar pin eliminators so when the time comes to replace these shocks I won't have to deal with the shitty factory setup ever again. They've improved the ride quality significantly and seem to actually have cut down on the vibrations the thing gets up past 65 mph (I can now hold 70 without really feeling them). To further deal with the vibes I plan on purchasing the Rusty's 1" drop transfer case skid and using that in conjunction with the 1" drop that's already on the thing. Supposedly with the Rusty's drop you don't lose any ground clearance, but honestly I couldn't care less about that since it will be wheeled very little going forward.
To address a more pressing issue, I finally got around to ordering all of my replacement heater core parts this morning from Rock Auto. I snagged a new heater core, evaporator core, and heater blend door. I'm planning to replace all of these items now because I have no intention of EVER tearing the dash apart again and might as well also replace what's likely to fail (17 year old evaporator core) while I'm in there. I am not looking forward to doing this at all, but I'm not paying $1000 to have someone else do it and likely forget to re-install as many screws as I will myself. The parts should arrive sometime next week, and I'll likely be taking care of things the last weekend of September.
THOOPY3- Moab Dessert
- Posts : 626
Join date : 2012-03-13
Age : 34
Location : Woburn, MA -
Re: Little Red (T.J.'s XJ)
![]() onlytopher 9/13/2015, 7:11 pm
onlytopher 9/13/2015, 7:11 pm
Having done a heater core, my recommendation is take a piece of cardboard and poke the screw through it as you go and label where they cane from.
onlytopher- Mall Crawler
- Posts : 79
Join date : 2012-09-06
Location : Salem MA
Re: Little Red (T.J.'s XJ)
![]() THOOPY3 9/14/2015, 9:41 am
THOOPY3 9/14/2015, 9:41 am
onlytopher wrote:Having done a heater core, my recommendation is take a piece of cardboard and poke the screw through it as you go and label where they cane from.
I haven't heard of that one before, but it's an extremely good idea that I'm definitely going to do. I'm also planning on taking photos every step so I can go back and quickly see what came from where.
The only part I'm a little bit worried about is disconnecting the A/C lines. I've seen there's a special tool for this that be rented from various auto parts stores, but I have no clue how it actually functions just from looking at photos of it. To make things a bit easier on myself I do plan on cutting corners where I can, i.e. not removing the entire steering column (because that just sounds like a bitch and a half) or seats like some threads online suggest. I'd likely snap all of the seat bolts anyway if the ones on the YJ were any indication.
THOOPY3- Moab Dessert
- Posts : 626
Join date : 2012-03-13
Age : 34
Location : Woburn, MA -
Re: Little Red (T.J.'s XJ)
![]() THOOPY3 9/24/2015, 4:06 pm
THOOPY3 9/24/2015, 4:06 pm
So tomorrow is D-Day/Battle of Thermopylae/Battle of Minas Tirith/T.J. against the kaijus as the heater and evaporator core replacement commences. Plans have changed slightly because I picked up a nice pair of heated, power leather seats from Shaun (dongalonga for those not in the know; pleasure doing business with you). They are a direct bolt-in for '95 and up Cherokees so it will just be remove four bolts (per seat), run power and grounds for seat motors, run power and grounds for heating elements, and enjoy. I've picked up all the electrical supplies needed to make that happen (which is a surprising amount of stuff) and am looking forward to upgrading from the factory seats. Those seats may be repurposed and installed in the YJ depending on the viability of that swap (which will be determined once the seats are out).
I've gotten my hands on a nice step-by-step write-up from JeepForum that I plan on following to accomplish the heater core replacement. It's pretty well written and has a bunch of photos as well which is a big plus. I will attempt to take some photos of the seat swap and heater core process along the way, but I foresee a good deal of anger and frustration in my future so we'll see how much patience I have for that. Keep me and the Cherokee in your prayers and hopefully we'll both see you all on the other side.
I've gotten my hands on a nice step-by-step write-up from JeepForum that I plan on following to accomplish the heater core replacement. It's pretty well written and has a bunch of photos as well which is a big plus. I will attempt to take some photos of the seat swap and heater core process along the way, but I foresee a good deal of anger and frustration in my future so we'll see how much patience I have for that. Keep me and the Cherokee in your prayers and hopefully we'll both see you all on the other side.
THOOPY3- Moab Dessert
- Posts : 626
Join date : 2012-03-13
Age : 34
Location : Woburn, MA -
Re: Little Red (T.J.'s XJ)
![]() THOOPY3 9/28/2015, 4:11 pm
THOOPY3 9/28/2015, 4:11 pm
**CAUTION: LONG-ASS POST AHEAD**
After three straight 7:30 a.m. to 7:30+ p.m. days, I can proudly say that the Cherokee and I have survived our endeavor unscathed, and in the case of the Cherokee emerged in better shape than when it started.
The idea was to leave the dash 'in place' in the Cherokee, a la this write-up from JeepForum: http://www.jeepforum.com/forum/f11/heater-core-replacement-what-i-learned-3105433/. But since it's not exactly the most technical write-up, I used another more in-depth JeepForum write-up that I found on a separate website, http://www.buckeyejeeps.com/stuff/XJEvapReplacement.pdf, and skipped over the steps involving the removal of the steering column and its associated harnesses.
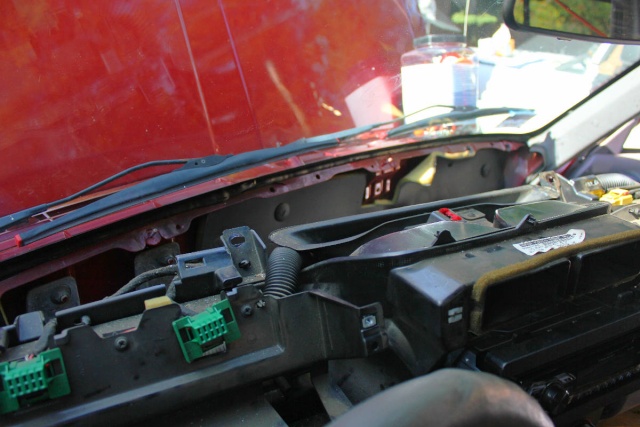
Removing the various dash panels was a breeze as I've done it quite a few times before now to deal with various electrical gremlins. The center console was a bitch because apparently my e-brake works too well, so I literally had to stand in the back seat and crank the living hell out of it until it was at a high enough angle for the console to be lifted and pulled over it. After that it's all about removing a few brackets and nuts, loosening others, and then gently lifting and swinging the console to the passenger side to reveal the HVAC box behind it. It should be supported from either underneath (we used an appropriately-sized cardboard box) and/or with rope or bungees (we chose bungees). That will look something likes this:
So, once you have the dash swung out of the way, the real fun begins. The first step is to remove the A/C lines from the condenser tubes. This was honestly the worst part of this entire project. After removing the nuts that hold the accumulator bracket (which also hold the HVAC box), the soft line attached to the accumulator let go no problem with the use of a quick disconnect tool. However, the hard line that leads to the radiator would not budge. And when I say would not budge, I mean would not budge. We ended up using a hack saw and cutting the tube off the evaporator with the line still attached to it.
From there, I took my Dremel and cut shallow notches in the remaining tube so we could then pry the remaining metal off using pliers/vice grips/etc. Even after prying half of the metal away it still would not give an inch. Eventually after much cursing and grunting, I was able to get the tip of a screwdriver on my Leatherman multi-tool on the lip of the tube, and with the help of vice grips finally get the connection apart. It was so stuck that I actually broke the tip of the screwdriver off the Leatherman and didn't even realize it until the next day when I went to use it again. In total (we bounced around and did other aspects because this was a major cock block) this took nearly 2.5 hours to accomplish. That pain in the ass looked something like this:

Once the nuts holding the accumulator in place are removed, there are only three more holding the HVAC box in place: one is to the left of the accumulator next to the blower motor (medium difficulty to remove); one is in the middle of the firewall a smidge above and to the left of the valve cover (easy difficulty to remove); and the MFer of all MFers is directly below the one in the middle of the firewall and is located squarely behind the block (worst difficulty level you can think of). As if its location wasn't bad enough, when I got the nut about 2/3 of the way off, the goddamn stud attached to the HVAC began to spin on me. So with barely enough room to get my hand and a wrench in this crevasse, I now had to attach needle-nose vice grips on the stud to keep it from pulling out which would ultimately allow the box to come out. It took forever to get this done (as I was being super-cautious because I refused to lose the nut in the bellhousing) but I got it done.
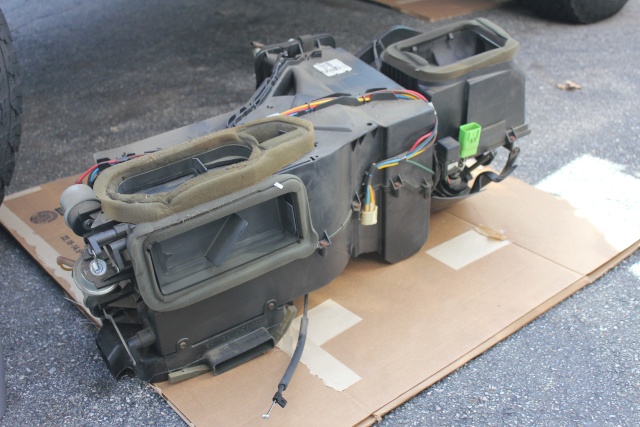
Once to this point you simply unplug the vacuum line connector, unplug the blower motor connector, separate the radio wire, and disconnect any wiring that may be in the way (somehow the jackass that owned this thing before me managed to run speaker wire through the HVAC box so I had to cut that or it wasn't coming out). Once there is nothing impeding the box from coming out, it gets slid back from the firewall and flipped 90 degrees, and at this point it can be He-Man'ed out of the vehicle and to the ground. That will look something like this:

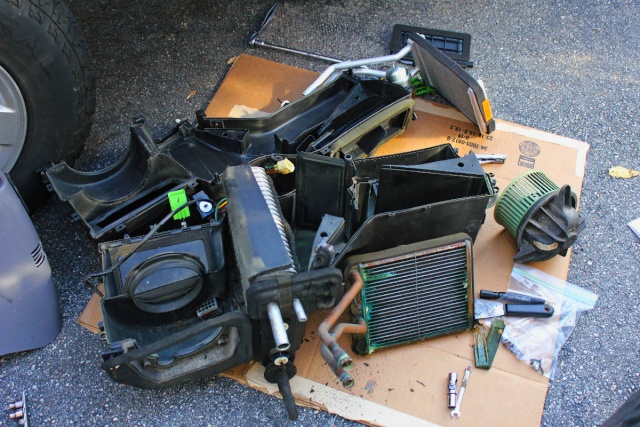
Once out of the vehicle there are 14 screws and two clips that hold the box together, along with three screws holding in the blower motor, insulating foam around the blower motor housing and evaporator and heater core inlet and outlet tubes, and vacuum lines that all need to be removed (I made sure to label the the lines so I remembered which went where). Only the foam on the upper part of the blower motor housing needs to be detached, but the foam around the tubes must be completely removed. Once all of this is done, the two halves of the box can be separated and you have access to all of your HVAC systems. That will look something like this:
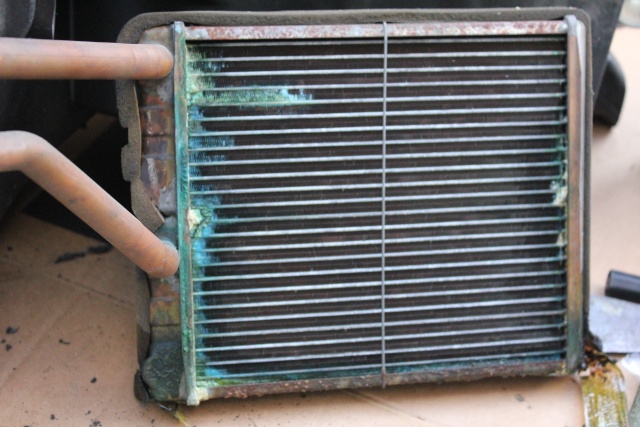
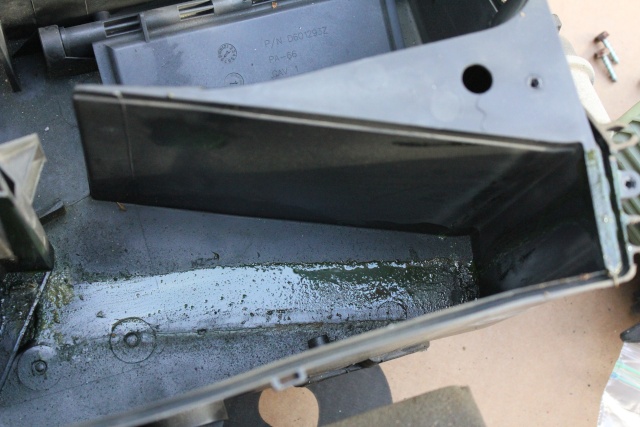
The evaporator core and the heater core simply lift directly out of the bottom half of the box. My diagnosis was confirmed by the condition of the heater core (yikes) and the lovely dried (and even still somewhat fresh) green trails all over the bottom of the box. That looked something like this:
After cleaning up the box and vacuuming dirt and pine needles out of the blower motor section, I removed the old foam from the old evaporator core and installed it onto the new one. The new heater core I bought luckily came with foam pre-installed, which was awesome since the old stuff was completely ruined from the leaks. After the heater core was installed I turned my attention to the defrost door that has not worked since I bought the thing last summer. To my surprise it turned out that the arm on the actuator was not broken but had simply come out of place. After lining the arm up with the rungs on the door itself, I moved the actuator arm and the defrost door now opens and closes perfectly. There's no telling how long it will last before it pops out again (it's a common problem with Cherokees from what I've read online) but I think I can make it last by slowly moving the air flow selector on the dash when switching from one function to another.
At this point I reattached the screws, clips, and vacuum lines, RTVed the seals back on the outside of the box, fixed the stubborn stud, and the box was back together. After this came the second most challenging part of the project which was getting the HVAC box back into the Jeep and the studs pushed through their holes. Since we were running out of patience and daylight Saturday night this part of the project carried over to Sunday morning. But with patience and sunlight at much higher levels my old man was able to coerce the box back into place with good shove. From there all the mounting bolts were put back into place, and we basically just went in reverse order to reattach everything we had removed.
Once the dash (minus panels in case something was amiss) and the heater hoses were reinstalled, the moment of truth came at about 4:05 yesterday when I reconnected the battery cables. To my great pleasure we had managed to get everything back in place and not tear or pinch any electrical lines, and I had full control of all interior functions (i.e. directionals, radio, windows, locks, lights). She fired right up, and after a few harrowing minutes she blew some of the hottest air out of those vents that I've ever felt in a car. I confirmed that all the temperature and air flow functions worked, and with no leaks from any hoses or the core itself we shut it down and I got to reinstalling the dash panels and finishing the wiring of the WJ seats and their heaters.
Overall, this was a good amount of work but nothing that really breaks your back. It's mostly time consuming because there are a few finicky bolts and nuts here and there and because you don't want to stretch or tear wires, so you need to check clearances often. I now feel I could certainly do it again, and I'm glad I didn't pay the outrageous amount that people on JeepForum say they pay to have a mechanic to do the job ($1000+). It took me three days because I was also wiring the new seats and their heaters which added more work to my docket.
The only bummer of the entire weekend is that I learned that either the switch or the motor that controls the recline/incline in the newly installed driver seat from the WJ doesn't work. (Shaun never actually used the power functions on them so he's off the hook for selling me defective equipment .) I'm going to investigate the work involved in replacing that particular motor, and if it's plausible to do the work myself I may try to find a reasonably priced seat at a local junkyard with a good motor (which I now know how to test) and swap it over. For now though the seat back is actually in a comfortable position for me, and the whole seat itself is ridiculously comfortable so I'm in no hurry to get this done. Riding to work this morning with the heat at melt-your-face-off levels and a heated seat under me almost made me forget I was driving a big red shitbox.
A few final thoughts:
-There's no way in hell you could pull the swinging of the dash off by yourself. There are a number of places where dash mounts/other things hang up, and the dash is pretty damn heavy. Aside from weight, there are an extremely large number of wires and harnesses located on the driver side that you need eyes on to ensure nothing is snagged or pinched. I enlisted the brains and brawn of my old man for a good amount of this project and we managed to get the dash swung without snagging any wires or snapping any plastic anywhere.
-I wouldn't say removing the passenger seat is essential but having it out definitely made things tremendously easier. I was taking mine out to upgrade to the WJ seats anyway, but all it takes is removing four 1/2 inch/13 mm nuts from the seat riser and it's out. There's no need to remove the driver seat if not pulling the steering column, and leaving it in actually gives you a place to sit while you remove all the dash and column panels.
-The designers and/or engineers at Chrysler during the mid-'90s really suck.
After three straight 7:30 a.m. to 7:30+ p.m. days, I can proudly say that the Cherokee and I have survived our endeavor unscathed, and in the case of the Cherokee emerged in better shape than when it started.
The idea was to leave the dash 'in place' in the Cherokee, a la this write-up from JeepForum: http://www.jeepforum.com/forum/f11/heater-core-replacement-what-i-learned-3105433/. But since it's not exactly the most technical write-up, I used another more in-depth JeepForum write-up that I found on a separate website, http://www.buckeyejeeps.com/stuff/XJEvapReplacement.pdf, and skipped over the steps involving the removal of the steering column and its associated harnesses.
Removing the various dash panels was a breeze as I've done it quite a few times before now to deal with various electrical gremlins. The center console was a bitch because apparently my e-brake works too well, so I literally had to stand in the back seat and crank the living hell out of it until it was at a high enough angle for the console to be lifted and pulled over it. After that it's all about removing a few brackets and nuts, loosening others, and then gently lifting and swinging the console to the passenger side to reveal the HVAC box behind it. It should be supported from either underneath (we used an appropriately-sized cardboard box) and/or with rope or bungees (we chose bungees). That will look something likes this:
So, once you have the dash swung out of the way, the real fun begins. The first step is to remove the A/C lines from the condenser tubes. This was honestly the worst part of this entire project. After removing the nuts that hold the accumulator bracket (which also hold the HVAC box), the soft line attached to the accumulator let go no problem with the use of a quick disconnect tool. However, the hard line that leads to the radiator would not budge. And when I say would not budge, I mean would not budge. We ended up using a hack saw and cutting the tube off the evaporator with the line still attached to it.
From there, I took my Dremel and cut shallow notches in the remaining tube so we could then pry the remaining metal off using pliers/vice grips/etc. Even after prying half of the metal away it still would not give an inch. Eventually after much cursing and grunting, I was able to get the tip of a screwdriver on my Leatherman multi-tool on the lip of the tube, and with the help of vice grips finally get the connection apart. It was so stuck that I actually broke the tip of the screwdriver off the Leatherman and didn't even realize it until the next day when I went to use it again. In total (we bounced around and did other aspects because this was a major cock block) this took nearly 2.5 hours to accomplish. That pain in the ass looked something like this:
Once the nuts holding the accumulator in place are removed, there are only three more holding the HVAC box in place: one is to the left of the accumulator next to the blower motor (medium difficulty to remove); one is in the middle of the firewall a smidge above and to the left of the valve cover (easy difficulty to remove); and the MFer of all MFers is directly below the one in the middle of the firewall and is located squarely behind the block (worst difficulty level you can think of). As if its location wasn't bad enough, when I got the nut about 2/3 of the way off, the goddamn stud attached to the HVAC began to spin on me. So with barely enough room to get my hand and a wrench in this crevasse, I now had to attach needle-nose vice grips on the stud to keep it from pulling out which would ultimately allow the box to come out. It took forever to get this done (as I was being super-cautious because I refused to lose the nut in the bellhousing) but I got it done.
Once to this point you simply unplug the vacuum line connector, unplug the blower motor connector, separate the radio wire, and disconnect any wiring that may be in the way (somehow the jackass that owned this thing before me managed to run speaker wire through the HVAC box so I had to cut that or it wasn't coming out). Once there is nothing impeding the box from coming out, it gets slid back from the firewall and flipped 90 degrees, and at this point it can be He-Man'ed out of the vehicle and to the ground. That will look something like this:
Once out of the vehicle there are 14 screws and two clips that hold the box together, along with three screws holding in the blower motor, insulating foam around the blower motor housing and evaporator and heater core inlet and outlet tubes, and vacuum lines that all need to be removed (I made sure to label the the lines so I remembered which went where). Only the foam on the upper part of the blower motor housing needs to be detached, but the foam around the tubes must be completely removed. Once all of this is done, the two halves of the box can be separated and you have access to all of your HVAC systems. That will look something like this:
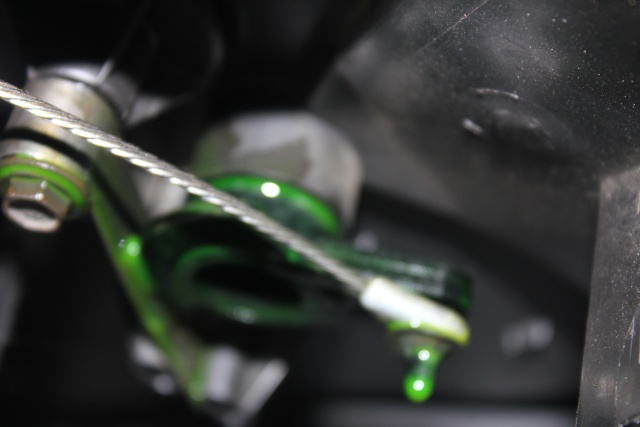
The evaporator core and the heater core simply lift directly out of the bottom half of the box. My diagnosis was confirmed by the condition of the heater core (yikes) and the lovely dried (and even still somewhat fresh) green trails all over the bottom of the box. That looked something like this:
After cleaning up the box and vacuuming dirt and pine needles out of the blower motor section, I removed the old foam from the old evaporator core and installed it onto the new one. The new heater core I bought luckily came with foam pre-installed, which was awesome since the old stuff was completely ruined from the leaks. After the heater core was installed I turned my attention to the defrost door that has not worked since I bought the thing last summer. To my surprise it turned out that the arm on the actuator was not broken but had simply come out of place. After lining the arm up with the rungs on the door itself, I moved the actuator arm and the defrost door now opens and closes perfectly. There's no telling how long it will last before it pops out again (it's a common problem with Cherokees from what I've read online) but I think I can make it last by slowly moving the air flow selector on the dash when switching from one function to another.
At this point I reattached the screws, clips, and vacuum lines, RTVed the seals back on the outside of the box, fixed the stubborn stud, and the box was back together. After this came the second most challenging part of the project which was getting the HVAC box back into the Jeep and the studs pushed through their holes. Since we were running out of patience and daylight Saturday night this part of the project carried over to Sunday morning. But with patience and sunlight at much higher levels my old man was able to coerce the box back into place with good shove. From there all the mounting bolts were put back into place, and we basically just went in reverse order to reattach everything we had removed.
Once the dash (minus panels in case something was amiss) and the heater hoses were reinstalled, the moment of truth came at about 4:05 yesterday when I reconnected the battery cables. To my great pleasure we had managed to get everything back in place and not tear or pinch any electrical lines, and I had full control of all interior functions (i.e. directionals, radio, windows, locks, lights). She fired right up, and after a few harrowing minutes she blew some of the hottest air out of those vents that I've ever felt in a car. I confirmed that all the temperature and air flow functions worked, and with no leaks from any hoses or the core itself we shut it down and I got to reinstalling the dash panels and finishing the wiring of the WJ seats and their heaters.
Overall, this was a good amount of work but nothing that really breaks your back. It's mostly time consuming because there are a few finicky bolts and nuts here and there and because you don't want to stretch or tear wires, so you need to check clearances often. I now feel I could certainly do it again, and I'm glad I didn't pay the outrageous amount that people on JeepForum say they pay to have a mechanic to do the job ($1000+). It took me three days because I was also wiring the new seats and their heaters which added more work to my docket.
The only bummer of the entire weekend is that I learned that either the switch or the motor that controls the recline/incline in the newly installed driver seat from the WJ doesn't work. (Shaun never actually used the power functions on them so he's off the hook for selling me defective equipment
A few final thoughts:
-There's no way in hell you could pull the swinging of the dash off by yourself. There are a number of places where dash mounts/other things hang up, and the dash is pretty damn heavy. Aside from weight, there are an extremely large number of wires and harnesses located on the driver side that you need eyes on to ensure nothing is snagged or pinched. I enlisted the brains and brawn of my old man for a good amount of this project and we managed to get the dash swung without snagging any wires or snapping any plastic anywhere.
-I wouldn't say removing the passenger seat is essential but having it out definitely made things tremendously easier. I was taking mine out to upgrade to the WJ seats anyway, but all it takes is removing four 1/2 inch/13 mm nuts from the seat riser and it's out. There's no need to remove the driver seat if not pulling the steering column, and leaving it in actually gives you a place to sit while you remove all the dash and column panels.
-The designers and/or engineers at Chrysler during the mid-'90s really suck.
Last edited by THOOPY3 on 9/29/2015, 9:20 am; edited 1 time in total
THOOPY3- Moab Dessert
- Posts : 626
Join date : 2012-03-13
Age : 34
Location : Woburn, MA -
dongalonga- Rubicon Trail
- Posts : 1047
Join date : 2012-03-20
Age : 40
Location : Lowell, MA
Re: Little Red (T.J.'s XJ)
![]() THOOPY3 9/29/2015, 10:44 am
THOOPY3 9/29/2015, 10:44 am
dongalonga wrote:Hooray you have several types of heat now!
And zero forms of cooling ability, haha. Funny how I was wearing a winter beanie as it was literally 35 degrees out Sunday morning when I was finishing this up, and then yesterday afternoon it was near 80 and humid.
There's no rest for the wicked though. With all this rain coming in (and possibly a tropical storm this weekend) I need to finish heat-shrinking the connections for the seat heaters and wrapping all the wiring in split tubing. I was hoping I'd be able to take a little break but better safe than sorry, especially since the Cherokee has a small leak somewhere on the passenger side and that happens to be where all the seat connections run. Blowing the whole fuse box due to an unused seat heater would be muy bad.
I'll post photos of the updated interior either later today or tomorrow.
THOOPY3- Moab Dessert
- Posts : 626
Join date : 2012-03-13
Age : 34
Location : Woburn, MA -
Re: Little Red (T.J.'s XJ)
![]() THOOPY3 10/1/2015, 9:56 am
THOOPY3 10/1/2015, 9:56 am
As promised, here's a photo of what the seats look like installed. They don't quite match the coloring of my interior, but I couldn't really give a damn about that.
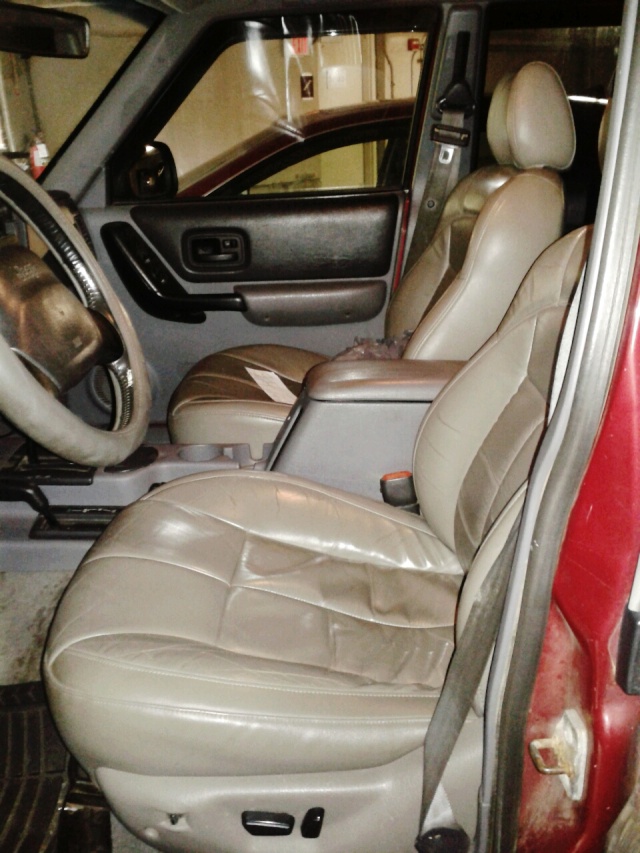
I also have a slight update to the recline motor issue. I discovered yesterday that the lumbar function on the passenger seat does in fact work. I was under the impression that only the recline worked and that the lumbar motor was attached to the WJ seat base (which I don't have), so needless to say this was a nice find. Neither the recline or lumbar functions on the driver seat worked when I had it hooked up to the power lead over the weekend, and I find the odds that both of those motors are cooked to be very slim. I'm now thinking that either the switch panel is no good or there's a sliced wire somewhere in the seat's wiring harness.
The cool thing is that the switch panels for driver and passenger seats are interchangeable, so if the rain holds off for a few hours this weekend I'm going to hook up the wiring for the driver seat and try the working passenger switch on that side. If the functions magically work, I know my issue and can buy a replacement switch for like $25 on Rock Auto. If not, I'll have to pop the seat out and start looking for broken wires. If somehow it does turn out that the motor(s) is the issue, I'm definitely going the junkyard route because a replacement motor from Chrysler/Mopar is $217, which after tax is about half of what I paid for the Jeep so that's not happening.
THOOPY3- Moab Dessert
- Posts : 626
Join date : 2012-03-13
Age : 34
Location : Woburn, MA -

Tonellin- Rausch Creek
- Posts : 313
Join date : 2013-01-08
Location : Medford
Re: Little Red (T.J.'s XJ)
![]() THOOPY3 10/4/2015, 4:52 pm
THOOPY3 10/4/2015, 4:52 pm
After trying the driver's side switches on the passenger side and discovering that they all functioned I decided yesterday to tear into the wiring on the driver seat to search for any breaks.
I removed the seat and removed the factory split tubing and tape to check things out. I discovered that there were no breaks in any of the wiring. What I did find was that the harness' main power lead split off into three different leads further down the loom: one went to the lumbar control and the other two went into the wiring harness for the memory module. That immediately got the gears working in my head. As I examined the memory module wiring harness I noticed that there was a red/blue wire that comes out of it and immediately takes a 90* turn and runs into the wiring harness for the recline motor. It is the only wire in common between those two harnesses; that combined with it being red immediately made me think that it controls the power for the motor.
I wasn't under the impression that the memory module needed to be hooked up when installing the seat, but luckily Shaun gave me the memory module when I grabbed the seats from him. So I grabbed the module, plugged in the appropriate harnesses, and brought the seat back out to the Cherokee to give it a go. Once I had all the wiring in place, I hit the switch for the seat recline and watched in great pleasure as the seat moved itself. I did my happy dance for a bit, then got to bolting the seat in place.
The memory module comes installed in a metal bracket that fits under the seat and slips over the two front seat mounting bolts. Unfortunately, however, the memory module is offset in the bracket and because of this doesn't clear the seat slider on the factory Cherokee base. My solution to this was to remove the module from the bracket and attach it to the bottom of the seat with zip ties. It's a bit hack, but there was just no way to make that bracket work and the memory unit must be installed towards the front of the seat because of the locations of the harnesses that plug into it (or you risk putting some serious strain on wiring that has been in the same position for the last 11+ years).
So I can now definitively say for anyone wondering/searching the internet for answers: in order to get a 10-way power WJ driver seat to work in a different vehicle you need to install the memory module along with it or provide power to the red/blue wire that exits the orange memory module wiring harness and enters the recline motor harness. (I cannot however comment on whether or not there is a ground wire that must be accessed in the recline motor harness to make it function as I used the main seat harness ground and have full functionality.)
Once everything was taken care of with the seat I got to removing the center console to re-position the seat heater wiring and drill out holes to install their switches. I used a 7/8 hole saw on the plastic and it made some seriously quick work of it. The holes were just small enough to hold the switches properly, but I used some clear Permatex to make sure they wouldn't move around down the road. I forgot to grab a photo of the switches installed, but I'd say everything turned out pretty clean and that they fit right in where they are. I'll try to grab a photo and post it up tomorrow.
As things stand right now the only major projects left to take care of are replacing the upper and lower control arms and installing a Rusty's drop transmission crossmember. There are a few small things like replacing the rear wiper motor and installing the trailer hitch I bought awhile back. I may also undertake a project to create a storage box/tire carrier for the cargo area during the winter, but that's not set in stone either. Hopefully going forward I'll be able to focus most of my efforts (and funds) to beefing up the YJ some more. The Cherokee sure has come a long way in a year though.
THOOPY3- Moab Dessert
- Posts : 626
Join date : 2012-03-13
Age : 34
Location : Woburn, MA -
dongalonga- Rubicon Trail
- Posts : 1047
Join date : 2012-03-20
Age : 40
Location : Lowell, MA
Re: Little Red (T.J.'s XJ)
![]() THOOPY3 11/9/2015, 2:42 pm
THOOPY3 11/9/2015, 2:42 pm
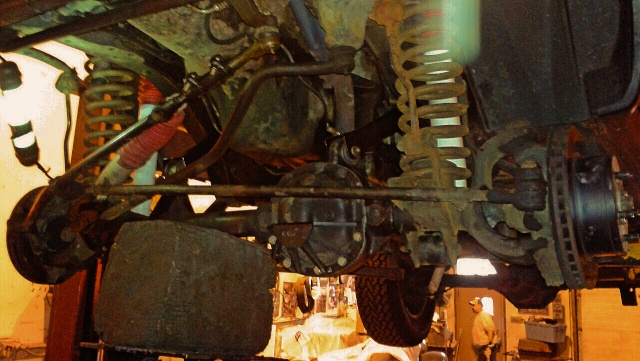
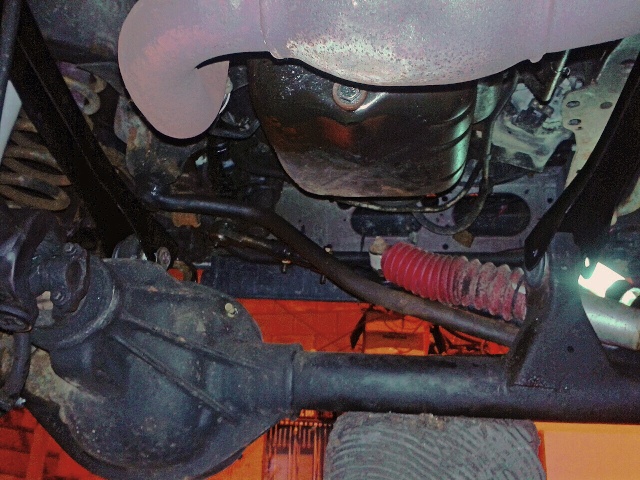
I finally got around to replacing the upper control arms and bushings this past weekend. I've known for a while that they were the cause of a number of my steering ailments, and now that the new ones are on my hypothesis was certainly correct. The steering is remarkably tighter and the lovely clunks that have been present around every turn for quite awhile are no longer. I went the cheap route and just picked up some Crown factory replacements which are fine for my needs since the Cherokee will be wheeled very infrequently.
The low-speed vibrations I was experiencing have also all but disappeared, unfortunately I'm still experiencing decent vibrations from about 55-65 mph. I knew that it was a long-shot that those vibes were from the arms but a guy can dream. I'll be addressing them with a Rusty's 1" drop crossmember (combined with the already in-place 1" drop). I'll be driving the thing to Ottawa at the beginning of January and I'd like to have all the steering geometry and vibe issues taken care of by that point. I'll also be picking up some adjustable lower control arms to help fix the caster and pinion angles and to tighten up the steering even further. Right now I'm leaning towards Iron Rock Offroad arms, but anything will be better than the fixed Rough Country arms that are on there now.
The nice thing about this job this was having access to a lift and air tools courtesy of the mechanic who I've been using for about a year now. I've never personally used a lift and I've got to say that it really does make a world of difference when doing this kind of work. I had every intention of my old man and I doing most of the work but my mechanic was kind enough to help out every step of the way so everything went pretty smoothly. A few bucks and a 12-pack of donuts tossed his way for breakfast and we were square for roughly 3 hours worth of work. The only real hang up came after the right arm was unbolted and the whole front end shifted to the left a few inches (thanks previous owner for installing a 6.5" lift and reusing the stock track bar). After struggling to get things lined up with a come-along we decided to try putting the thing back on the ground, and that did the trick. Once I decide what arms I'm going with the plan is to get it back on the lift and make quick work of that job as well.
THOOPY3- Moab Dessert
- Posts : 626
Join date : 2012-03-13
Age : 34
Location : Woburn, MA -
Page 8 of 9 • 1, 2, 3, 4, 5, 6, 7, 8, 9 ![]()
Page 8 of 9
Permissions in this forum:
You cannot reply to topics in this forum|
|
|